EC2 Container Registry Resources
Introduction
The aws-cloudformation role includes a EC2 container registry template that is designed to define the following AWS resources:
- EC2 Container Registry (ECR) repositories
Note
Before commencing the tasks below, ensure you have successfully completed all tasks in the following sections:
Creating the Playbook
We will get started by establishing a network resources playbook that defines network resources for Demo Resources account.
1. Clone the AWS Starter to a local folder called demo-ecr-resources and re-initialise the Git repository.
$ git clone git@github.com:casecommons/aws-starter.git demo-ecr-resources
  Cloning into 'demo-ecr-resources'...
  remote: Counting objects: 22, done.
  remote: Compressing objects: 100% (14/14), done.
  remote: Total 22 (delta 4), reused 22 (delta 4), pack-reused 0
  Receiving objects: 100% (22/22), done.
  Resolving deltas: 100% (4/4), done
$ cd demo-ecr-resources
$ rm -rf .git
$ git init
Initialized empty Git repository in /Users/jmenga/Source/casecommons/demo-ecr-resources/.git/
2. Update the roles/requirements.yml file to the desired versions for each role:
# You can specify git tag, commit or branch for the version property
- src: git@github.com:casecommons/aws-cloudformation.git
  scm: git
  version: 0.7.0
  name: aws-cloudformation
- src: git@github.com:casecommons/aws-sts.git
  scm: git
  version: 0.1.2
  name: aws-sts
3. Install the roles using the ansible-galaxy command as demonstrated below:
$ ansible-galaxy install -r roles/requirements.yml --force
- extracting aws-cloudformation to /Users/jmenga/Source/casecommons/demo-ecr-resources/roles/aws-cloudformation
- aws-cloudformation was installed successfully
- extracting aws-sts to /Users/jmenga/Source/casecommons/demo-ecr-resources/roles/aws-sts
- aws-sts was installed successfully
4. Modify the group_vars/all/vars.yml file, which contains global settings for the playbook:
# Stack Settings
cf_stack_name: ecr-resources
cf_stack_template: "templates/ecr.yml.j2"
cf_stack_tags:
  org:business:owner: Casecommons
  org:business:product: ECR Resources
  org:business:severity: High
  org:tech:environment: "{{ env }}"
  org:tech:contact: pema@casecommons.org

# CloudFormation settings
# This sets a policy that disables updates to existing resources
# This requires you to explicitly set the cf_disable_stack_policy flag to true when running the playbook
cf_stack_policy:
  Statement:
  - Effect: "Deny"
    Action: "Update:*"
    Principal: "*"
    Resource: "*"
Notice that we reference the templates/ecr.yml.y2 template that is embedded within the aws-cloudformation role.
5. Remove the local templates folder, since we are using a template that is embedded within the aws-cloudformation role:
$ rm -rf templates
Defining a New Environment
We will now add a new environment called demo-resources to the playbook, which will be used to create CloudFormation resources in the demo-resources account.
1. Modify the inventory file so that it defines a single environment called demo-resources, ensuring you specify ansible_connection=local:
[demo-resources]
demo-resources ansible_connection=local
2. Remove the group_vars/non-prod environment folder that is included in the starter template:
$ rm -rf group_vars/non-prod
3. Create a file called group_vars/demo-resources/vars.yml, which will hold all environment specific configuration for the demo-resources environment:
$ mkdir -p group_vars/demo-resources
$ touch group_vars/demo-resources/vars.yml
4. Add the following settings to group_vars/demo-resources/vars.yml:
# STS role to assume
sts_role_arn: arn:aws:iam::160775127577:role/admin

# Repositories
config_ecr_repos:
  casecommons/intake: {}
  casecommons/intake-api: {}
  casecommons/intake-base: {}
  casecommons/elasticsearch: {}
  casecommons/nginx: {}
  casecommons/squid: {}
Here we target the demo-resources account by specifying the demo-resources IAM admin role in the sts_role_arn variable, whilst the config_ecr_repos dicitionary defines the ECR repositories resources that will be created:
casecommons/intake- repository for the Casecommons Intake Accelerator application imagecasecommons/intake-api- repository for the Casecommons Intake API application imagecasecommons/intake-base- repository for the Casecommons base image used for the Intake Accelerator and Intake API application imagescasecommons/elasticsearch- repository for the Casecommons ElasticSearch imagecasecommons/nginx- repository for the Casecommons Nginx imagecasecommons/squid- repository for the Casecommons Squid proxy image
Running the Playbook
Now that we’ve defined environment settings for the demo-resources environment, let’s run the playbook to create ECR repository resources for the environment.
1. Ensure your local AWS environment is configured to target the demo-resources account:
$ export AWS_PROFILE=demo-resources-admin
2. Run the Ansible playbook targeting the demo-resources environment as demonstrated below:
$ ansible-playbook site.yml -e env=demo-resources

PLAY [Assume Role] *************************************************************

TASK [aws-sts : set_fact] ******************************************************
ok: [demo-resources]

TASK [aws-sts : checking if sts functions are sts_disabled] ********************
skipping: [demo-resources]

TASK [aws-sts : setting empty sts_session_output result] ***********************
skipping: [demo-resources]

TASK [aws-sts : setting sts_creds if legacy AWS credentials are present (e.g. for Ansible Tower)] ***
skipping: [demo-resources]

TASK [aws-sts : assume sts role] ***********************************************
Enter MFA code: ******
ok: [demo-resources]
...
...
TASK [aws-cloudformation : set local path fact if s3 upload disabled] **********
ok: [demo-resources]

TASK [aws-cloudformation : configure application stack] ************************
...
...
PLAY RECAP *********************************************************************
demo-resources             : ok=20   changed=1    unreachable=0    failed=0
3. The playbook will take a few minutes to create the CloudFormation stack and associated resources. Whilst the CloudFormation stack is being created, you can review the CloudFormation stack that was generated in the build/<timestamp> folder:
$ tree build
build
└── 20170226213833
    ├── ecr-resources-config.json
    ├── ecr-resources-policy.json
    ├── ecr-resources-stack.json
    └── ecr-resources-stack.yml
The following shows the ecr-resources-stack.yml file that was generated and uploaded to CloudFormation:
AWSTemplateFormatVersion: "2010-09-09"

Description: ECR Repositories

Resources:
  CasecommonsSquid:
    Type: "AWS::ECR::Repository"
    Properties:
      RepositoryName: "casecommons/squid"
  CasecommonsIntakeBase:
    Type: "AWS::ECR::Repository"
    Properties:
      RepositoryName: "casecommons/intake-base"
  CasecommonsIntakeApi:
    Type: "AWS::ECR::Repository"
    Properties:
      RepositoryName: "casecommons/intake-api"
  CasecommonsNginx:
    Type: "AWS::ECR::Repository"
    Properties:
      RepositoryName: "casecommons/nginx"
  CasecommonsElasticsearch:
    Type: "AWS::ECR::Repository"
    Properties:
      RepositoryName: "casecommons/elasticsearch"
  CasecommonsIntake:
    Type: "AWS::ECR::Repository"
    Properties:
      RepositoryName: "casecommons/intake"
4. Once the playbook execution completes successfully, login to the demo-resources account. You should see a new CloudFormation stack called ecr-resources:
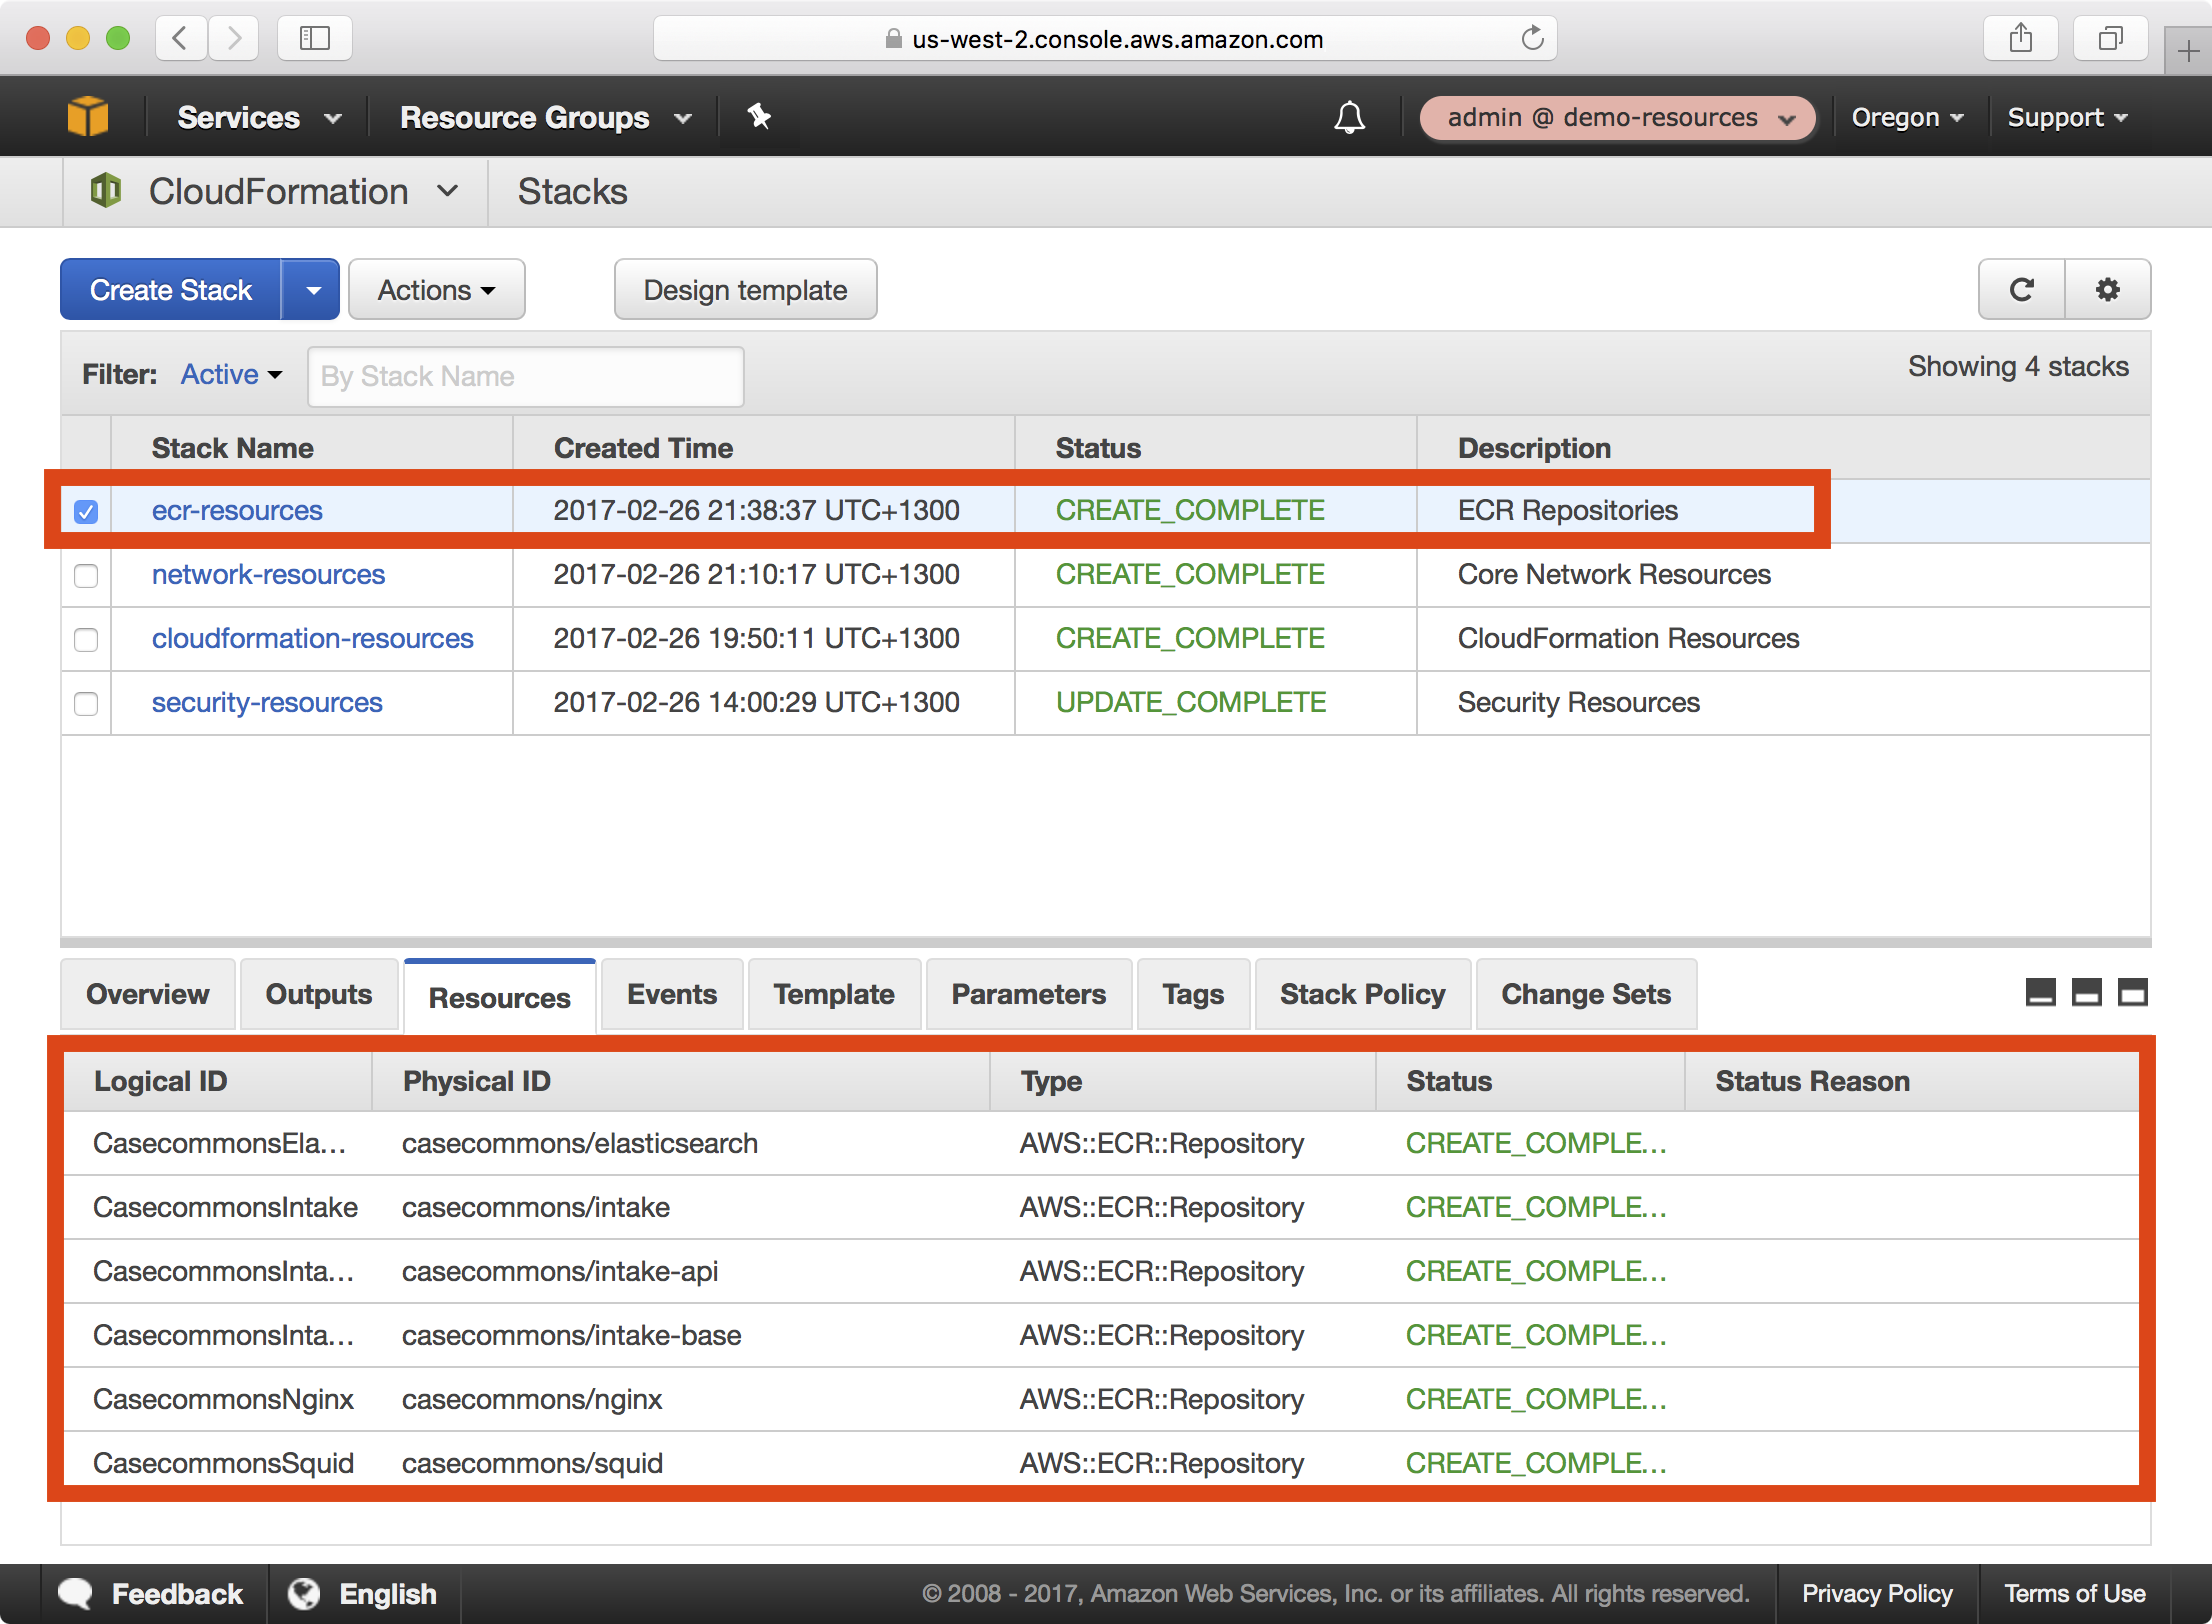
Notice that each of the specified ECR repositories have been created.
5. If you open the ECS dashboard and select Repositories, you can see each of the created ECR Repositories:

6. Select the casecommons/squid repository, which will display details about this repository:
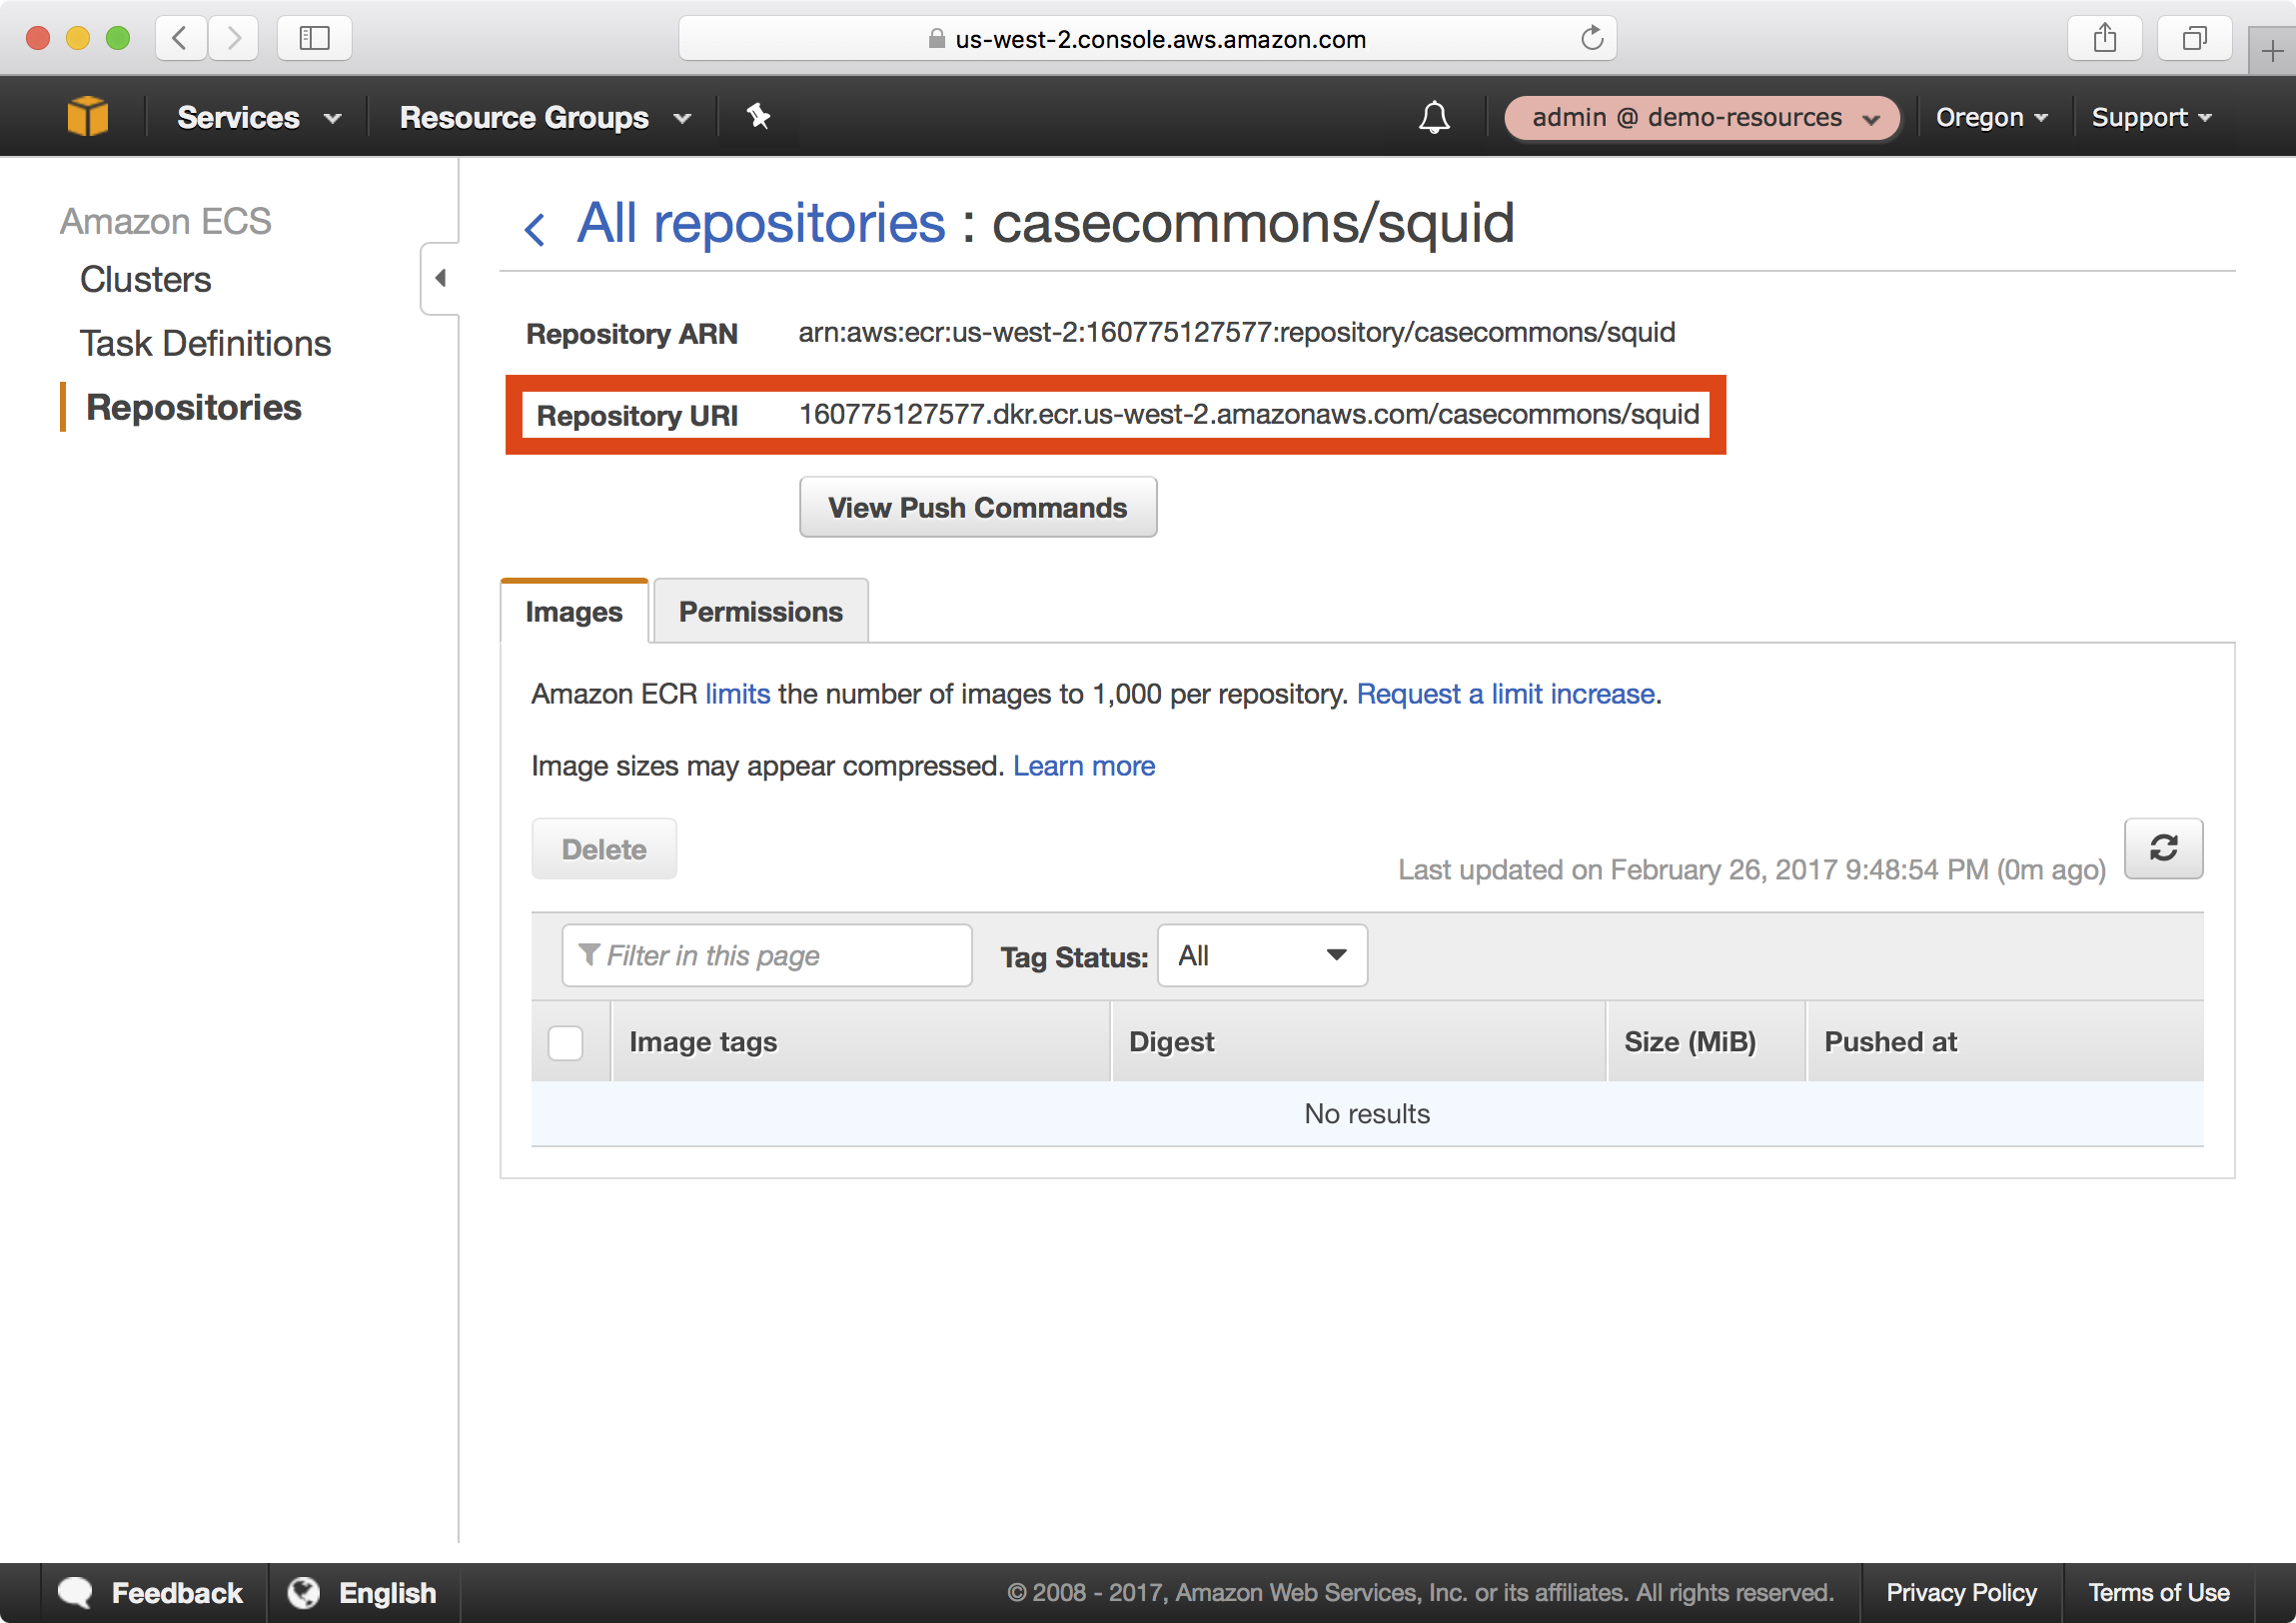
Notice the Repository URI setting for the squid repository - this is the fully qualified name you should use when referencing images in this repository and is comprised of three parts:
160775127577.dkr.ecr.us-west-2.amazonaws.com- the Docker registry namecasecommons- the Docker organization namesquid- the Docker repository name
We need to specify the Repository URI whenever we tag and publish images for this repository.
Publishing Docker Images
In this section we will demonstrate how to publish a Docker image to one of our newly created ECR repositories. We will create an image for the casecommons/squid repository using the Docker squid image that is defined at https://github.com/casecommons/docker-squid.
1. Clone the Casecommons squid repository to your local environment:
$ git clone git@github.com:Casecommons/docker-squid.git
Cloning into 'docker-squid'...
remote: Counting objects: 62, done.
remote: Total 62 (delta 0), reused 0 (delta 0), pack-reused 62
Receiving objects: 100% (62/62), 12.48 KiB | 0 bytes/s, done.
Resolving deltas: 100% (16/16), done.
$ cd docker-squid
$ tree -L 1
.
├── Makefile
├── Makefile.settings
├── README.md
├── docker
└── src
2. Open the Makefile at the root of the docker-squid repository and modify the highlighted settings:
# Project variables
export PROJECT_NAME ?= squid
ORG_NAME ?= casecommons
REPO_NAME ?= squid
DOCKER_REGISTRY ?= 160775127577.dkr.ecr.us-west-2.amazonaws.com
AWS_ACCOUNT_ID ?= 160775127577
DOCKER_LOGIN_EXPRESSION ?= $$(aws ecr get-login --registry-ids $(AWS_ACCOUNT_ID))
...
...
Here we ensure the Makefile settings are configured with the correct Docker registry name (DOCKER_REGISTRY), organization name (ORG_NAME), repository name (REPO_NAME) and AWS account ID (AWS_ACCOUNT_ID).
3. Run the make login command to login to the ECR repository for the demo-resources account:
$ export AWS_PROFILE=demo-resources-admin
$ make login
=> Logging in to Docker registry ...
Enter MFA code: *****
Login Succeeded
=> Logged in to Docker registry
4. Run the make release command, which will build the squid image:
$ make release
=> Building images...
Building squid
Step 1/11 : FROM alpine
...
...
=> Build complete
=> Starting squid service...
Creating network "squid_default" with the default driver
Creating squid_squid_1
=> Release environment created
=> Squid is running at http://172.16.154.128:32776
4. Run the make tag latest command, which will tag the image with the latest tag:
$ make tag latest
=> Tagging release image with tags latest...
=> Tagging complete
5. Run the make publish command, which will publish the image to your ECR repository:
$ make publish
=> Publishing release image to 160775127577.dkr.ecr.us-west-2.amazonaws.com/casecommons/squid...
The push refers to a repository [160775127577.dkr.ecr.us-west-2.amazonaws.com/casecommons/squid]
a99ab02493c4: Pushed
de9eaa36d055: Pushed
ac2f445f0e4a: Pushed
6566ea35d012: Pushed
60ab55d3379d: Pushed
latest: digest: sha256:086598386c752d053436cb46aedc52f6c03026e53981936c4d8b867ce042ac66 size: 1362
=> Publish complete
6. Run the make clean command to clean up the local Docker environment.
$ make clean
=> Destroying release environment...
Stopping squid_squid_1 ... done
Removing squid_squid_1 ... done
Removing network squid_default
=> Removing dangling images...
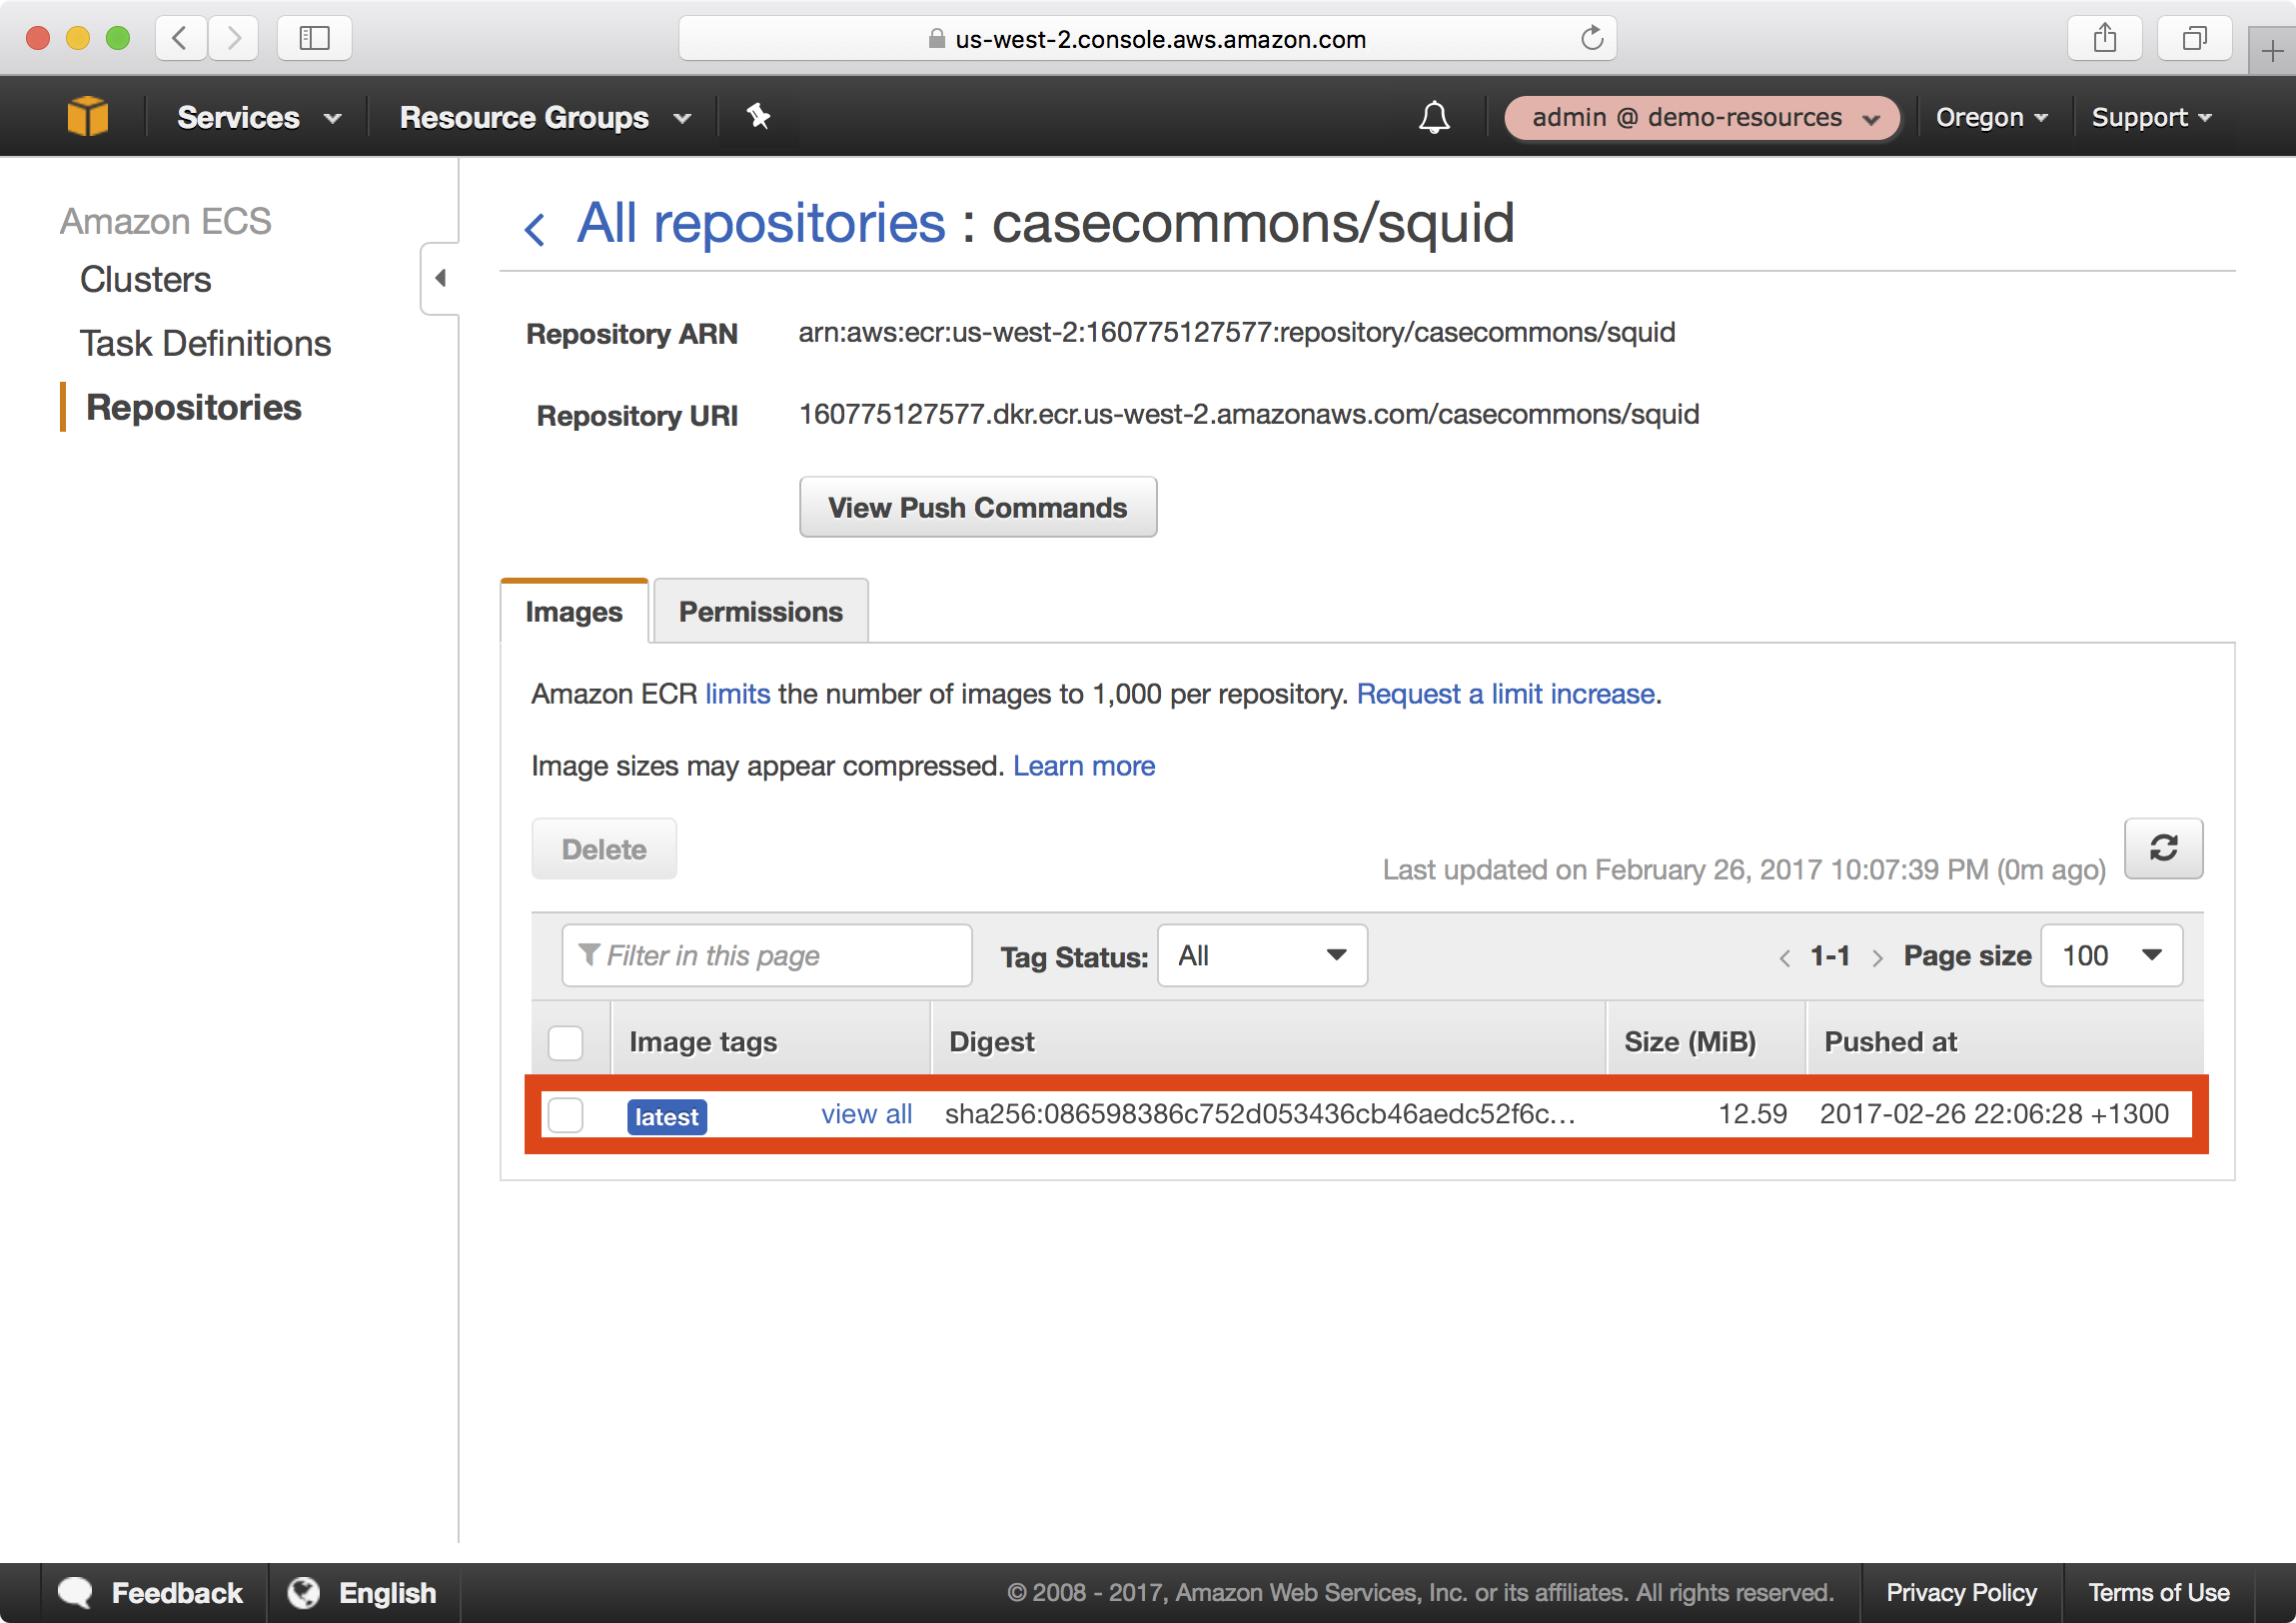
7. In the AWS console, you should now be able to see your newly published image:
Wrap Up
We created ECR repositories in our demo-resources account, which provides a private Docker registry and repositories for publishing Docker images, and learned how to publish Docker images to our ECR repositories.
Note
At this point you should commit your changes to the ECR resources playbook before continuing.