Intake Accelerator Stack
Introduction
We have established all of the shared resource stacks in our demo-users and demo-resources accounts, and created the Intake API application stack.
We will now deploy the Intake Accelerator application to our demo-resources account, creating a demo environment, with the Intake Accelerator application published at https://demo-intake.demo.cloudhotspot.co.
Note
The Intake Accelerator stack relies on a number of supporting services and resources that we created in the Intake API Stack section including:
Creating the Intake Image
The Intake Accelerator Docker image needs to be published to the casecommons/intake ECR repository, so that it is available to ECS instances when we deploy the CloudFormation stack for running the Intake API application.
1. Clone the Intake application from the following forked repository (https://github.com/mixja/intake) to your local environment and ensure you checkout the production_workflow branch:
$ git clone git@github.com:mixja/intake.git
Cloning into 'intake'...
remote: Counting objects: 8913, done.
remote: Compressing objects: 100% (19/19), done.
remote: Total 8913 (delta 8), reused 4 (delta 4), pack-reused 8890
Receiving objects: 100% (8913/8913), 2.68 MiB | 974.00 KiB/s, done.
Resolving deltas: 100% (6329/6329), done.
$ cd intake
$ git checkout production_workflow
Branch production_workflow set up to track remote branch production_workflow from origin.
Switched to a new branch 'production_workflow'
2. Open the Makefile at the root of the intake repository and modify the highlighted settings:
# Project variables
PROJECT_NAME ?= intake_accelerator
ORG_NAME ?= casecommons
REPO_NAME ?= intake
DOCKER_REGISTRY ?= 160775127577.dkr.ecr.us-west-2.amazonaws.com
AWS_ACCOUNT_ID ?= 160775127577
DOCKER_LOGIN_EXPRESSION := eval $$(aws ecr get-login --registry-ids $(AWS_ACCOUNT_ID))
...
...
Here we ensure the Makefile settings are configured with the correct Docker registry name (DOCKER_REGISTRY), organization name (ORG_NAME), repository name (REPO_NAME) and AWS account ID (AWS_ACCOUNT_ID).
3. Open the docker/release/Dockerfile file and modify the FROM directive to reference the intake-base image you published earlier:
FROM 160775127577.dkr.ecr.us-west-2.amazonaws.com/casecommons/intake-base
MAINTAINER Pema Geyleg <pema@casecommons.org>
HEALTHCHECK --interval=3s --retries=20 CMD ${HEALTHCHECK:-curl -fs localhost:${HTTP_PORT:-3000}}
...
...
4. Open the docker/release/docker-compose.yml file and modify the image variable for the nginx, intake-api and intake-api-nginx services to reference the images published to the demo-resources EC2 Container Registry:
version: '2'
...
...
services:
...
...
  nginx:
    image: 160775127577.dkr.ecr.us-west-2.amazonaws.com/casecommons/nginx
    ports:
      - "${HTTP_PORT}"
...
...
  intake-api:
    image: 160775127577.dkr.ecr.us-west-2.amazonaws.com/casecommons/intake-api
    volumes:
      - intake-api-webroot:/intake_api_prototype/public
      - intake-api-tmp:/tmp
...
...
  intake-api-nginx:
    image: 160775127577.dkr.ecr.us-west-2.amazonaws.com/casecommons/nginx
    ports:
      - "${HTTP_PORT}"
...
...
4. Run the make login command to login to the ECR repository for the demo-resources account:
$ export AWS_PROFILE=demo-resources-admin
$ make login
=> Logging in to Docker registry ...
Enter MFA code: *****
Login Succeeded
=> Logged in to Docker registry
5. Run the make test command, which will run unit tests in a Docker build container:
$ make test
=> Pulling latest images...
Pulling redis (redis:3.0)...
...
...
=> Running tests...
Creating network "intakeacceleratortest_default" with the default driver
Creating intakeacceleratortest_redis_1
Creating intakeacceleratortest_rspec_test_1
Attaching to intakeacceleratortest_rspec_test_1
...
...
javascript_test_1  | TOTAL: 558 SUCCESS
javascript_test_1  | TOTAL: 558 SUCCESS
javascript_test_1  | 01 03 2017 08:57:37.695:WARN [launcher]: Firefox was not killed in 2000 ms, sending SIGKILL.
intakeacceleratortest_javascript_test_1 exited with code 0
=> Testing complete
6. Run the make build command, which will build a Debian package from the application source and copy it to the local target folder:
$ make build
=> Building images...
Building builder
Step 1/12 : FROM casecommons/ca_intake_base_image:latest
...
...
builder_1          | {:timestamp=>"2017-03-01T09:00:19.538128+0000", :message=>"Created package", :path=>"/build_artefacts/intake-accelerator_1.b869606_amd64.deb"}
intakeacceleratortest_builder_1 exited with code 0
=> Copying application artifacts...
=> Build complete
7. Run the make release command, which will build the release image for the Intake API application, start a minimal production-like environment and run acceptance tests.
$ make release
$ make release
=> Pulling latest images...
Pulling intake-api (160775127577.dkr.ecr.us-west-2.amazonaws.com/casecommons/intake-api:latest)...
latest: Pulling from casecommons/intake-api
Digest: sha256:04cfa51f3d684b0a20132b7d515322816c5d49efccef4eabb9b98e6e03f1e211
...
...
=> Starting Intake API...
Creating intakeaccelerator_intake-api_1
Creating intakeaccelerator_intake-api-nginx_1
=> Starting redis...
Creating intakeaccelerator_redis_1
=> Starting application...
Creating intakeaccelerator_app_1
=> Starting nginx...
Creating intakeaccelerator_nginx_1
=> Application is running at http://172.16.154.128:32801
8. Run the make tag latest command, which will tag the image with the latest tag:
$ make tag latest
=> Tagging release image with tags latest...
=> Tagging complete
9. Run the make publish command, which will publish the image to your ECR repository:
$ make publish
=> Publishing release image to 160775127577.dkr.ecr.us-west-2.amazonaws.com/casecommons/intake...
The push refers to a repository [160775127577.dkr.ecr.us-west-2.amazonaws.com/casecommons/intake
250774d98791: Pushed
d6e0c772e63d: Pushed
0eb3fff043d9: Pushed
cc269cc723a3: Pushed
985910e761d0: Pushed
e302f1438372: Pushed
7cebbf491a73: Pushed
ba3d5a81c1e6: Pushed
5d53f93940f5: Pushed
38dcb92de9f2: Pushed
a2ae92ffcd29: Pushed
latest: digest: sha256:7c645b33cd0d8d13cd7450b4653aa1f96336dadc76c363f8d4a52dd193134a05 size: 2628
=> Publish complete
10. Run the make clean command to clean up the local Docker environment.
$ make clean
=> Destroying development environment...
...
...
=> Removing dangling images...
=> Clean complete
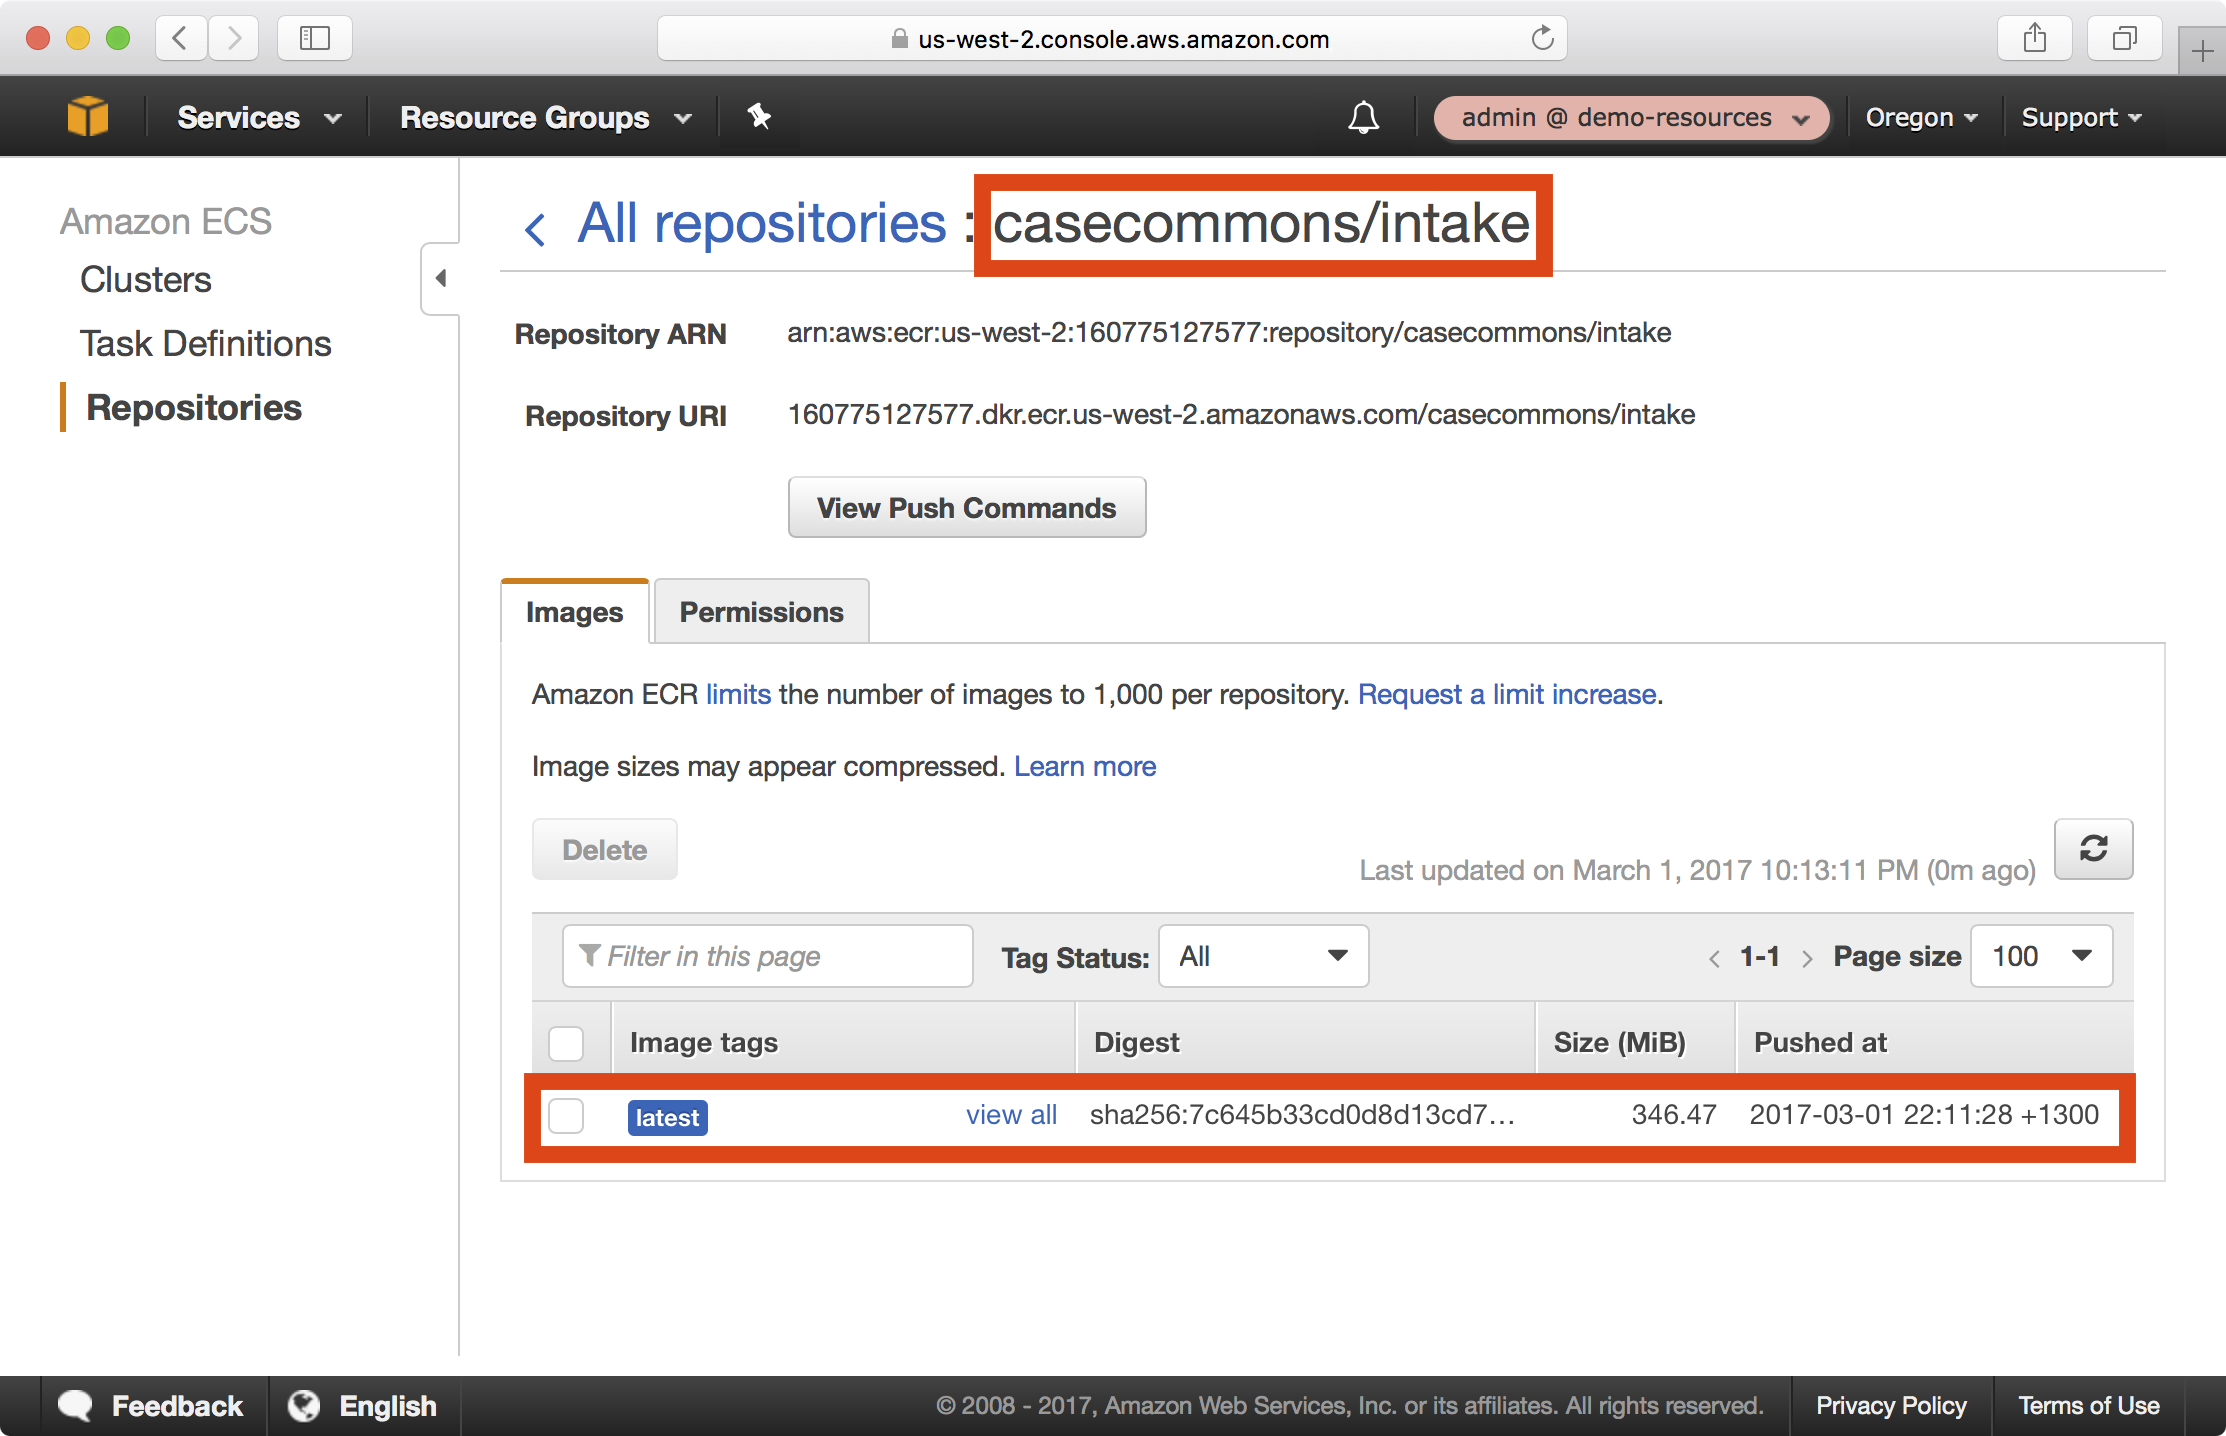
11. In the AWS console under ECS > Repositories, you should now be able to see your newly published image in the casecommons/intake repository:
Installing the Playbook
We now have all the supporting pieces in place to deploy the Intake Accelerator application stack to the demo resources account. Instead of creating a new playbook as we have done previously in this tutorial, we will instead clone an existing playbook and add a new environment called demo-resources to the playbook.
1. Clone the Intake Accelerator AWS project to your local environment.
$ git clone git@github.com:Casecommons/intake-accelerator-aws.git
  Cloning into 'intake-accelerator-aws'...
  remote: Counting objects: 165, done.
  remote: Compressing objects: 100% (9/9), done.
  remote: Total 165 (delta 1), reused 0 (delta 0), pack-reused 152
  Receiving objects: 100% (165/165), 30.07 KiB | 0 bytes/s, done.
  Resolving deltas: 100% (62/62), done.
$ cd intake-accelerator-aws
3. Install the required Ansible roles for the playbook using the ansible-galaxy command as demonstrated below:
$ ansible-galaxy install -r roles/requirements.yml --force
- extracting aws-cloudformation to /Users/jmenga/Source/casecommons/temp/roles/aws-cloudformation
- aws-cloudformation was installed successfully
- extracting aws-sts to /Users/jmenga/Source/casecommons/temp/roles/aws-sts
- aws-sts was installed successfully
- extracting aws-ecs-tasks to /Users/jmenga/Source/casecommons/temp/roles/aws-ecs-tasks
- aws-ecs-tasks was installed successfully
5. Review the group_vars/all/vars.yml file, which contains global settings for the playbook:
cf_stack_name: "{{ 'intake-accelerator-' + env }}"
cf_stack_tags:
  org:business:owner: CA Intake
  org:business:product: Intake Accelerator
  org:business:severity: High
  org:tech:environment: "{{ env }}"
  org:tech:contact: pema@casecommons.org

cf_stack_inputs:
  ApplicationAutoscalingDesiredCount: "{{ config_application_desired_count }}"
  ApplicationAMI: "{{ config_application_ami }}"
  ApplicationInstanceType: "{{ config_application_instance_type }}"
  ApplicationLoadBalancerPort: "{{ config_application_frontend_port }}"
  ApplicationPort: "{{ config_application_port }}"
  ApplicationKeyName: "{{ config_application_keyname }}"
  ApplicationDockerImage: "{{ config_application_image }}"
  ApplicationDockerImageTag: "{{ config_application_tag }}"
  ApplicationApiUrl: "{{ config_application_api_url }}"
  ApplicationAuthentication: "{{ config_application_authentication }}"
  ApplicationAuthenticationUrl: "{{ config_application_authentication_url }}"
  ApplicationDomain: "{{ config_application_domain }}"
  Environment: "{{ env }}"
  LogRetention: "{{ config_log_retention }}"
  NginxDockerImage: "{{ config_nginx_image }}"
  NginxDockerImageTag: "{{ config_nginx_tag }}"
  SecretKeyBaseCipher: "{{ config_application_secret_key_base }}"
You can see this stack has many different stack inputs, which revolve around application settings.
One thing to note is that the cf_stack_template variable is not defined - this variable defaults to the path templates/stack.yml.j2 in the local playbook, and you will find this playbook includes a large CloudFormation template in this location.
Defining a New Environment
We will now add a new environment called demo to the playbook, which will be used to create the Intake API application stack in the demo-resources account.
1. Modify the inventory file so that it defines a new environment called demo, ensuring you specify ansible_connection=local:
[dev]
dev ansible_connection=local

[demo]
demo ansible_connection=local
```
2. Create a file called group_vars/demo/vars.yml, which will hold all environment specific configuration for the demo environment:
$ mkdir -p group_vars/demo
$ touch group_vars/demo/vars.yml
4. Copy the existing settings from group_vars/dev/vars.yml to group_vars/demo/vars.yml and modify as shown below:
# STS settings
sts_role_arn: arn:aws:iam::160775127577:role/admin

# Application settings
config_application_keyname: admin
config_application_instance_type: t2.micro
config_application_desired_count: 2
config_application_ami: ami-4662e126
config_application_image: 160775127577.dkr.ecr.us-west-2.amazonaws.com/casecommons/intake
config_application_tag: latest
config_application_frontend_port: 443
config_application_port: 3000
config_application_secret_key_base: xxxxx
config_application_api_url: https://demo-intake-api.demo.cloudhotspot.co/
config_application_authentication: "true"
config_application_authentication_url: http://perry.intake.cwds.tabordasolutions.net
config_application_domain: demo.cloudhotspot.co

# Nginx settings
config_nginx_image: 160775127577.dkr.ecr.us-west-2.amazonaws.com/casecommons/nginx
config_nginx_tag: latest

# Load balancer settings
config_lb_certificate_arn:
  Fn::ImportValue: DemoCloudhotspotCoCertificateArn

# Log settings
config_log_retention: 30
config_log_deletion_policy: Delete
Here we target the demo-resources account by specifying the demo-resources IAM admin role in the sts_role_arn variable, whilst the remaining settings configure the Intake APi application stack specify to the demo-resources template account:
config_application_keyname- specifies the name of the EC2 key pair that ECS container instances will be created with. Notice this matches the name of the EC2 key pair created earlier.config_application_ami- specifies the AMI ID of the image used to create the ECS container instances. Notice this matches the ID of the AMI created earlierconfig_application_image- specifies the Docker image used to run the Intake Accelerator application containers. Notice this matches the image we created earlierconfig_application_secret_key_base- an encrypted application setting that provides cryptographic material for an application secret key. We will securely generate an encrypted value for this setting shortly.config_application_api_url- specifies the URL of the Intake API endpoint that the Intake Accelerator application should connect to.config_application_domain- specifies the base domain that our application will be served from.config_nginx_image- specifies the Docker image used to run the Intake API Nginx containers. Notice this matches the image we created earlierconfig_lb_certificate_arn- specifies the ARN of the AWS certificate manager (ACM) certificate to serve from the application load balancer for HTTPS connections. Notice that we can specify this setting as a CloudFormation instrinsic function, as the template is configured to cast the configured value to a JSON object. The intrinsic function imports the CloudFormation exportDemoCloudhotspotCoCertificateArn, which was created earlier when we created the certificate in the security resources playbook.
Creating Secrets using KMS
Our demo environment settings include a single setting (config_application_secret_key_base) that we need to generate encrypted values for.
The approach here is to simply use the AWS Key Management Service (KMS) to encrypt the plaintext value of the secret. We will use the KMS key that was created as part of the CloudFormation resources stack.
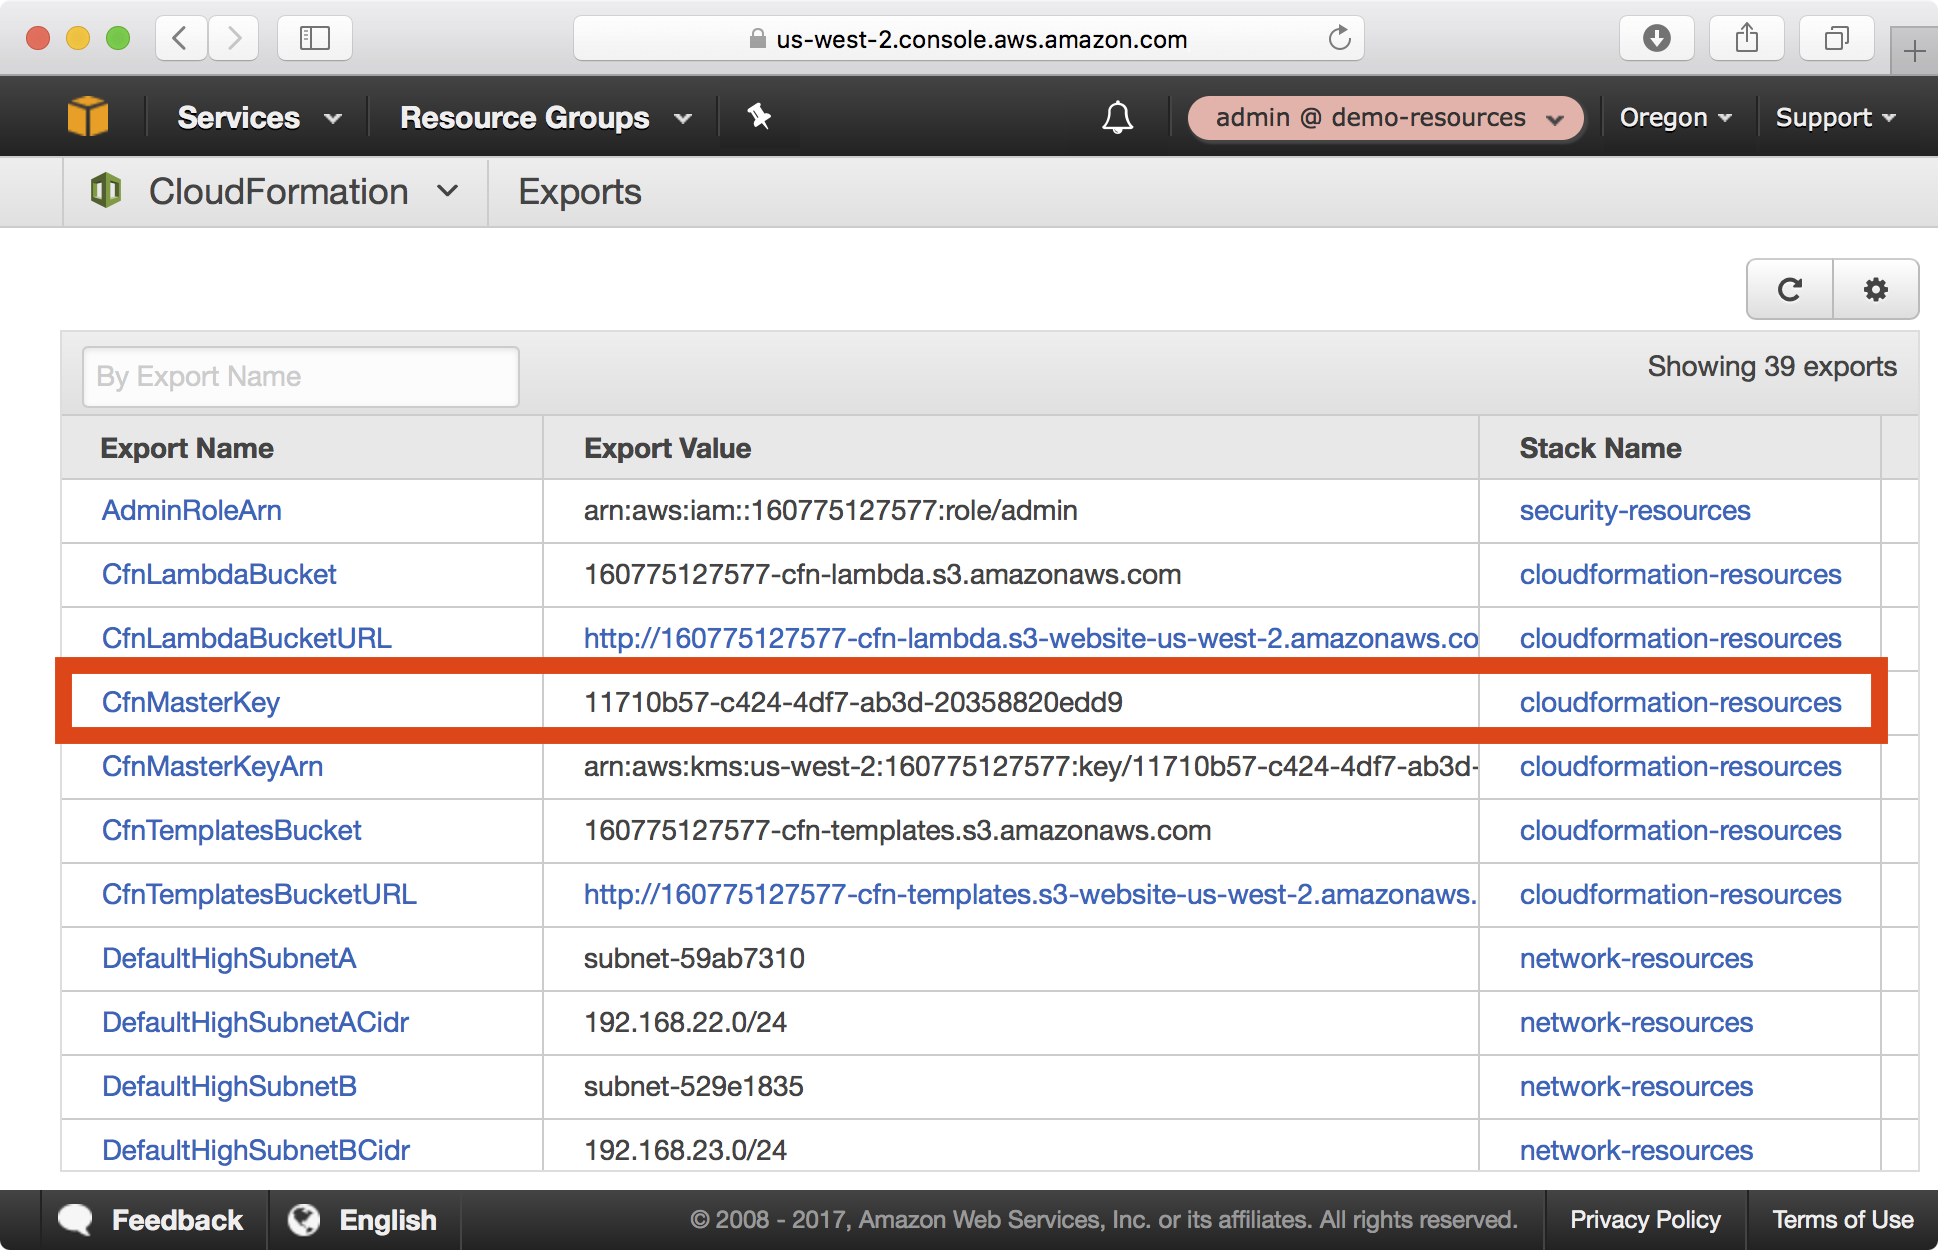
1. In the AWS console, open the CloudFormation > Exports from the CloudFormation dashboard. Copy the CfnMasterKey export value, which defines the key ID of the KMS key we will use for encryption.
2. In a local shell configured with an admin profile targetting the demo resources account, run the following command to generate ciphertext for the config_application_secret_key_base variable:
$ export AWS_PROFILE=demo-resources-admin
$ aws kms encrypt --key-id 11710b57-c424-4df7-ab3d-20358820edd9 --plaintext $(openssl rand -base64 32)
Enter MFA code: ******
'{
    "KeyId": "arn:aws:kms:us-west-2:160775127577:key/11710b57-c424-4df7-ab3d-20358820edd9",
    "CiphertextBlob": "AQECAHjbSbOZ8FLk7XffvdtrDewDyQKH9bOaMrY6jf+N3si+SQAAAIswgYgGCSqGSIb3DQEHBqB7MHkCAQAwdAYJKoZIhvcNAQcBMB4GCWCGSAFlAwQBLjARBAxUVkZgkHNkRWRcbtgCARCAR2bG8d33uID+nq01bRjHeNJzsFgTqrOxCoY7LmR+tyVT/3oTAQYePtsJC3Dt9zmOJ4G82Q36X4q0ng5r8YPaj15wp/en0tPY"
}
3. Copy the CiphertextBlob value from the aws kms encrypt command output and set the config_application_secret_key_base variable in group_vars/demo/vars.yml to this value:
# STS settings
sts_role_arn: arn:aws:iam::160775127577:role/admin

# Application settings
config_application_keyname: admin
config_application_instance_type: t2.micro
config_application_desired_count: 2
config_application_ami: ami-4662e126
config_application_image: 160775127577.dkr.ecr.us-west-2.amazonaws.com/casecommons/intake
config_application_tag: latest
config_application_frontend_port: 443
config_application_port: 3000
config_application_secret_key_base: AQECAHjbSbOZ8FLk7XffvdtrDewDyQKH9bOaMrY6jf+N3si+SQAAAIswgYgGCSqGSIb3DQEHBqB7MHkCAQAwdAYJKoZIhvcNAQcBMB4GCWCGSAFlAwQBLjARBAxUVkZgkHNkRWRcbtgCARCAR2bG8d33uID+nq01bRjHeNJzsFgTqrOxCoY7LmR+tyVT/3oTAQYePtsJC3Dt9zmOJ4G82Q36X4q0ng5r8YPaj15wp/en0tPY
config_application_api_url: https://demo-intake-api.demo.cloudhotspot.co/
config_application_authentication: "true"
config_application_authentication_url: http://perry.intake.cwds.tabordasolutions.net
config_application_domain: demo.cloudhotspot.co
...
...
Running the Playbook
Now that we’ve defined environment settings for the demo environment targeting our demo-resources account, let’s run the playbook.
1. Ensure your local AWS environment is configured to target the demo-resources account:
$ export AWS_PROFILE=demo-resources-admin
2. Run the Ansible playbook targeting the demo environment as demonstrated below:
$ ansible-playbook site.yml -e env=demo

PLAY [Assume Role] *************************************************************

TASK [aws-sts : set_fact] ******************************************************
ok: [demo]

TASK [aws-sts : checking if sts functions are sts_disabled] ********************
skipping: [demo]

TASK [aws-sts : setting empty sts_session_output result] ***********************
skipping: [demo]

TASK [aws-sts : setting sts_creds if legacy AWS credentials are present (e.g. for Ansible Tower)] ***
skipping: [demo]

TASK [aws-sts : assume sts role] ***********************************************
Enter MFA code: ******
ok: [demo]
...
...
TASK [aws-cloudformation : set local path fact if s3 upload disabled] **********
ok: [demo]

TASK [aws-cloudformation : configure application stack] ************************
...
...
PLAY RECAP *********************************************************************
demo                       : ok=18   changed=1    unreachable=0    failed=0
3. The playbook will take approxiately 10 minutes to create the CloudFormation stack and associated resources. Whilst the CloudFormation stack is being created, you can review the CloudFormation stack that was generated in the build/<timestamp> folder:
$ tree build
build
└── 20170301224832
    ├── intake-accelerator-demo-config.json
    ├── intake-accelerator-demo-policy.json
    ├── intake-accelerator-demo-stack.json
    └── intake-accelerator-demo-stack.yml
The following shows the intake-accelerator-demo-stack.yml file that was generated and uploaded to CloudFormation:
AWSTemplateFormatVersion: "2010-09-09"

Description: Intake Accelerator - demo

Parameters:
  ApplicationAMI:
    Type: String
    Description: Application Amazon Machine Image ID
  ApplicationInstanceType:
    Type: String
    Description: Application EC2 Instance Type
  ApplicationAutoscalingDesiredCount:
    Type: Number
    Description: Application AutoScaling Group Desired Count
  ApplicationDockerImage:
    Type: String
    Description: Docker Image for Application
  ApplicationDockerImageTag:
    Type: String
    Description: Docker Image Tag for Application
    Default: latest
  ApplicationKeyName:
    Type: String
    Description: EC2 Key Pair for Application SSH Access
  ApplicationLoadBalancerPort:
    Type: Number
    Description: Application Front End HTTP Port
  ApplicationPort:
    Type: Number
    Description: Application HTTP Port
  ApplicationDomain:
    Type: String
    Description: Base public domain of the application URL
  ApplicationCacheFailover:
    Type: String
    Description: Enables/disables Redis cache automatic failover
    AllowedValues:
      - "true"
      - "false"
    Default: "false"
  ApplicationCacheInstanceCount:
    Type: Number
    Description: Number of Redis cache instances
    Default: 1
  ApplicationCacheInstanceType:
    Type: String
    Description: Type of Redis cache instance
    Default: cache.t2.micro
  ApplicationCacheVersion:
    Type: String
    Description: Redis cache version
    Default: "3.2.4"
  ApplicationApiUrl:
    Type: String
    Description: Intake API URL Endpoint
  ApplicationAuthentication:
    Type: String
    Description: Enables or disables authentication
    Default: "true"
    AllowedValues:
      - "true"
      - "false"
  ApplicationAuthenticationUrl:
    Type: String
    Description: Authentication URL for the Intake Accelerator application
  Environment:
    Type: String
    Description: Stack Environment
  LogRetention:
    Type: Number
    Description: Log retention in days
  NginxDockerImage:
    Type: String
    Description: Docker Image for Nginx
  NginxDockerImageTag:
    Type: String
    Description: Docker Image Tag for Nginx
    Default: latest
  SecretKeyBaseCipher:
    Type: String
    Description: KMS Encrypted Secret Key Base

Conditions:
  ApplicationCacheFailoverEnabled:
    Fn::Equals:
      - { "Ref" : "ApplicationCacheFailover" }
      - "true"

Resources:
  ApplicationDnsRecord:
    Type: "AWS::Route53::RecordSet"
    Properties:
      Name:
        Fn::Sub: "${Environment}-intake.${ApplicationDomain}"
      TTL: "300"
      HostedZoneName: "${ApplicationDomain}."
      Type: "CNAME"
      Comment:
        Fn::Sub: "Intake Accelerator Application - ${Environment}"
      ResourceRecords:
        - Fn::Sub: "${ApplicationLoadBalancer.DNSName}"
  ApplicationLoadBalancer:
    Type: "AWS::ElasticLoadBalancingV2::LoadBalancer"
    Properties:
      Scheme: "internet-facing"
      SecurityGroups:
       - Ref: "ApplicationLoadBalancerSecurityGroup"
      Subnets:
        - Fn::ImportValue: DefaultPublicSubnetA
        - Fn::ImportValue: DefaultPublicSubnetB
      LoadBalancerAttributes:
        - Key: "deletion_protection.enabled"
          Value: false
        - Key: "idle_timeout.timeout_seconds"
          Value: 30
      Tags:
        - Key: "Name"
          Value:
            Fn::Sub: ${AWS::StackName}-${Environment}-lb
  ApplicationLoadBalancerApplicationListener:
    Type: "AWS::ElasticLoadBalancingV2::Listener"
    Properties:
      Certificates:
        - CertificateArn: {"Fn::ImportValue": "DemoCloudhotspotCoCertificateArn"}
      DefaultActions:
        - TargetGroupArn: { "Ref": "IntakeAcceleratorServiceTargetGroup" }
          Type: forward
      LoadBalancerArn: { "Ref": "ApplicationLoadBalancer" }
      Port: { "Ref": "ApplicationLoadBalancerPort" }
      Protocol: "HTTPS"
  IntakeAcceleratorServiceTargetGroup:
    Type: "AWS::ElasticLoadBalancingV2::TargetGroup"
    Properties:
      VpcId:
        Fn::ImportValue: "DefaultVpcId"
      Protocol: "HTTP"
      Port: { "Ref": "ApplicationPort" }
      TargetGroupAttributes:
        - Key: "deregistration_delay.timeout_seconds"
          Value: 60
  ApplicationLoadBalancerSecurityGroup:
    Type: "AWS::EC2::SecurityGroup"
    Properties:
      VpcId:
        Fn::ImportValue: "DefaultVpcId"
      GroupDescription: "Intake Accelerator Load Balancer Security Group"
      SecurityGroupIngress:
        - IpProtocol: "tcp"
          FromPort: { "Ref": "ApplicationLoadBalancerPort" }
          ToPort: { "Ref": "ApplicationLoadBalancerPort" }
          CidrIp: "0.0.0.0/0"
  ApplicationLoadBalancerToApplicationIngress:
    Type: "AWS::EC2::SecurityGroupIngress"
    Properties:
      IpProtocol: "tcp"
      FromPort: { "Ref": "ApplicationPort" }
      ToPort: { "Ref": "ApplicationPort" }
      GroupId: { "Ref": "ApplicationAutoscalingSecurityGroup" }
      SourceSecurityGroupId: { "Ref": "ApplicationLoadBalancerSecurityGroup" }
  ApplicationLoadBalancerToApplicationEgress:
    Type: "AWS::EC2::SecurityGroupEgress"
    Properties:
      IpProtocol: "tcp"
      FromPort: { "Ref": "ApplicationPort" }
      ToPort: { "Ref": "ApplicationPort" }
      GroupId: { "Ref": "ApplicationLoadBalancerSecurityGroup" }
      DestinationSecurityGroupId: { "Ref": "ApplicationAutoscalingSecurityGroup" }
  ApplicationAutoscaling:
    Type: "AWS::AutoScaling::AutoScalingGroup"
    DependsOn:
      - DmesgLogGroup
      - DockerLogGroup
      - EcsAgentLogGroup
      - EcsInitLogGroup
      - MessagesLogGroup
    CreationPolicy:
      ResourceSignal:
        Count: { "Ref": "ApplicationAutoscalingDesiredCount"}
        Timeout: "PT15M"
    UpdatePolicy:
      AutoScalingRollingUpdate:
        MinInstancesInService: { "Ref": "ApplicationAutoscalingDesiredCount"}
        MinSuccessfulInstancesPercent: "100"
        WaitOnResourceSignals: "true"
        PauseTime: "PT15M"
    Properties:
      VPCZoneIdentifier:
        - Fn::ImportValue: "DefaultMediumSubnetA"
        - Fn::ImportValue: "DefaultMediumSubnetB"
      LaunchConfigurationName: { "Ref" : "ApplicationAutoscalingLaunchConfiguration" }
      MinSize: "0"
      MaxSize: "4"
      DesiredCapacity: { "Ref": "ApplicationAutoscalingDesiredCount"}
      Tags:
        - Key: Name
          Value:
            Fn::Sub: ${AWS::StackName}-instance
          PropagateAtLaunch: "true"
  ApplicationAutoscalingLaunchConfiguration:
    Type: "AWS::AutoScaling::LaunchConfiguration"
    Metadata:
      AWS::CloudFormation::Init:
        config:
          commands:
            10_first_run:
              command: "sh firstrun.sh"
              env:
                STACK_NAME: { "Ref": "AWS::StackName" }
                AUTOSCALING_GROUP: "ApplicationAutoscaling"
                AWS_DEFAULT_REGION: { "Ref": "AWS::Region" }
                ECS_CLUSTER: { "Ref": "ApplicationCluster" }
                DOCKER_NETWORK_MODE: host
                PROXY_URL:
                  Fn::ImportValue: DefaultProxyURL
              cwd: "/home/ec2-user/"
          files:
            /etc/ecs/ecs.config:
              content:
                Fn::Sub: "ECS_CLUSTER=${ApplicationCluster}\n"
    Properties:
      ImageId: { "Ref": "ApplicationAMI" }
      InstanceType: { "Ref": "ApplicationInstanceType" }
      IamInstanceProfile: { "Ref": "ApplicationAutoscalingInstanceProfile" }
      KeyName: { "Ref": "ApplicationKeyName" }
      SecurityGroups:
        - Ref: "ApplicationAutoscalingSecurityGroup"
      UserData:
        Fn::Base64:
          Fn::Join: ["\n", [
            "#!/bin/bash",
            "set -e",
            "Fn::Join": ["", [
              "Fn::Sub": "/opt/aws/bin/cfn-init -v --stack ${AWS::StackName} --resource ApplicationAutoscalingLaunchConfiguration --region ${AWS::Region}",
              "    --http-proxy ", "Fn::ImportValue": "DefaultProxyURL",
              "    --https-proxy ", "Fn::ImportValue": "DefaultProxyURL"
            ] ],
            "Fn::Join": ["", [
              "Fn::Sub": "/opt/aws/bin/cfn-signal -e $? --stack ${AWS::StackName} --resource ApplicationAutoscaling --region ${AWS::Region}",
              "    --http-proxy ", "Fn::ImportValue": "DefaultProxyURL",
              "    --https-proxy ", "Fn::ImportValue": "DefaultProxyURL"
            ] ]
          ] ]
  ApplicationAutoscalingSecurityGroup:
    Type: "AWS::EC2::SecurityGroup"
    Properties:
      VpcId:
        Fn::ImportValue: "DefaultVpcId"
      GroupDescription: "Intake Accelerator Security Group"
      SecurityGroupIngress:
        - IpProtocol: "tcp"
          FromPort: 22
          ToPort: 22
          CidrIp:
            Fn::ImportValue: "DefaultManagementSubnetACidr"
        - IpProtocol: "tcp"
          FromPort: 22
          ToPort: 22
          CidrIp:
            Fn::ImportValue: "DefaultManagementSubnetBCidr"
      SecurityGroupEgress:
        - IpProtocol: "tcp"
          FromPort: 3128
          ToPort: 3128
          DestinationSecurityGroupId:
            Fn::ImportValue: DefaultProxySecurityGroup
        - IpProtocol: "udp"
          FromPort: 53
          ToPort: 53
          CidrIp:
            Fn::Join: ["", [
              "Fn::ImportValue": "DefaultVpcDnsServer", "/32"
            ] ]
        - IpProtocol: "udp"
          FromPort: 123
          ToPort: 123
          CidrIp: 0.0.0.0/0
  ApplicationAutoscalingRole:
    Type: "AWS::IAM::Role"
    Properties:
      AssumeRolePolicyDocument:
        Version: "2012-10-17"
        Statement:
          - Effect: "Allow"
            Principal:
              Service: [ "ec2.amazonaws.com" ]
            Action: [ "sts:AssumeRole" ]
      Path: "/"
      ManagedPolicyArns: []
      Policies:
        - {"PolicyName": "CloudWatchLogs", "PolicyDocument": {"Version": "2012-10-17", "Statement": [{"Action": ["logs:CreateLogGroup", "logs:CreateLogStream", "logs:PutLogEvents", "logs:DescribeLogStreams"], "Resource": {"Fn::Sub": "arn:aws:logs:${AWS::Region}:${AWS::AccountId}:log-group:${AWS::StackName}*"}, "Effect": "Allow"}]}}
        - PolicyName: "EC2ContainerInstancePolicy"
          PolicyDocument:
            Statement:
              - Effect: "Allow"
                Action:
                  - "ecs:RegisterContainerInstance"
                  - "ecs:DeregisterContainerInstance"
                Resource:
                  Fn::Sub: "arn:aws:ecs:${AWS::Region}:${AWS::AccountId}:cluster/${ApplicationCluster}"
              - Effect: "Allow"
                Action:
                  - "ecs:DiscoverPollEndpoint"
                  - "ecs:Submit*"
                  - "ecs:Poll"
                  - "ecs:StartTelemetrySession"
                Resource: "*"
              - Effect: "Allow"
                Action:
                  - "ecr:BatchCheckLayerAvailability"
                  - "ecr:BatchGetImage"
                  - "ecr:GetDownloadUrlForLayer"
                  - "ecr:GetAuthorizationToken"
                Resource: "*"
              - Effect: "Allow"
                Action:
                - "kms:Decrypt"
                - "kms:DescribeKey"
                Resource:
                  Fn::ImportValue: "CfnMasterKeyArn"
  ApplicationAutoscalingInstanceProfile:
    Type: "AWS::IAM::InstanceProfile"
    Properties:
      Path: "/"
      Roles: [ { "Ref": "ApplicationAutoscalingRole" } ]
  ApplicationCache:
    Type: "AWS::ElastiCache::ReplicationGroup"
    Properties:
      ReplicationGroupDescription:
        Fn::Sub: ${AWS::StackName}-redis-cache
      AutomaticFailoverEnabled: { "Ref": "ApplicationCacheFailover" }
      NumCacheClusters: { "Ref": "ApplicationCacheInstanceCount" }
      CacheNodeType: { "Ref": "ApplicationCacheInstanceType" }
      Port: "6379"
      Engine: "redis"
      EngineVersion: { "Ref": "ApplicationCacheVersion" }
      CacheSubnetGroupName: { "Ref": "ApplicationCacheSubnetGroup" }
      PreferredMaintenanceWindow: "sun:10:30-sun:12:00"
      SnapshotWindow:
        Fn::If:
          - "ApplicationCacheFailoverEnabled"
          - "08:00-10:00"
          - { "Ref": "AWS::NoValue" }
      SecurityGroupIds:
        - { "Ref" : "ApplicationCacheSecurityGroup" }
  ApplicationCacheSubnetGroup:
    Type: "AWS::ElastiCache::SubnetGroup"
    Properties:
      Description:
        Fn::Sub: ${AWS::StackName}-redis-cache-subnet-group
      SubnetIds:
        - Fn::ImportValue: DefaultHighSubnetA
        - Fn::ImportValue: DefaultHighSubnetB
  ApplicationCacheSecurityGroup:
    Type: "AWS::EC2::SecurityGroup"
    Properties:
      GroupDescription:
        Fn::Sub: ${AWS::StackName}-redis-cache-sg
      VpcId:
        Fn::ImportValue: DefaultVpcId
      SecurityGroupEgress:
        - IpProtocol: "icmp"
          FromPort : -1
          ToPort : -1
          CidrIp: "192.0.2.0/24"
  ApplicationToApplicationCacheEgress:
    Type: "AWS::EC2::SecurityGroupEgress"
    Properties:
      IpProtocol: "tcp"
      FromPort: "6379"
      ToPort: "6379"
      GroupId: { "Ref": "ApplicationAutoscalingSecurityGroup" }
      DestinationSecurityGroupId: { "Ref": "ApplicationCacheSecurityGroup" }
  ApplicationToApplicationCacheIngress:
    Type: "AWS::EC2::SecurityGroupIngress"
    Properties:
      IpProtocol: "tcp"
      FromPort: "6379"
      ToPort: "6379"
      GroupId: { "Ref": "ApplicationCacheSecurityGroup" }
      SourceSecurityGroupId: { "Ref": "ApplicationAutoscalingSecurityGroup" }
  ApplicationCluster:
    Type: "AWS::ECS::Cluster"
  ApplicationTaskDefinition:
    Type: "AWS::ECS::TaskDefinition"
    Properties:
      NetworkMode: host
      Volumes:
        - Name: webroot
          Host: {}
      ContainerDefinitions:
      - Name: intake
        Image:
          Fn::Sub: ${ApplicationDockerImage}:${ApplicationDockerImageTag}
        MemoryReservation: 500
        LogConfiguration:
          LogDriver: awslogs
          Options:
            awslogs-group:
              Fn::Sub: ${AWS::StackName}/ecs/IntakeAcceleratorService/intake
            awslogs-region: { "Ref": "AWS::Region" }
            awslogs-stream-prefix: docker
        Environment:
          - Name: KMS_SECRET_KEY_BASE
            Value: { "Ref": "SecretKeyBaseCipher" }
          - Name: RAILS_ENV
            Value: production
          - Name: NODE_ENV
            Value: production
          - Name: API_URL
            Value: { "Ref": "ApplicationApiUrl" }
          - Name: REDIS_HOST
            Value:
              Fn::Sub: ${ApplicationCache.PrimaryEndPoint.Address}
          - Name: REDIS_PORT
            Value: "6379"
          - Name: AUTHENTICATION
            Value: { "Ref": "ApplicationAuthentication" }
          - Name: AUTHENTICATION_URL
            Value: { "Ref": "ApplicationAuthenticationUrl" }
          - Name: http_proxy
            Value:
              Fn::ImportValue: DefaultProxyURL
          - Name: https_proxy
            Value:
              Fn::ImportValue: DefaultProxyURL
          - Name: no_proxy
            Value: "169.254.169.254,localhost"
        MountPoints:
          - SourceVolume: webroot
            ContainerPath: /tmp
        Command:
          - bundle
          - exec
          - puma
          - -e
          - production
          - -b
          - unix:///tmp/app.sock
          - -C
          - config/puma.rb
      - Name: nginx
        Image:
          Fn::Sub: ${NginxDockerImage}:${NginxDockerImageTag}
        MemoryReservation: 200
        LogConfiguration:
          LogDriver: awslogs
          Options:
            awslogs-group:
              Fn::Sub: ${AWS::StackName}/ecs/IntakeAcceleratorService/nginx
            awslogs-region: { "Ref": "AWS::Region" }
            awslogs-stream-prefix: docker
        PortMappings:
        - ContainerPort: { "Ref": "ApplicationPort" }
          Protocol: tcp
        Environment:
          - Name: HTTP_PORT
            Value: { "Ref": "ApplicationPort" }
          - Name: WEB_ROOT
            Value: /ca_intake/public
          - Name: UPSTREAM_URL
            Value: unix:///tmp/app.sock
        MountPoints:
          - SourceVolume: webroot
            ContainerPath: /tmp
        VolumesFrom:
          - SourceContainer: intake
            ReadOnly: "true"
  IntakeAcceleratorService:
    Type: "AWS::ECS::Service"
    DependsOn:
      - ApplicationLoadBalancer
      - ApplicationAutoscaling
      - IntakeAcceleratorServiceLogGroup
      - IntakeAcceleratorNginxLogGroup
    Properties:
      Cluster: { "Ref": "ApplicationCluster" }
      TaskDefinition: { "Ref": "ApplicationTaskDefinition" }
      DesiredCount: { "Ref": "ApplicationAutoscalingDesiredCount"}
      DeploymentConfiguration:
          MinimumHealthyPercent: 50
          MaximumPercent: 200
      LoadBalancers:
        - ContainerName: nginx
          ContainerPort: { "Ref": "ApplicationPort" }
          TargetGroupArn: { "Ref": "IntakeAcceleratorServiceTargetGroup" }
      Role: { "Ref": "EcsServiceRole" }
  EcsServiceRole:
    Type: "AWS::IAM::Role"
    Properties:
      AssumeRolePolicyDocument:
        Version: "2012-10-17"
        Statement:
          - Effect: "Allow"
            Principal:
              Service: [ "ecs.amazonaws.com" ]
            Action: [ "sts:AssumeRole" ]
      Path: "/"
      ManagedPolicyArns:
        - "arn:aws:iam::aws:policy/service-role/AmazonEC2ContainerServiceRole"
  DmesgLogGroup:
    Type: "AWS::Logs::LogGroup"
    DeletionPolicy: "Delete"
    Properties:
      LogGroupName:
        Fn::Sub: ${AWS::StackName}/ec2/ApplicationAutoscaling/var/log/dmesg
      RetentionInDays: { "Ref": "LogRetention" }
  DockerLogGroup:
    Type: "AWS::Logs::LogGroup"
    DeletionPolicy: "Delete"
    Properties:
      LogGroupName:
        Fn::Sub: ${AWS::StackName}/ec2/ApplicationAutoscaling/var/log/docker
      RetentionInDays: { "Ref": "LogRetention" }
  EcsAgentLogGroup:
    Type: "AWS::Logs::LogGroup"
    DeletionPolicy: "Delete"
    Properties:
      LogGroupName:
        Fn::Sub: ${AWS::StackName}/ec2/ApplicationAutoscaling/var/log/ecs/ecs-agent
      RetentionInDays: { "Ref": "LogRetention" }
  EcsInitLogGroup:
    Type: "AWS::Logs::LogGroup"
    DeletionPolicy: "Delete"
    Properties:
      LogGroupName:
        Fn::Sub: ${AWS::StackName}/ec2/ApplicationAutoscaling/var/log/ecs/ecs-init
      RetentionInDays: { "Ref": "LogRetention" }
  MessagesLogGroup:
    Type: "AWS::Logs::LogGroup"
    DeletionPolicy: "Delete"
    Properties:
      LogGroupName:
        Fn::Sub: ${AWS::StackName}/ec2/ApplicationAutoscaling/var/log/messages
      RetentionInDays: { "Ref": "LogRetention" }
  IntakeAcceleratorServiceLogGroup:
    Type: "AWS::Logs::LogGroup"
    DeletionPolicy: "Delete"
    Properties:
      LogGroupName:
        Fn::Sub: ${AWS::StackName}/ecs/IntakeAcceleratorService/intake
      RetentionInDays: { "Ref": "LogRetention" }
  IntakeAcceleratorNginxLogGroup:
    Type: "AWS::Logs::LogGroup"
    DeletionPolicy: "Delete"
    Properties:
      LogGroupName:
        Fn::Sub: ${AWS::StackName}/ecs/IntakeAcceleratorService/nginx
      RetentionInDays: { "Ref": "LogRetention" }
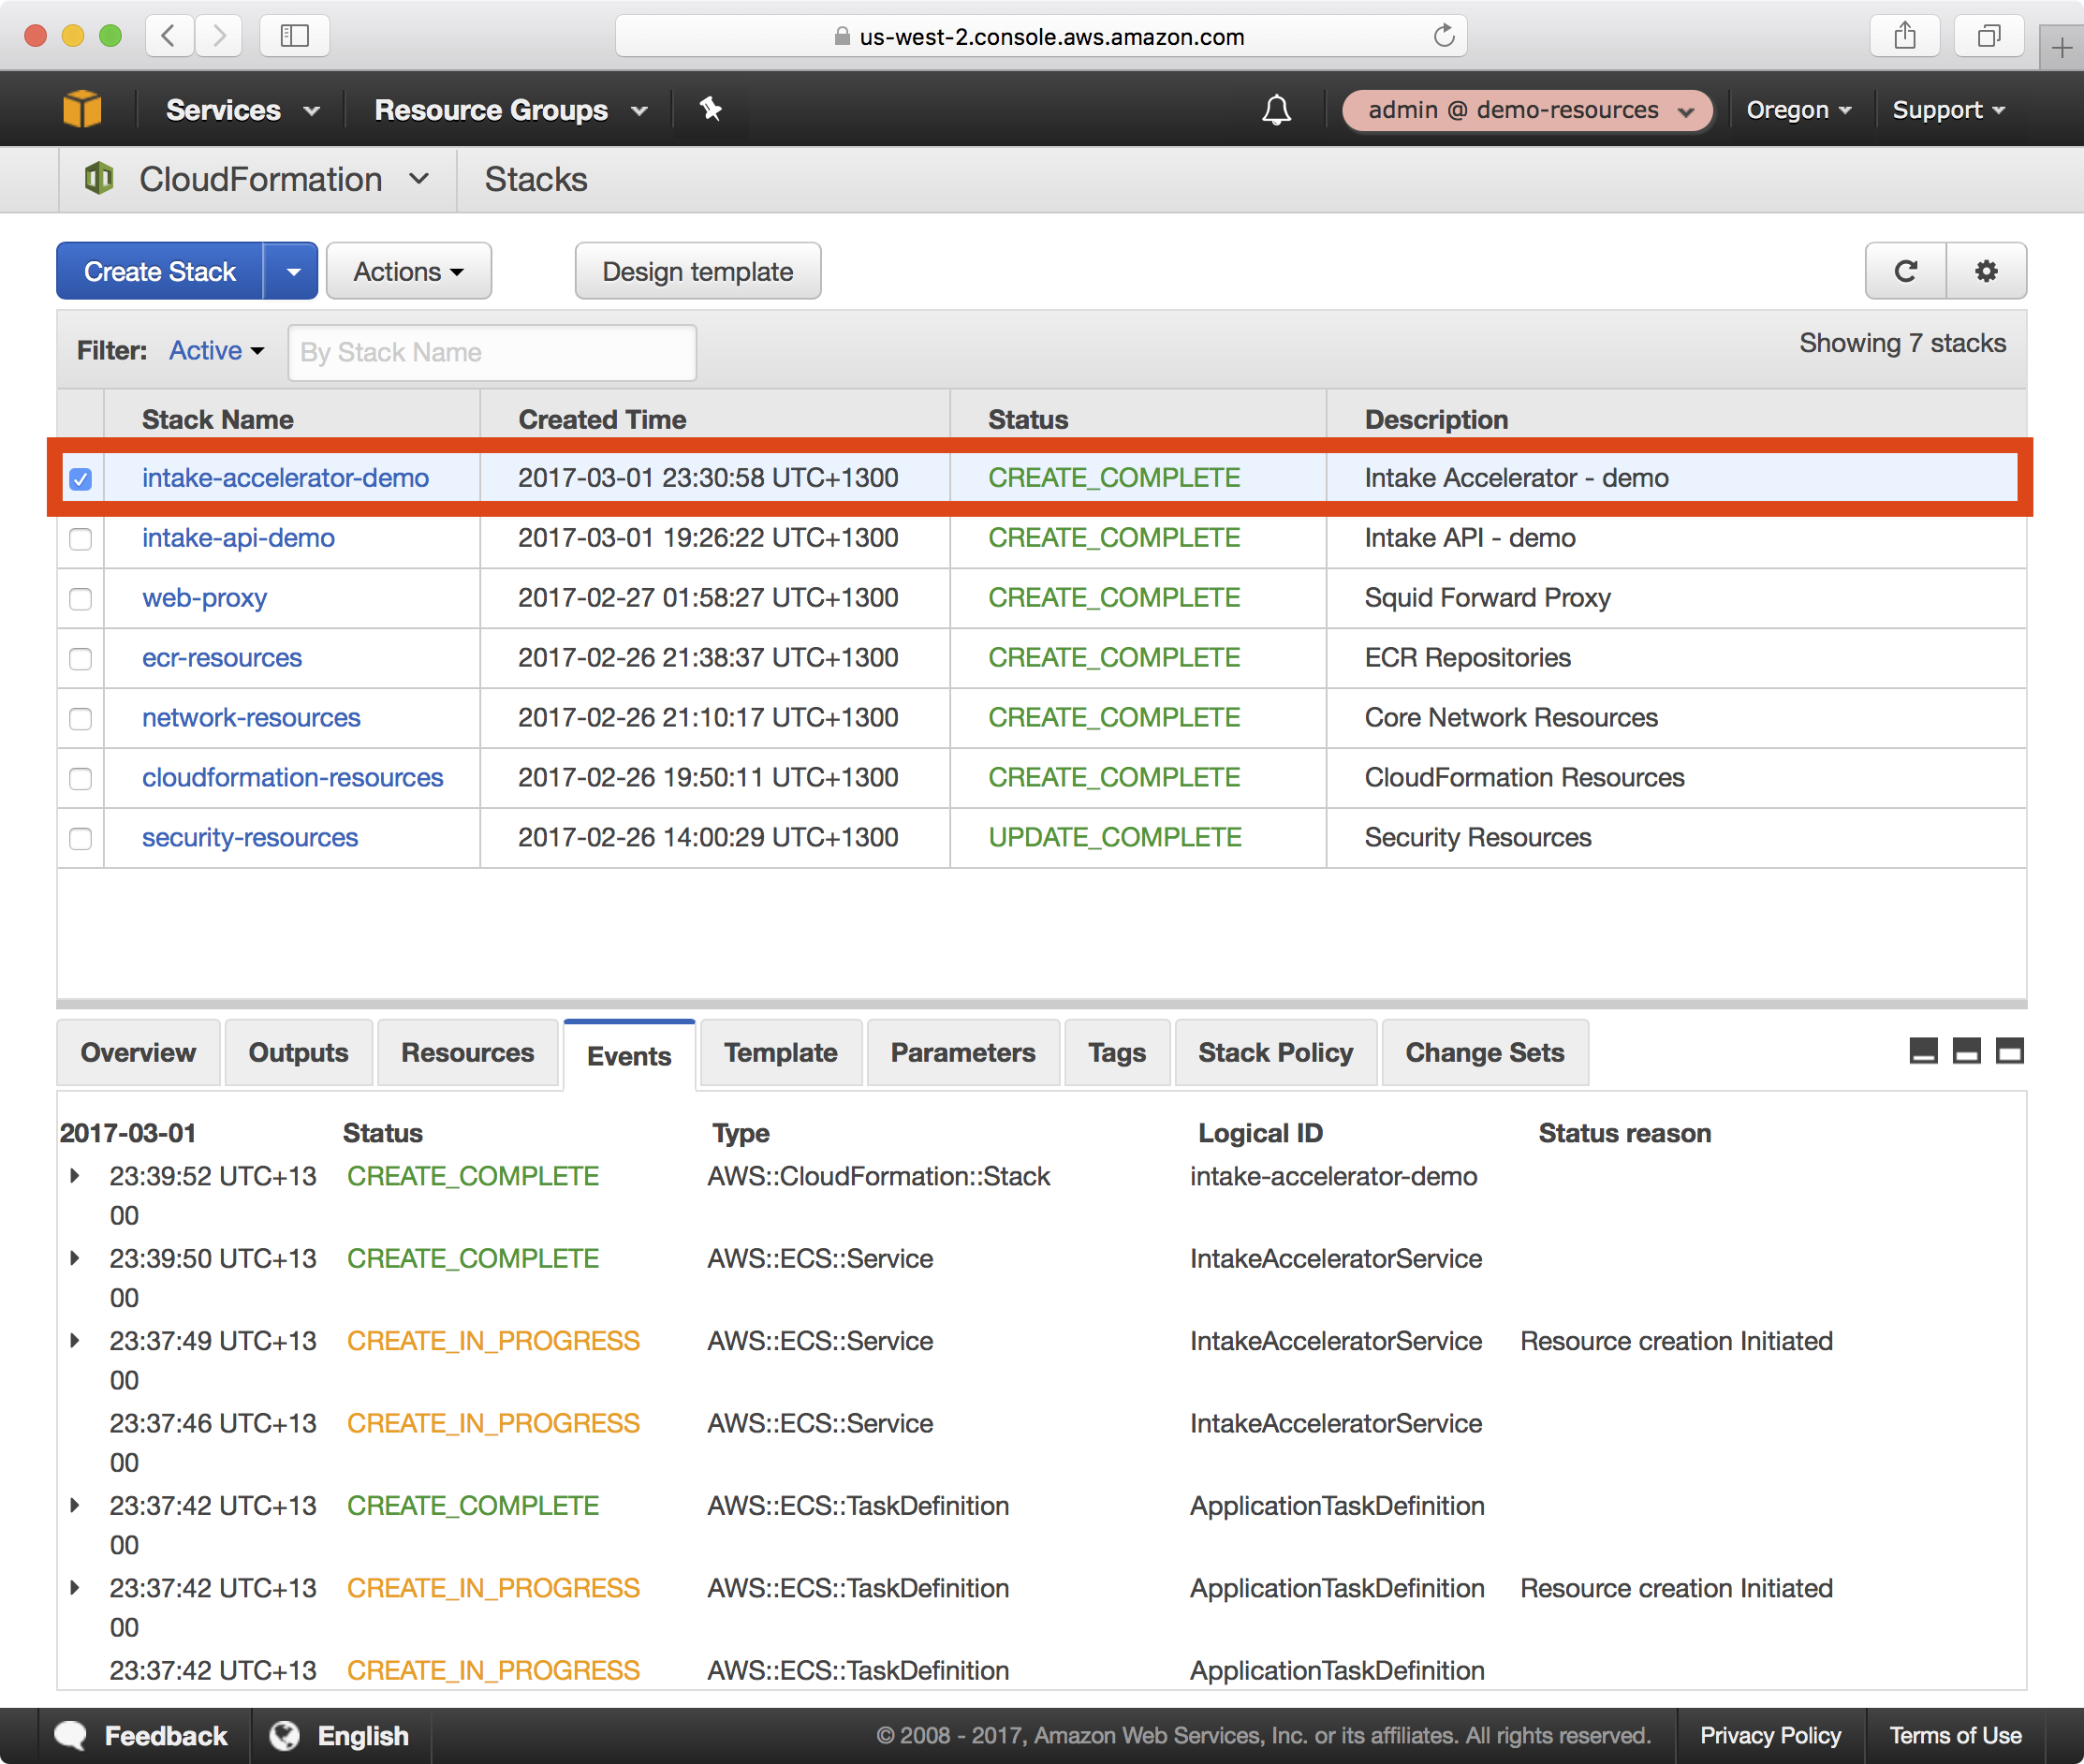
4. Once the playbook execution completes successfully, login to the demo-resources account in the AWS console. You should see a new CloudFormation stack called intake-accelerator-demo in the CloudFormation dashboard:
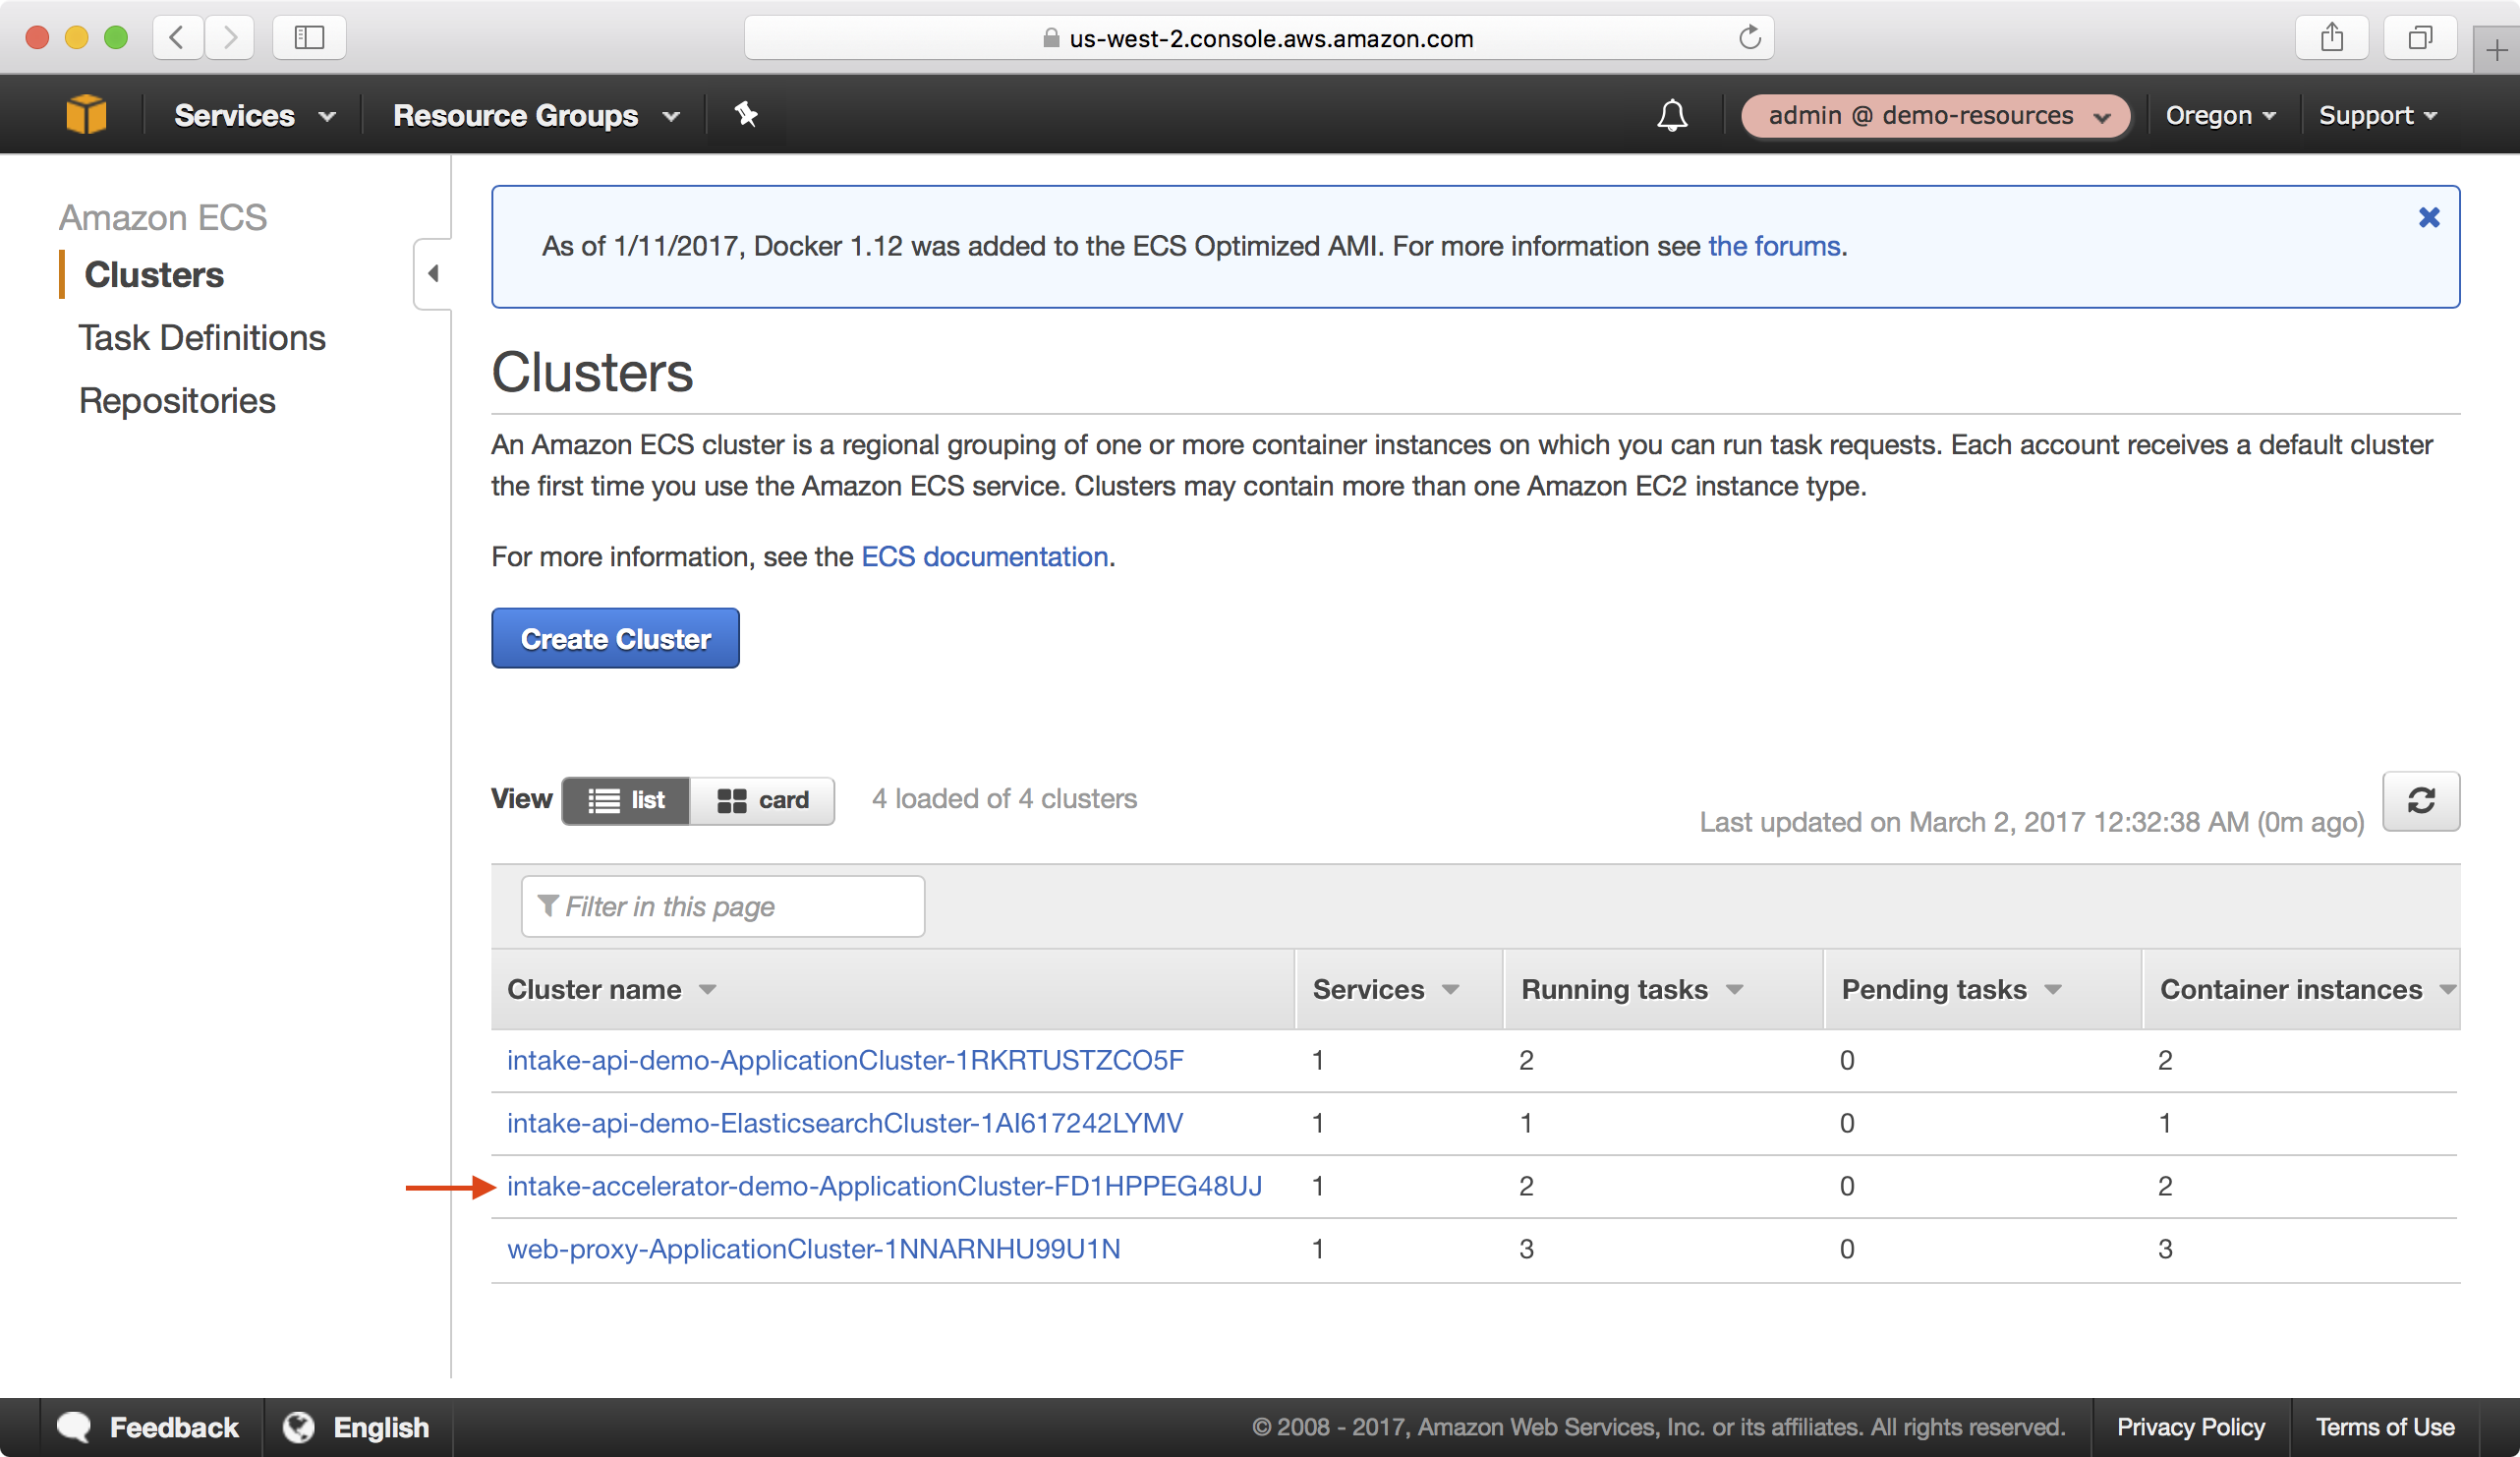
5. If you navigate to ECS > Clusters you should be able to see the ECS cluster for the Intake Accelerator application.
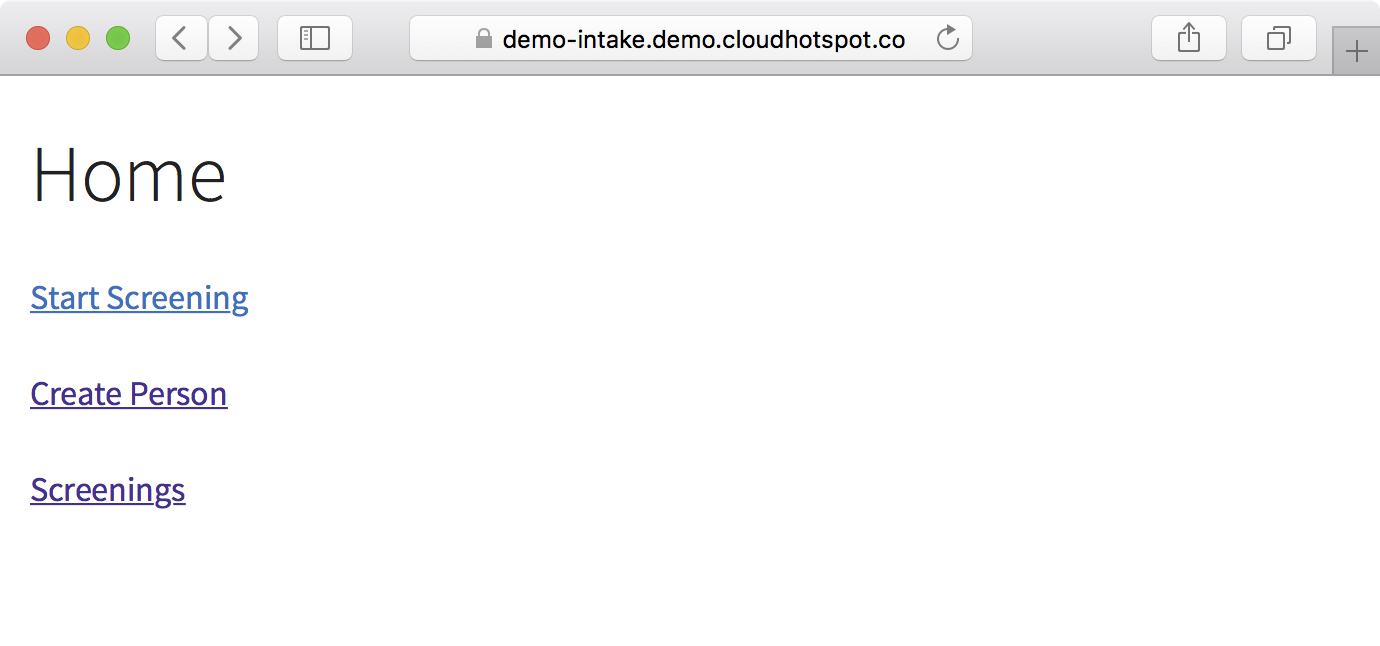
6. You can verify the Intake Accelerator is functional by browsing to https://demo-intake.demo.cloudhotspot.co/:
Wrap Up
We first published a Docker image required for the Intake Accelerator stack to the ECR repository created earlier in this tutotial. We then created a new environment in the Intake Accelerator playbook, learned how to encrypt secrets using the AWS KMS key created earlier in the CloudFormation resources stack, and finally successully deployed the Intake Accelerator stack.