Security Resources
Introduction
The initial set of AWS resources that need to be created for any AWS account are security resources, which establish the base IAM roles and groups that are required to create and manage additional AWS resources in each account.
In this tutorial, we first need to create security resources for the Demo Users account, after which we need to establish create security resources in the Demo Resources account.
Security Resources Template
The aws-cloudformation role includes a security resources template that is designed to define the following security resources:
- IAM roles
- IAM groups
- ACM certificates
By default, without any custom configuration, the security template creates the following resources:
- An admin IAM role that has the AWS AdministratorAccess managed policy attached and trusts your AWS account and an optional list of other AWS accounts to assume the role
- An Administrators IAM group that has an IAM policy attached that permits members of this group the ability to assume the admin role.
- A Users IAM group that has an IAM policy attached that enforces a requirement for multi-factor authentication (MFA) for all AWS operations except for a minimal set of IAM operations that allow a user to register/resync his/her MFA device and change his/her password.
Creating a Temporary User
The security resources stack is the first stack you will create in a given AWS account, and requires a temporary administrative user to be created with an API access key configured to run the security resources playbook. This temporary user is required to seed an initial administrative IAM role - once established, we can remove the temporary user and configure regular users that can assume the administrative IAM role as required to manage all AWS resources in the account.
We will first create a temporary user in the Demo Users account - later on you will repeat these instructions to create a temporary user in the Demo Resources account.
These instructions assume you are configuring a new account and have logged in to the account using root credentials to perform initial setup.
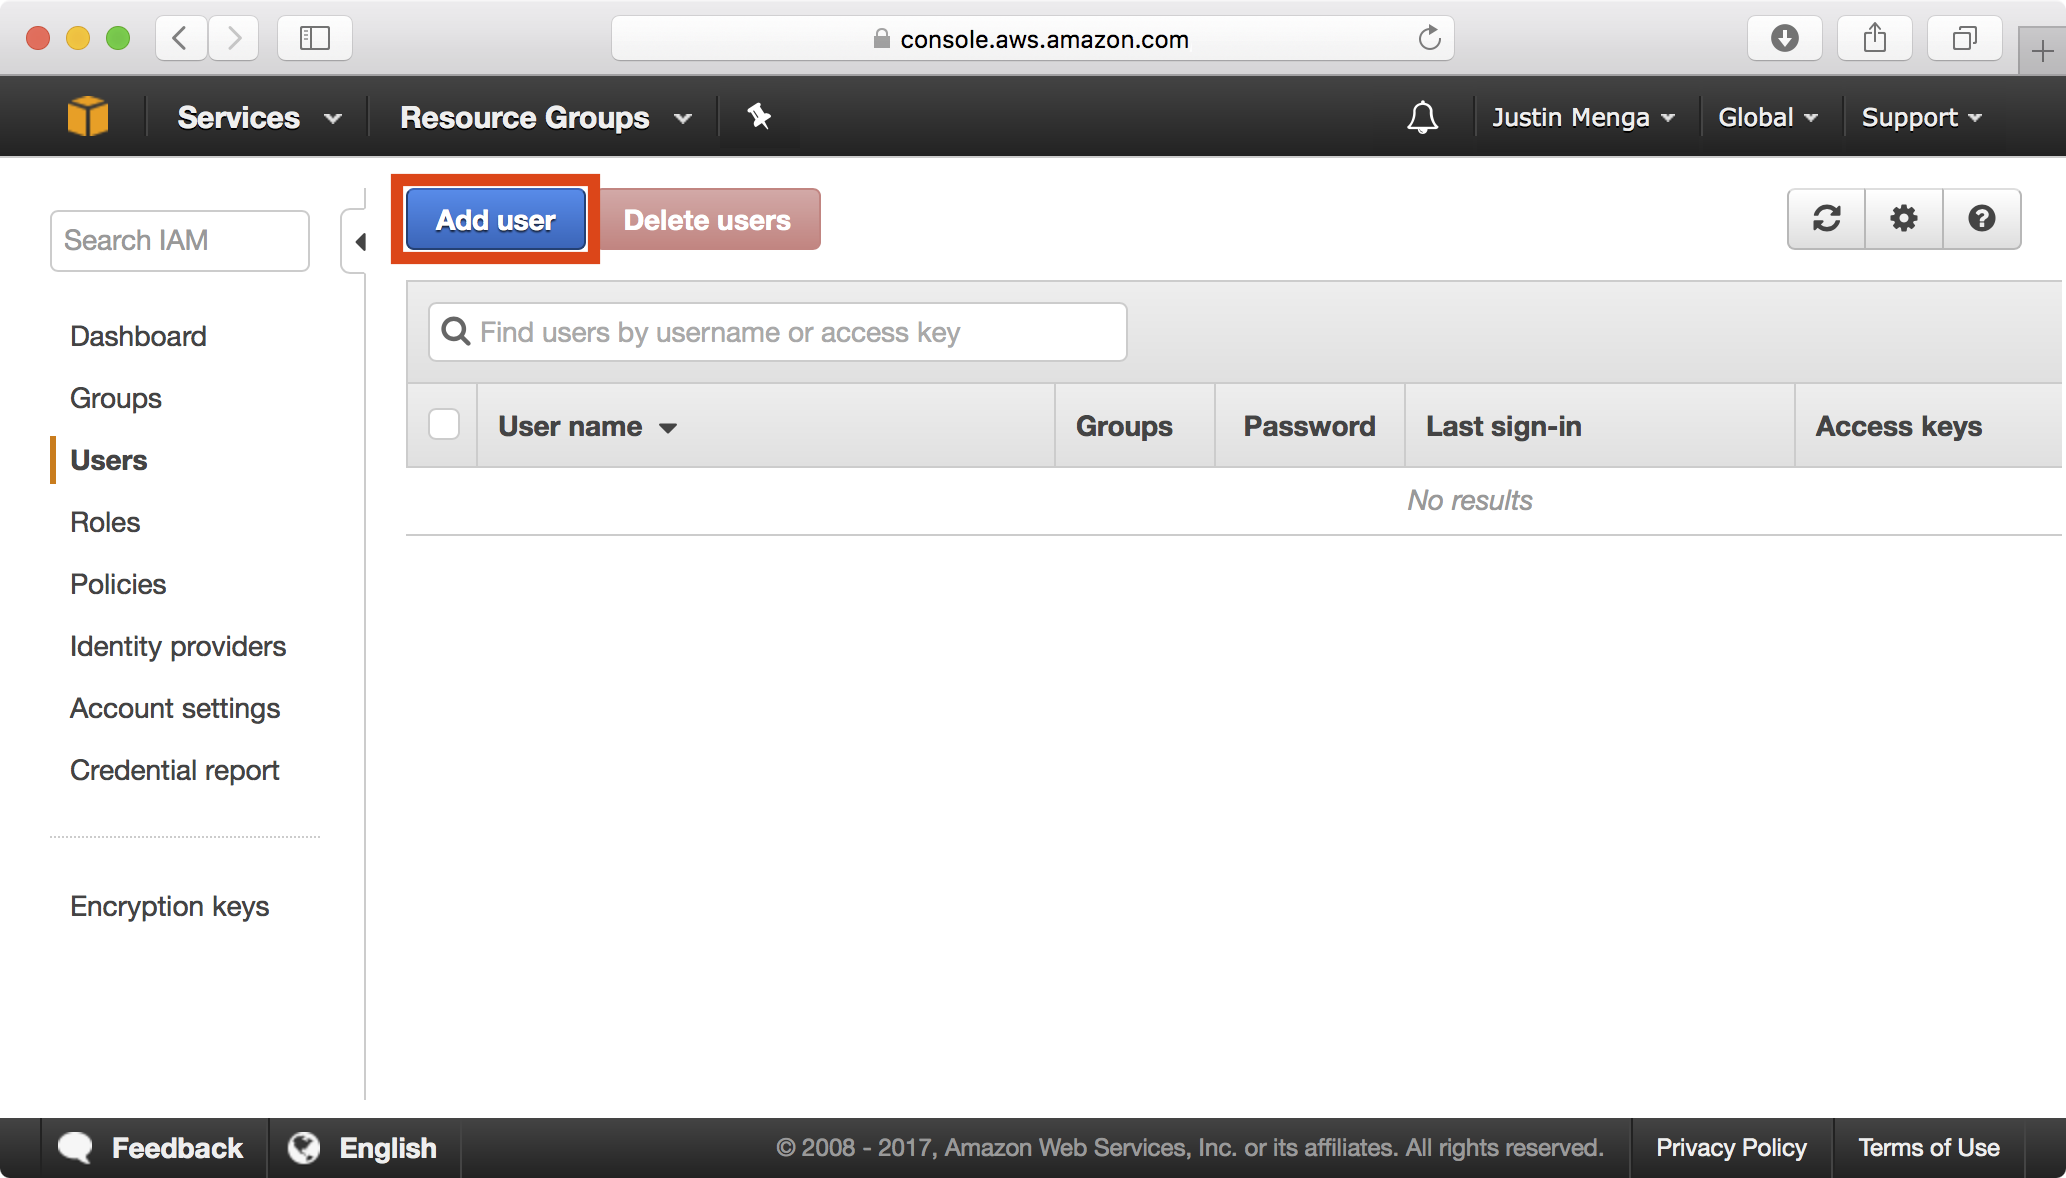
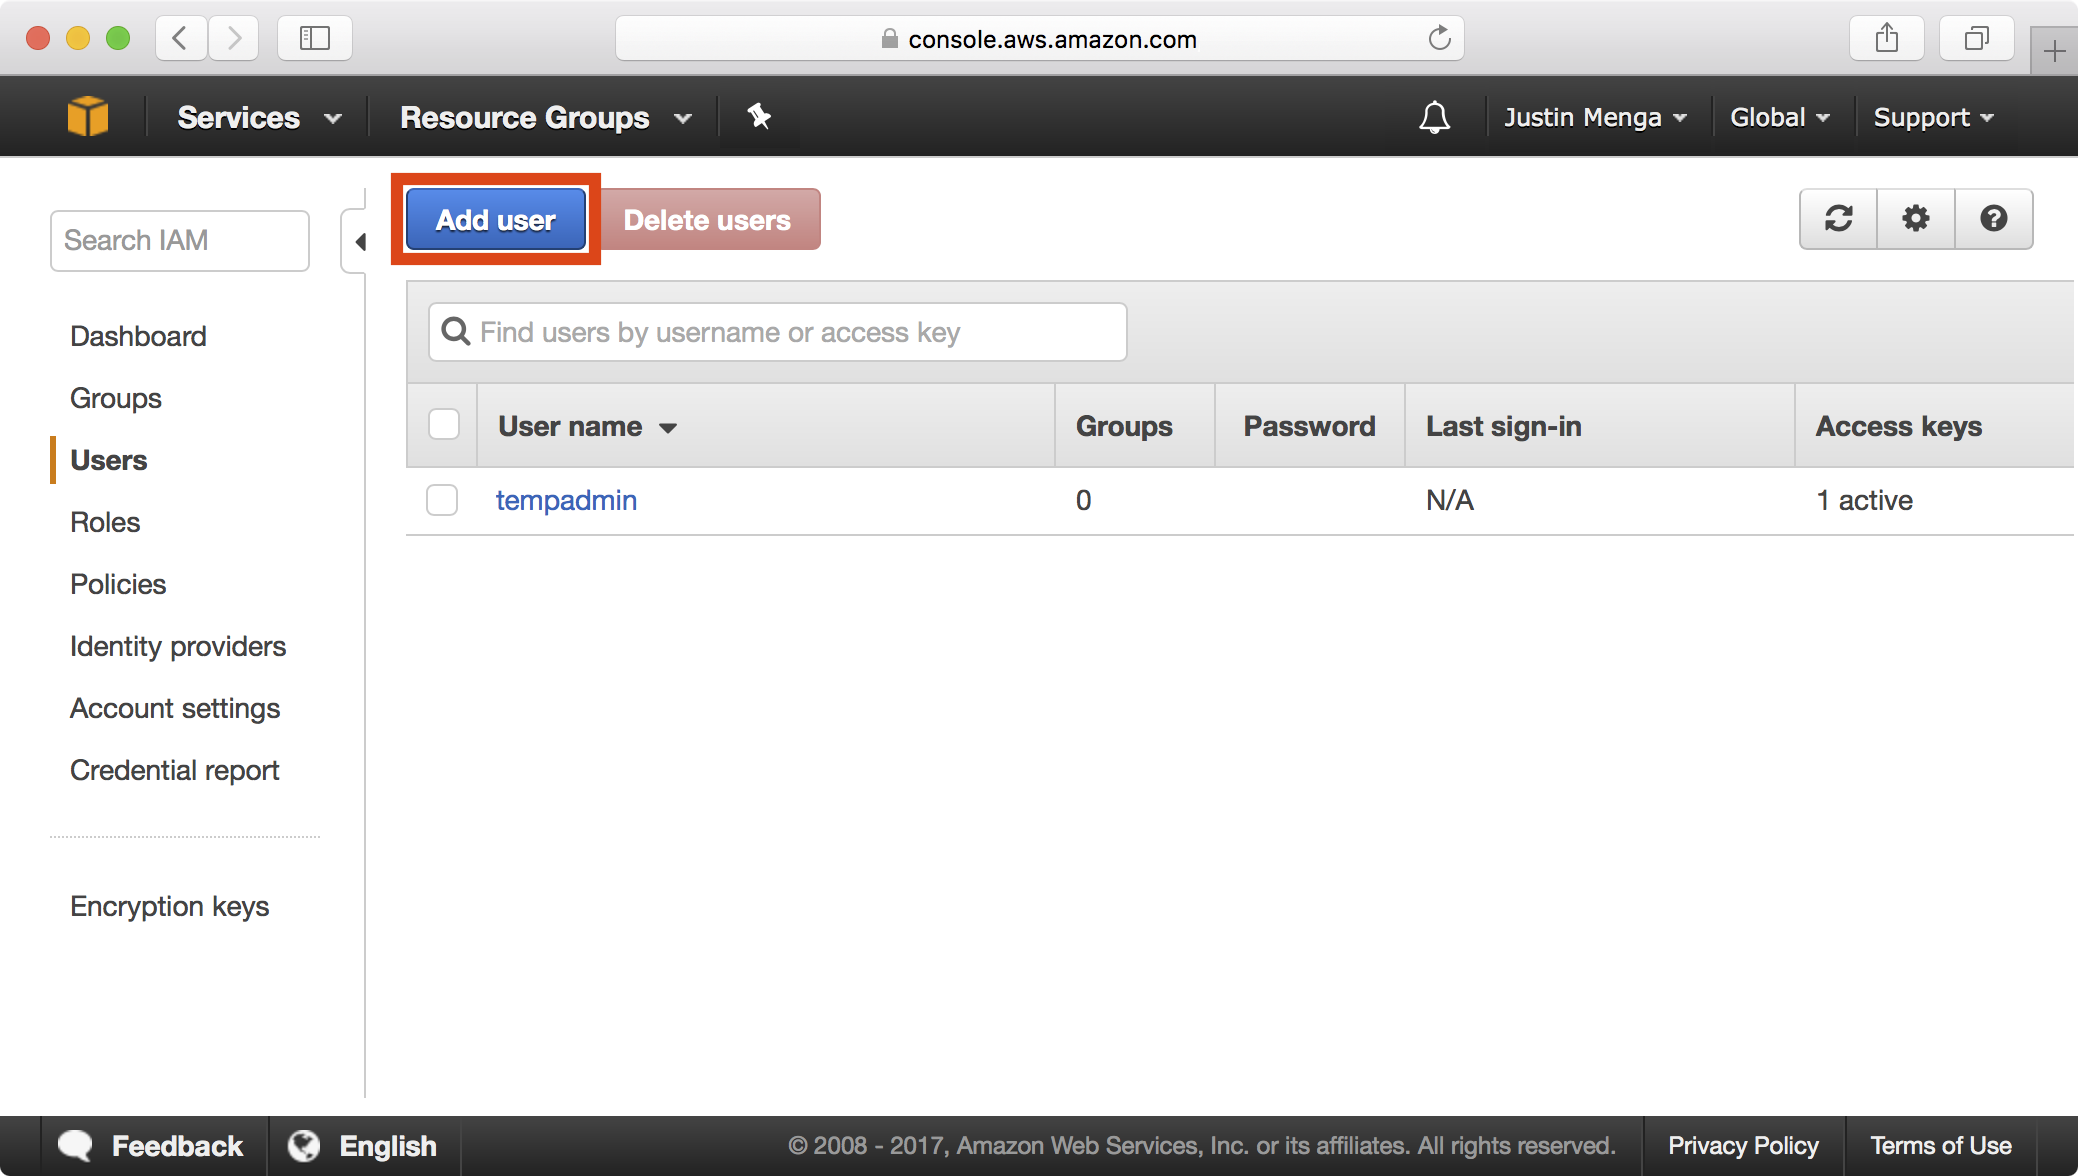
In the IAM dashboard, select Users on the left panel and click Add User.
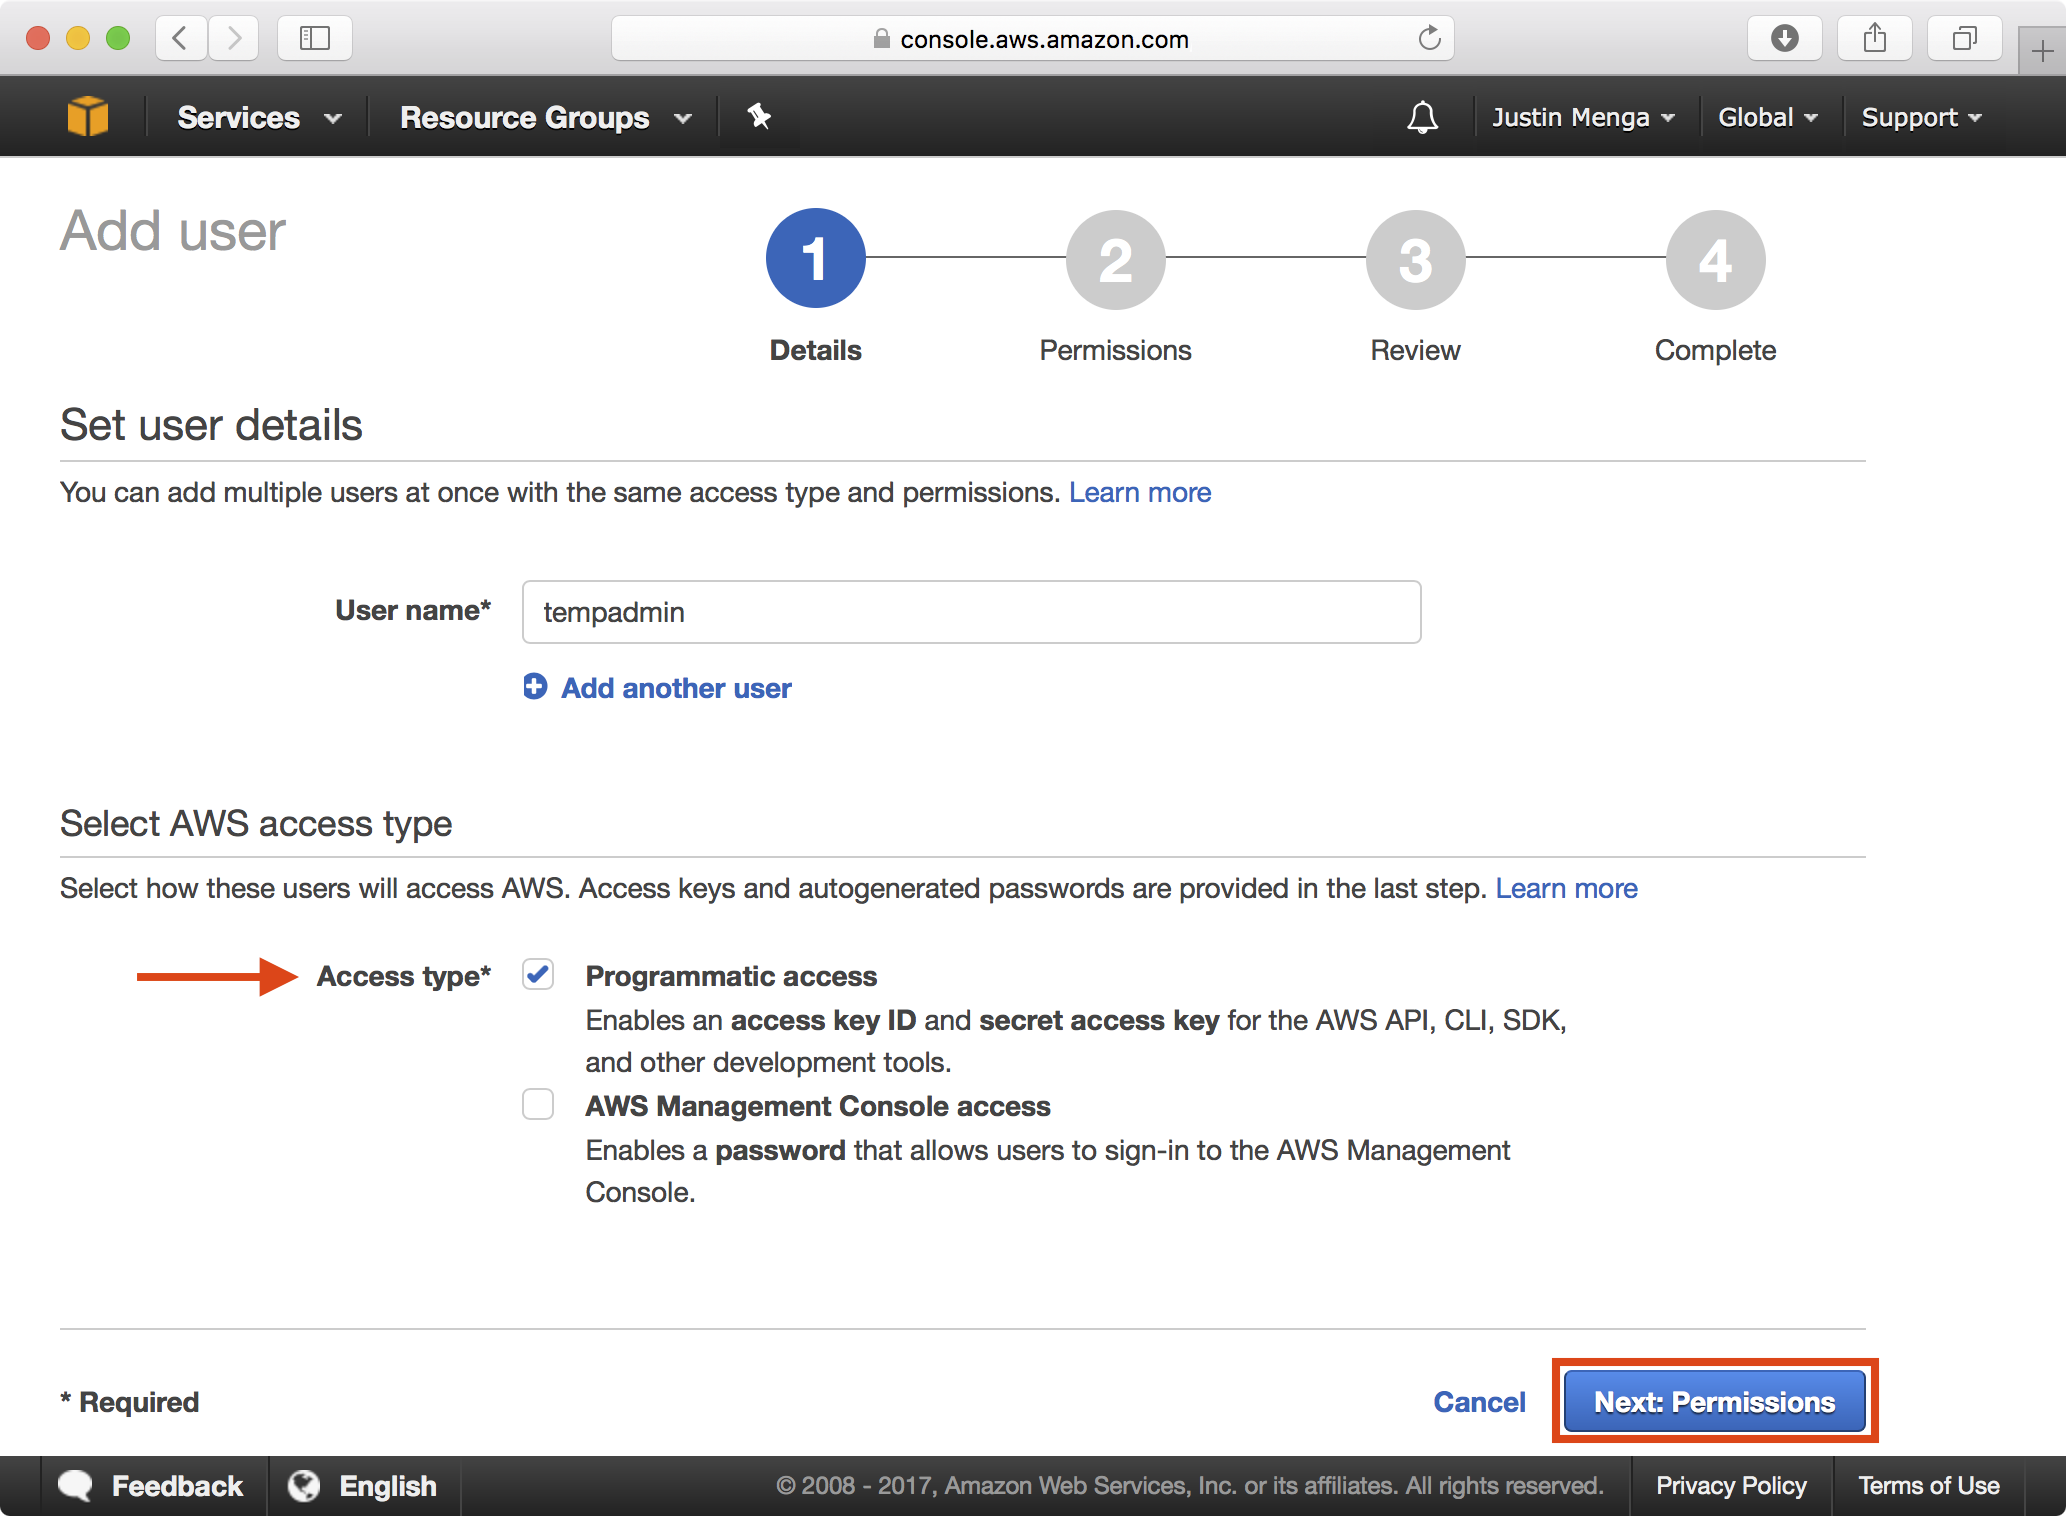
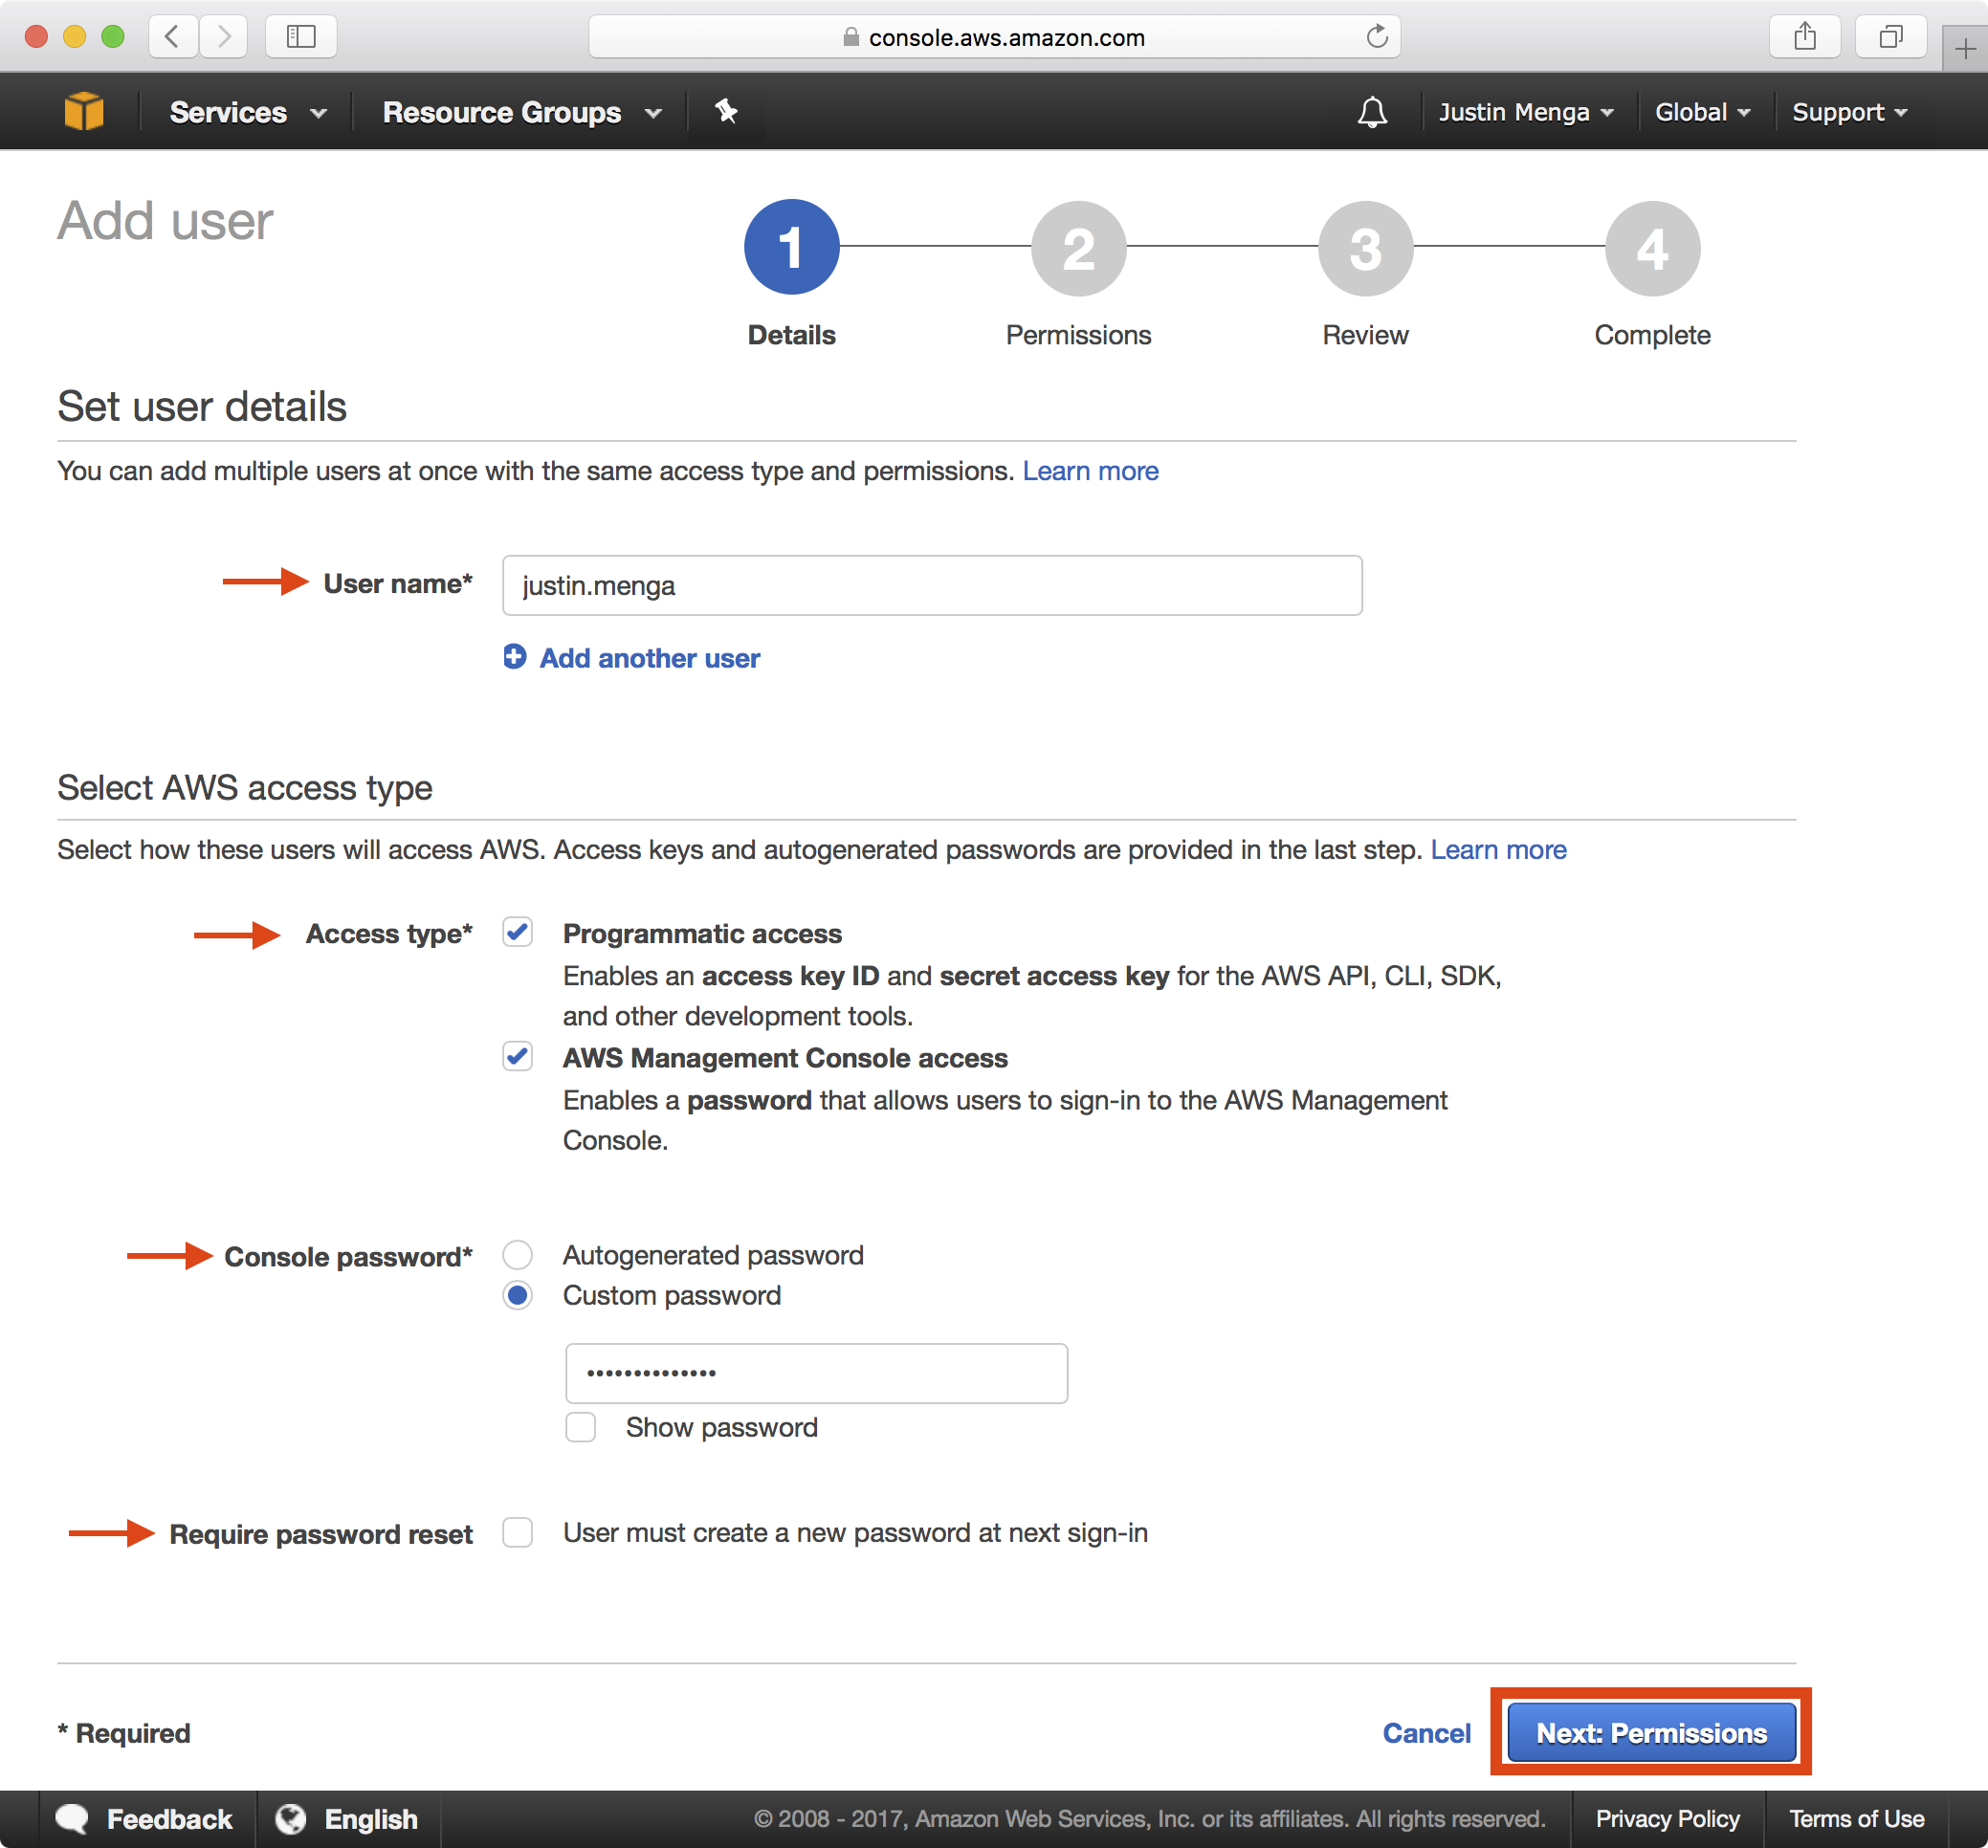
Specify an appropriate user name, select the option to enable Programmatic access, and click Next: Permissions.
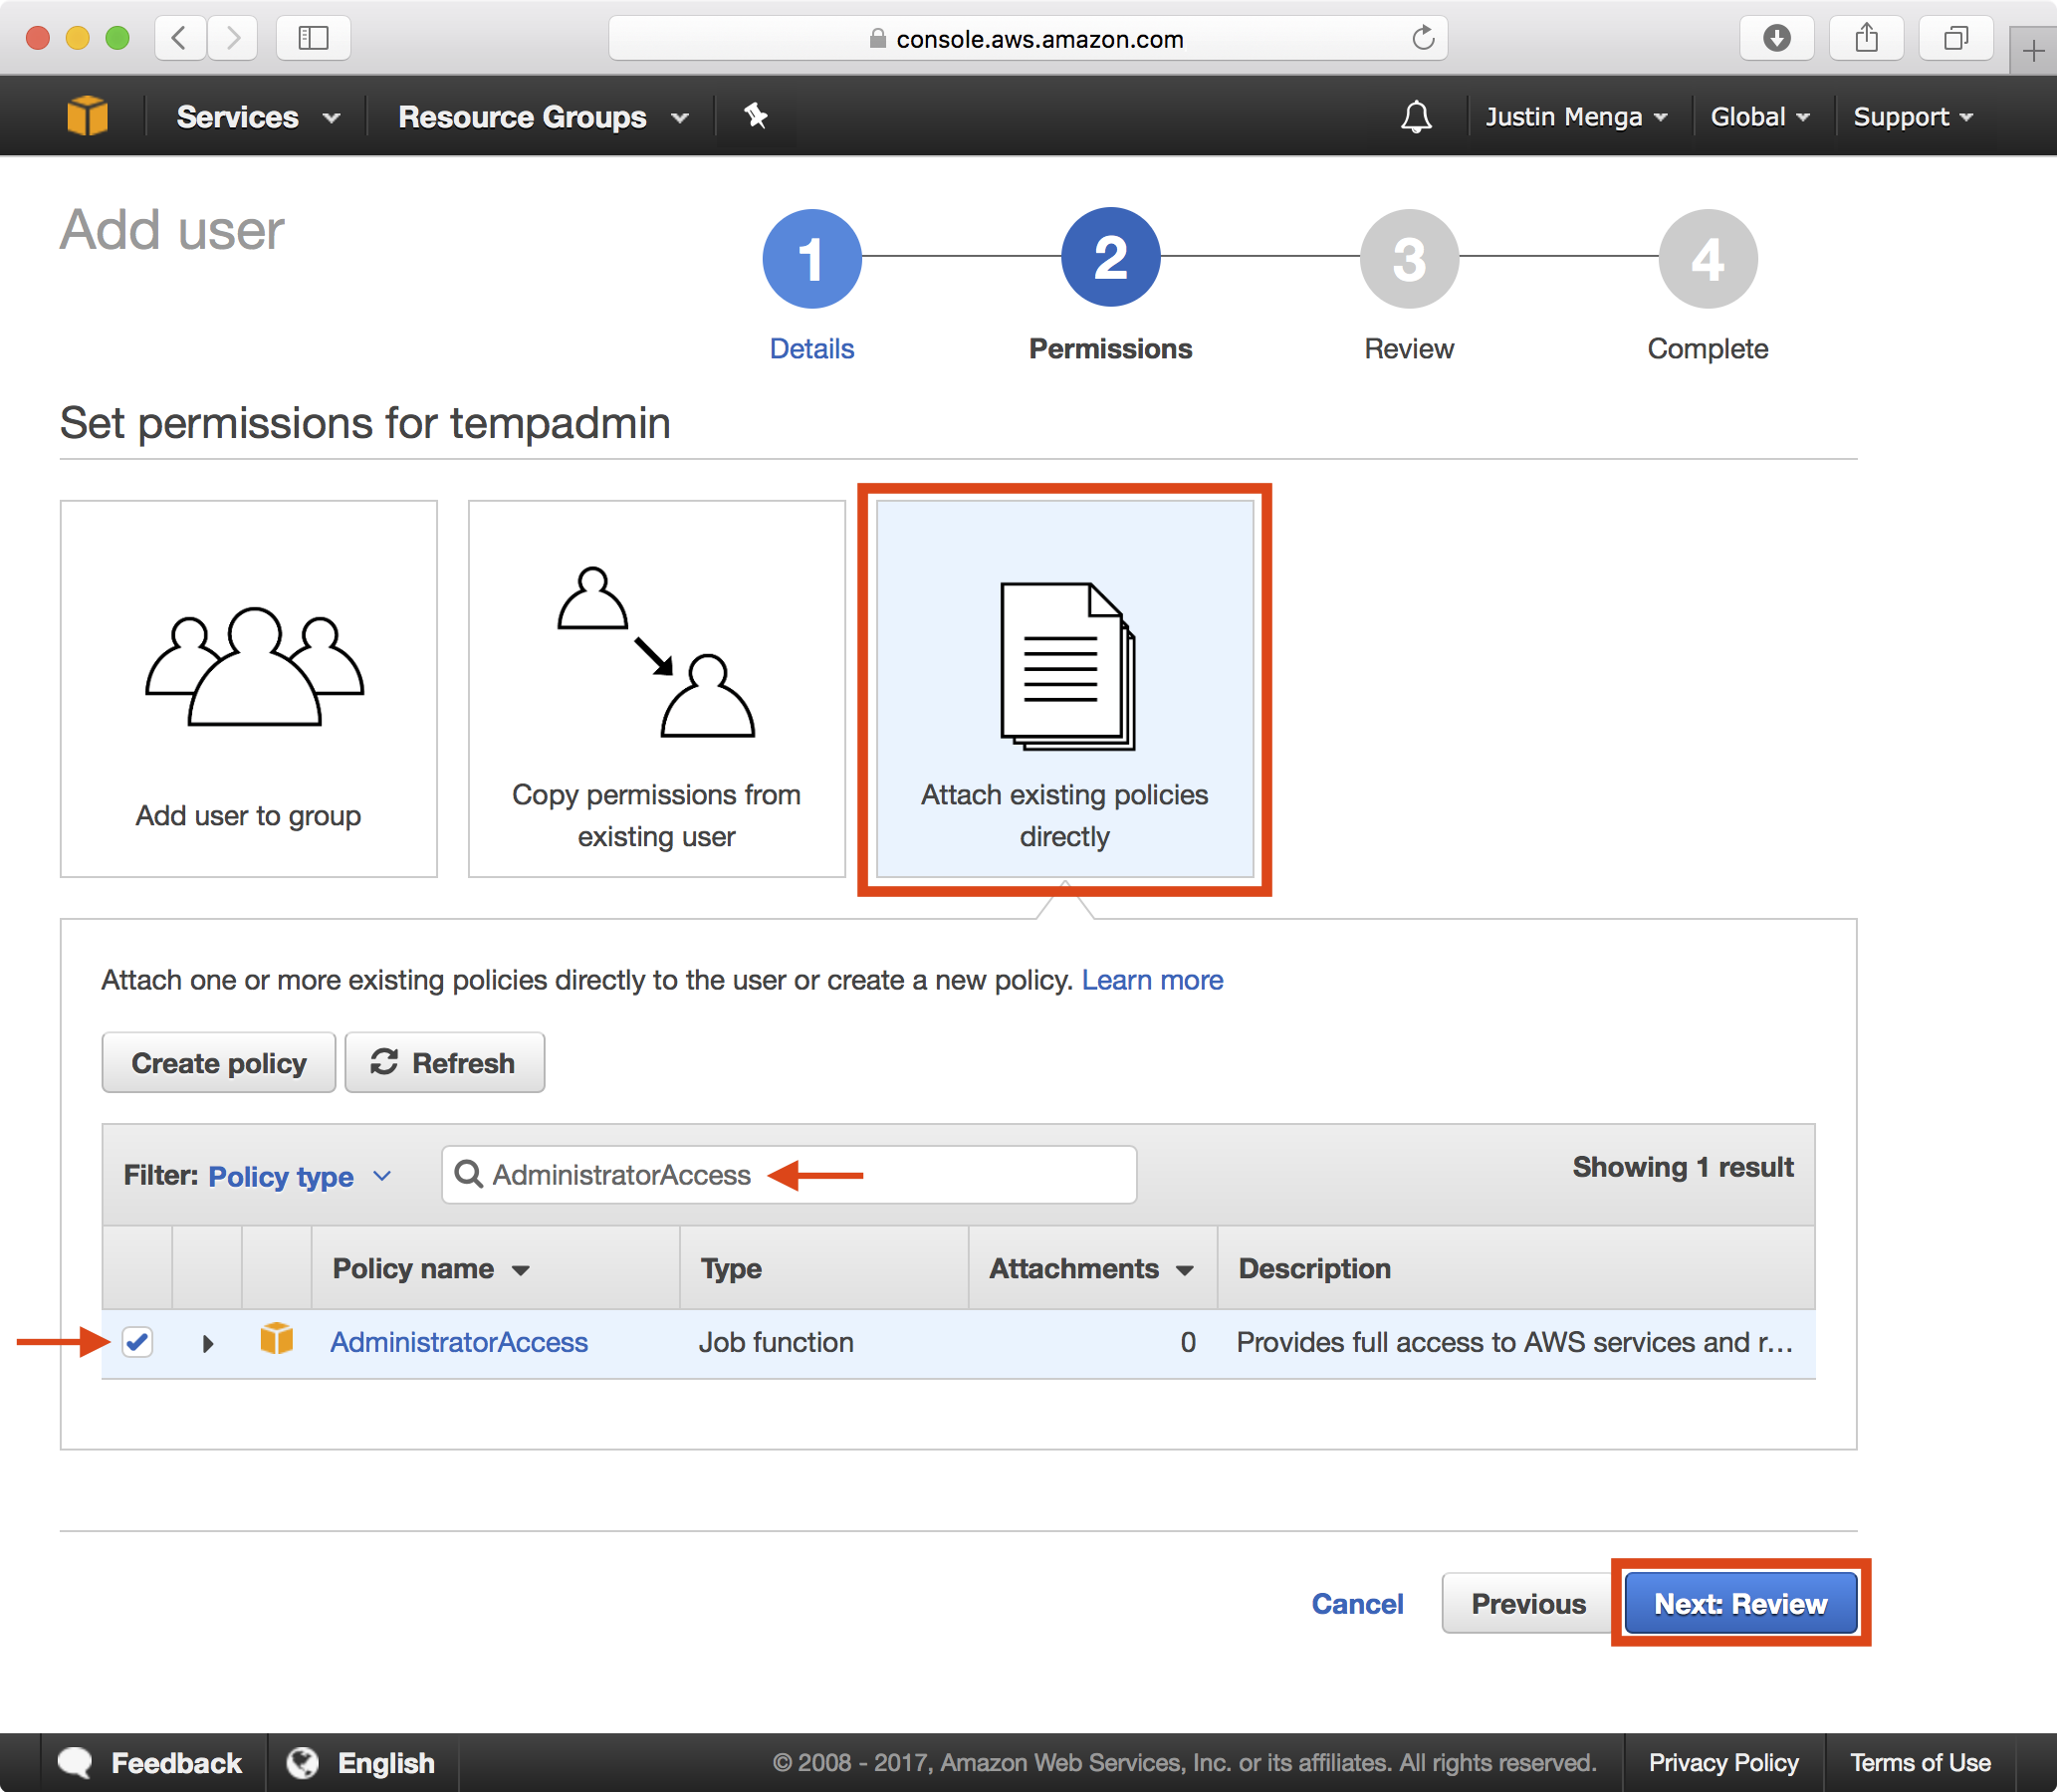
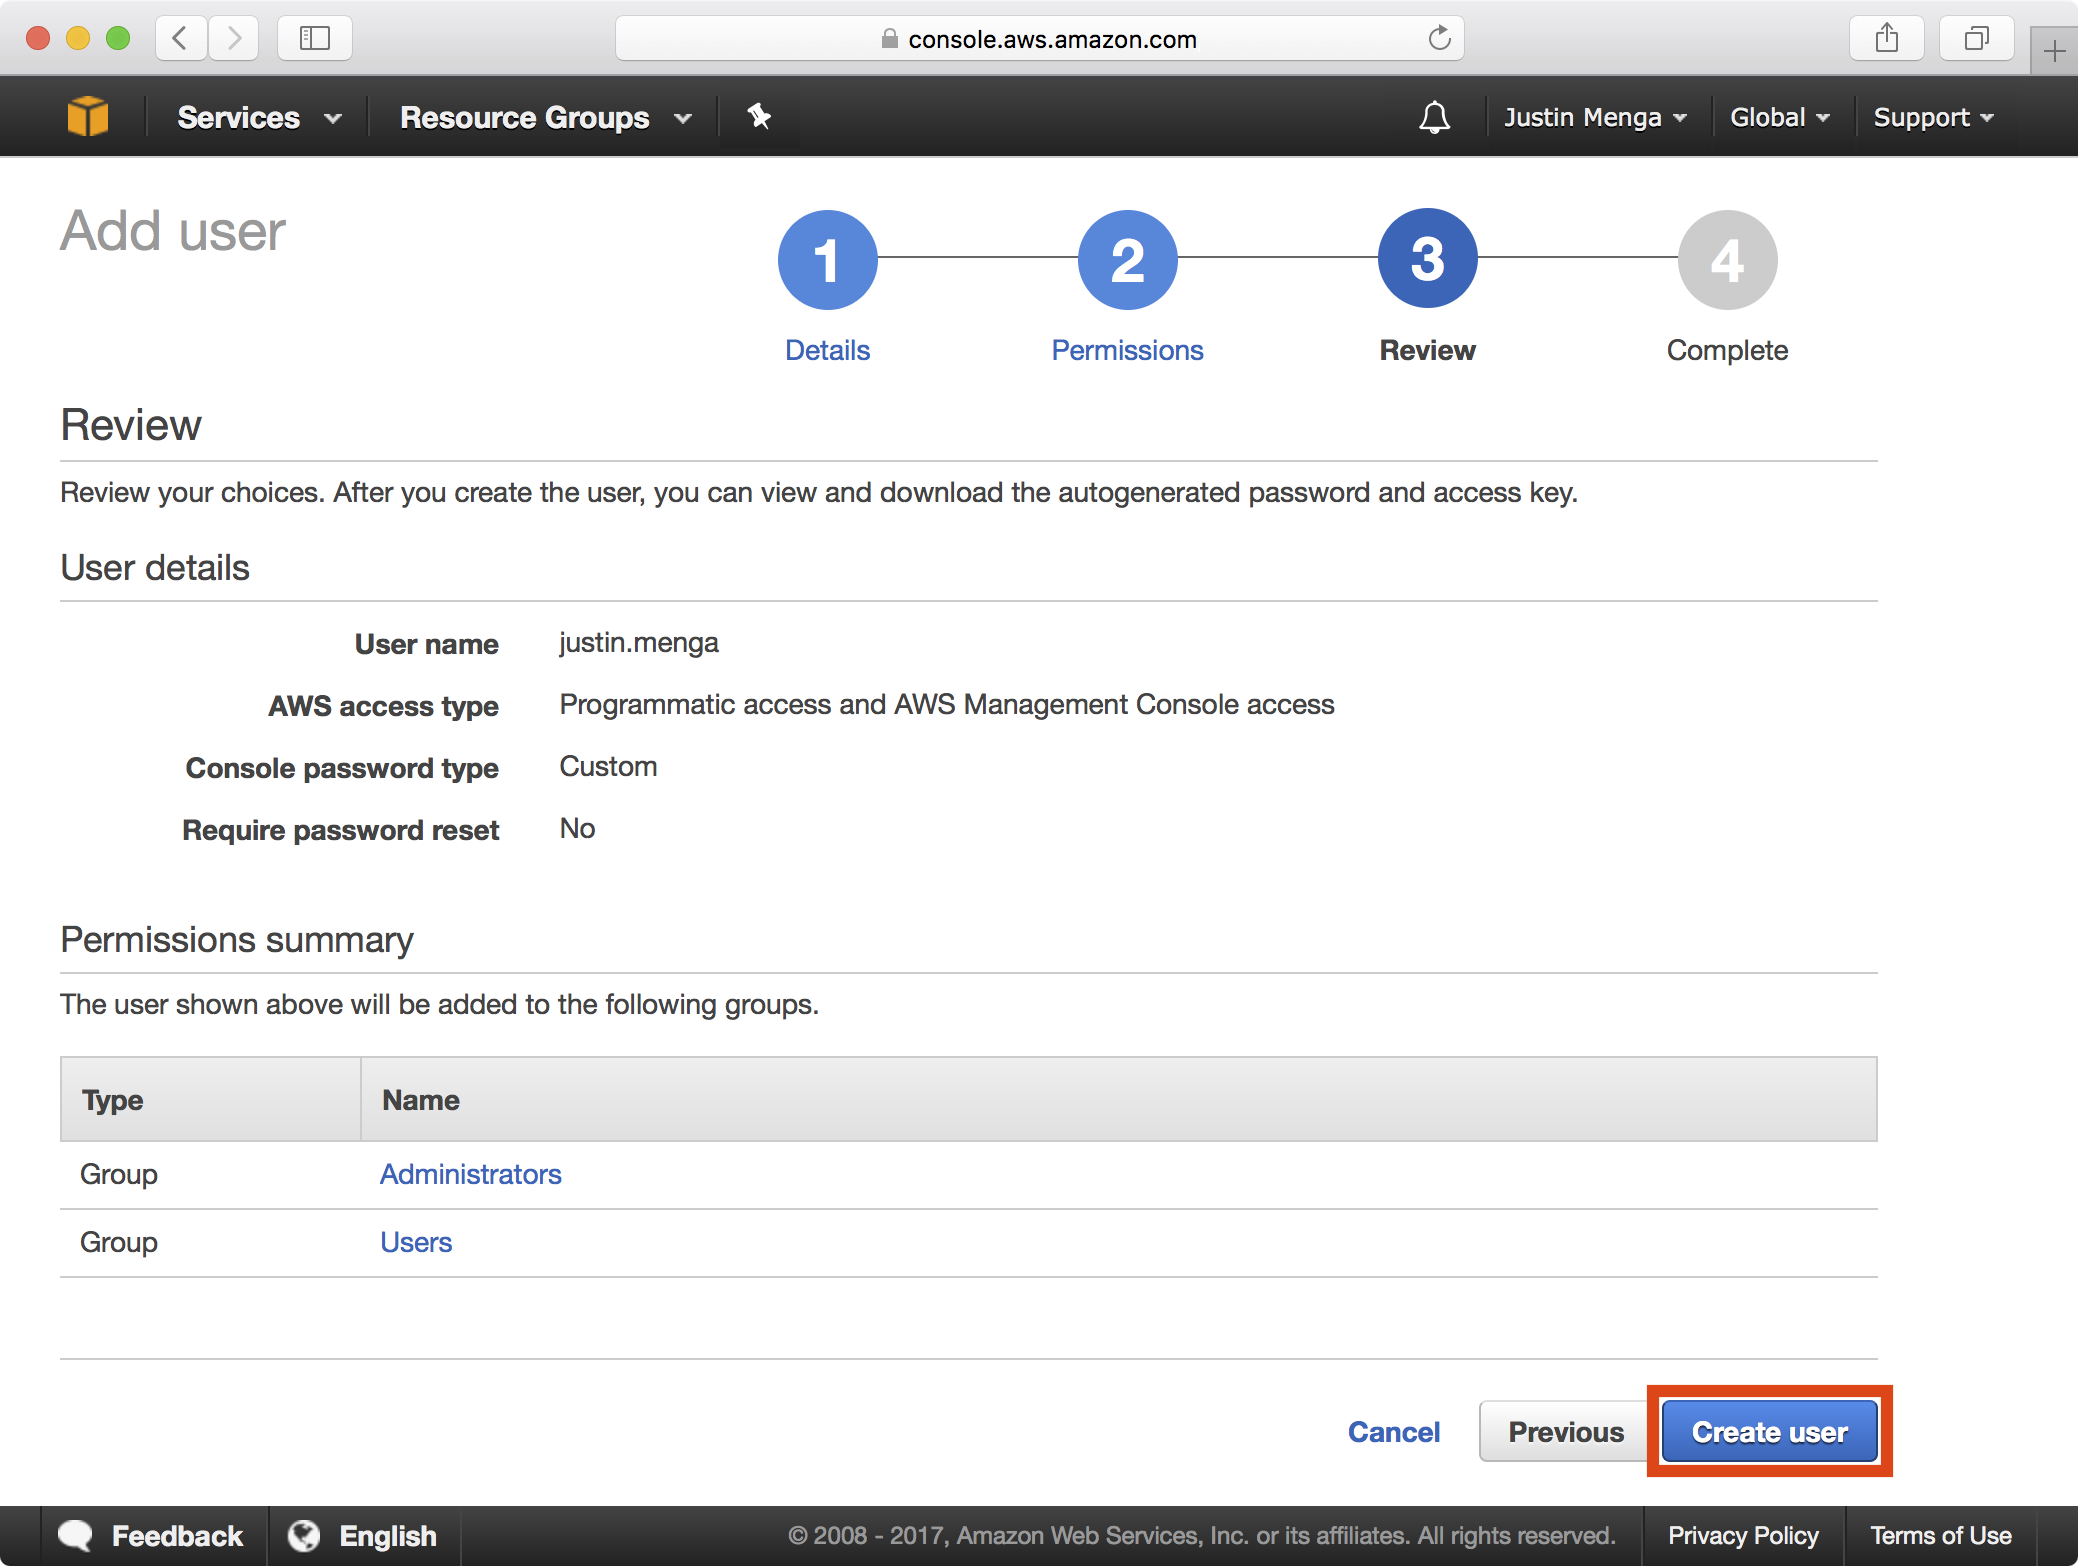
Select the Attach existing policies directly option and type AdministratorAccess in the Filter input. Ensure the AdministratorAccess policy is selected and then click Next: Review.
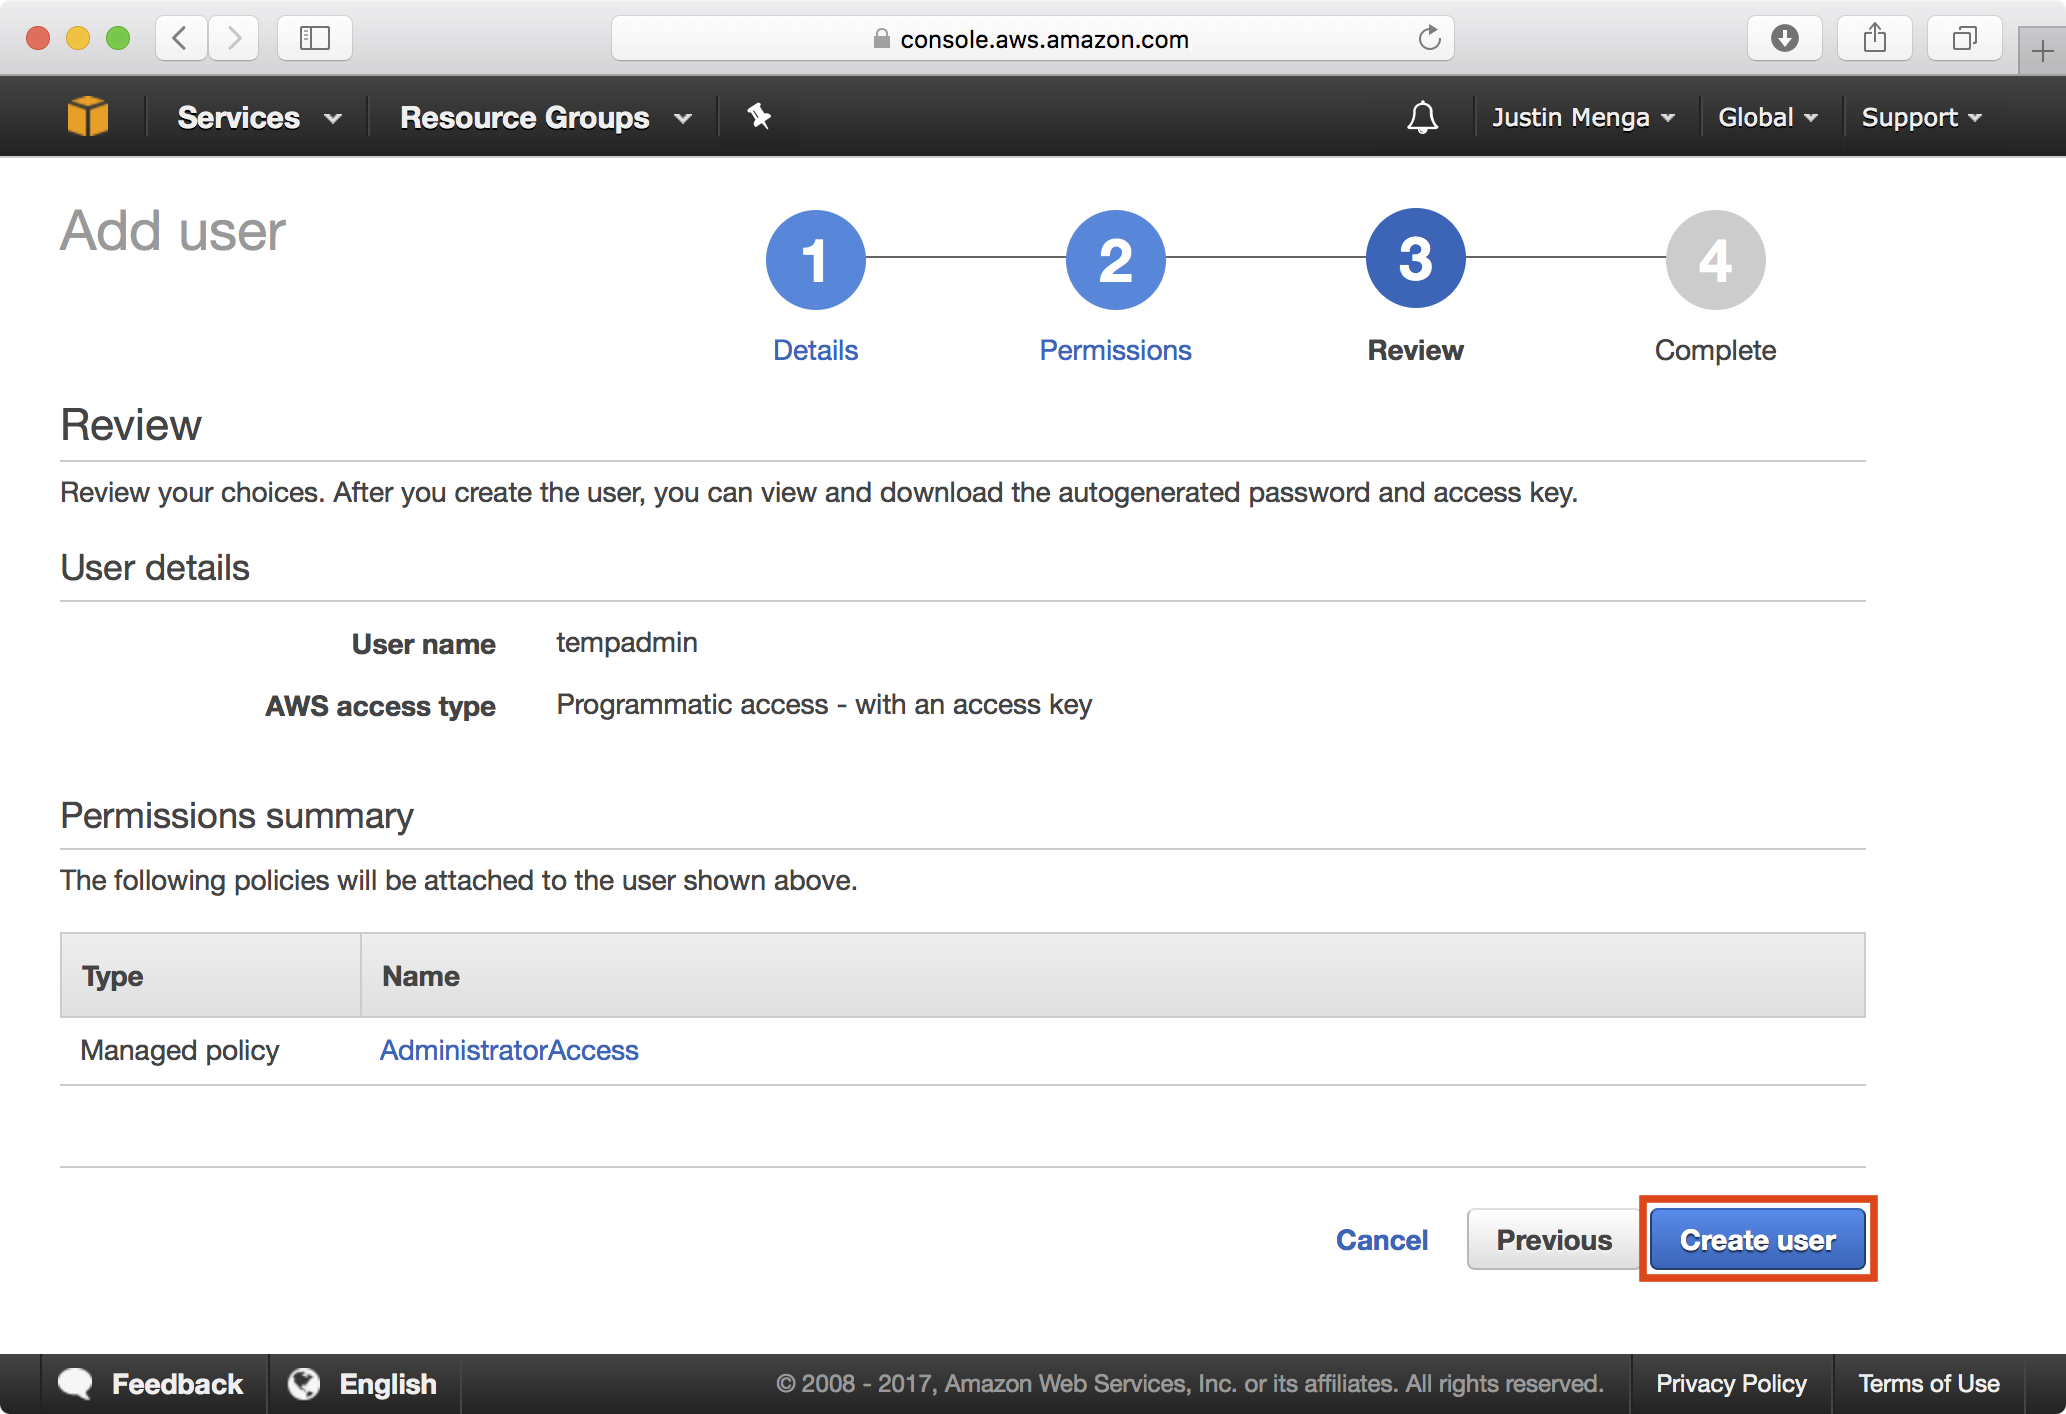
Click on the Create User button.
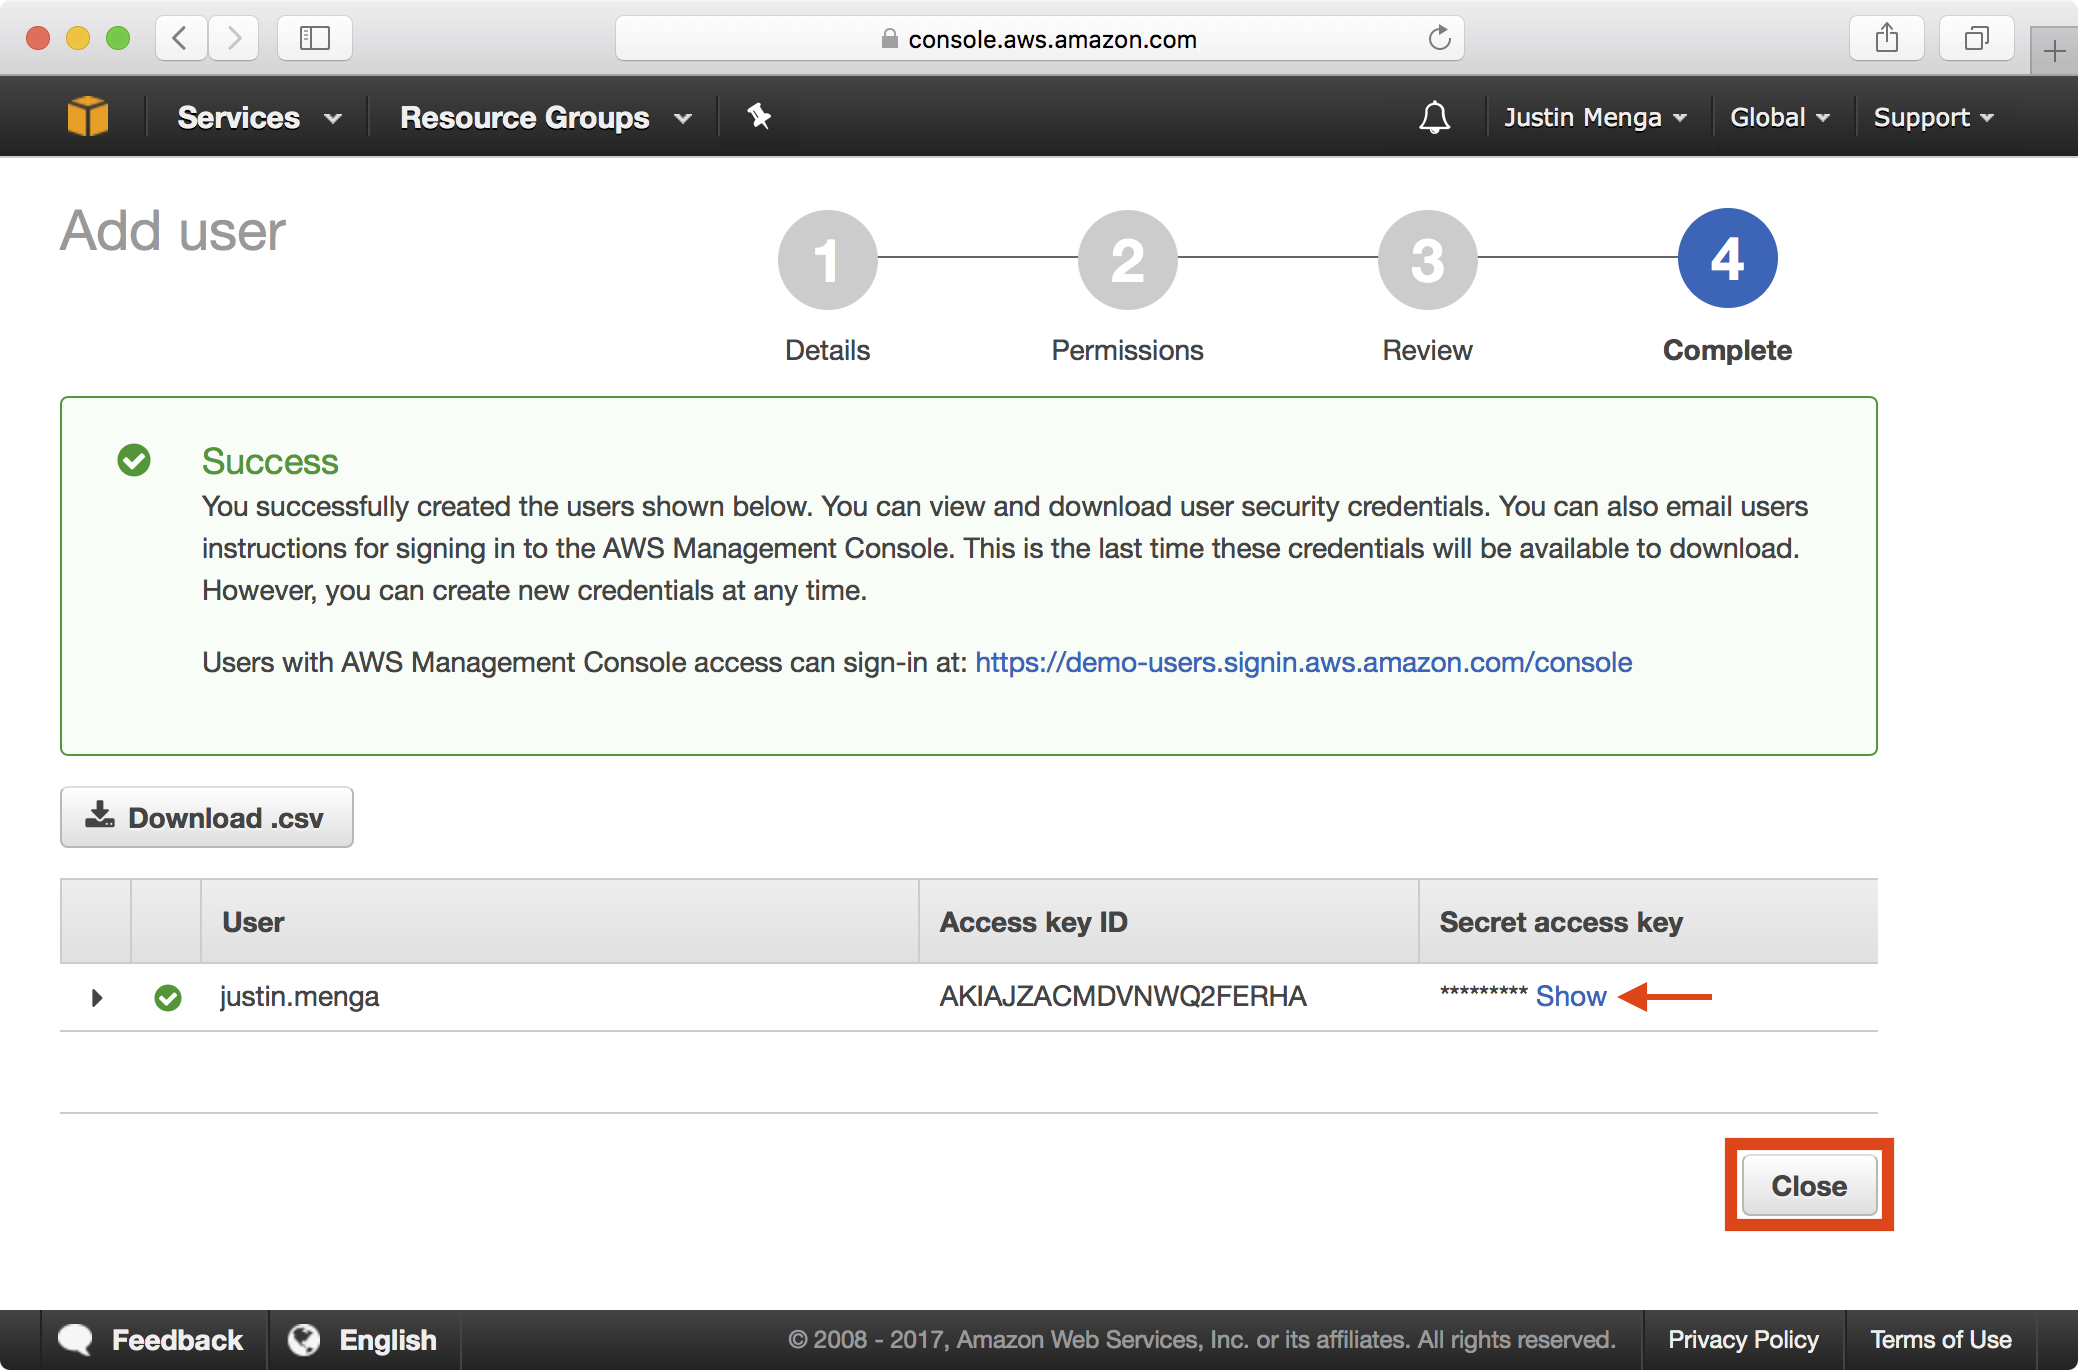
Click on the Show link to display the secret access key for the newly created user.
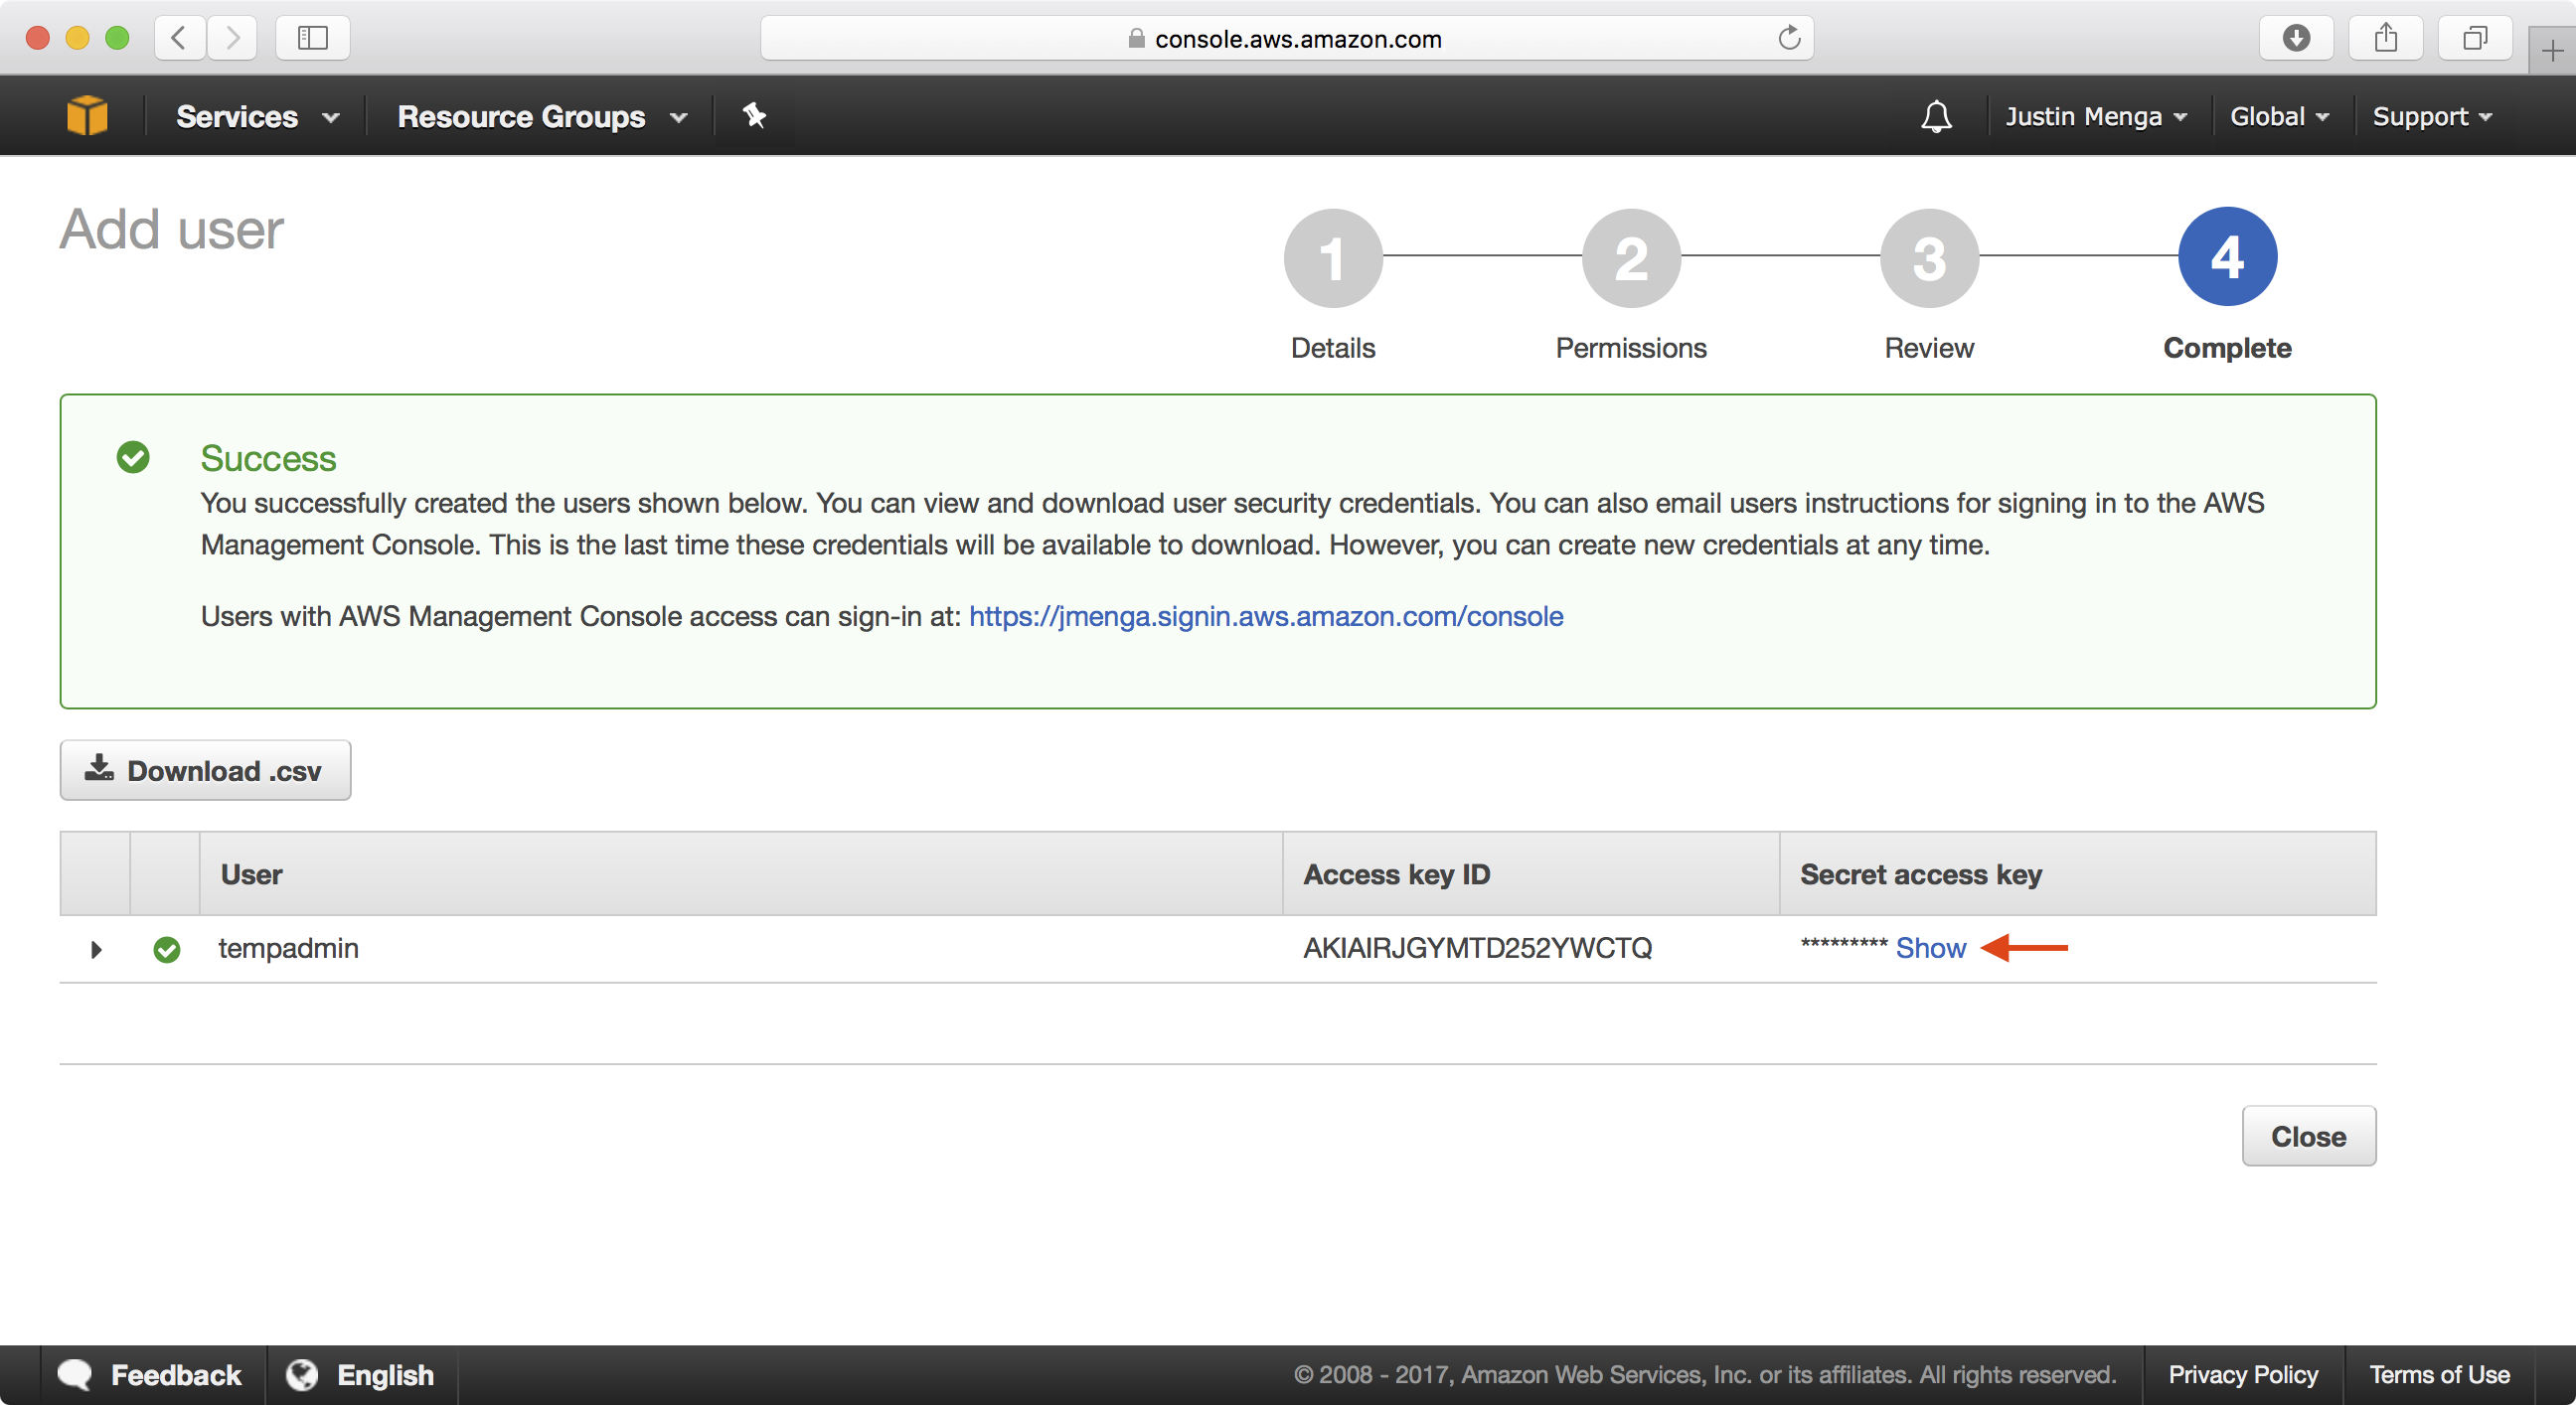
Copy the Access key ID and Secret access key values which you will need to configure the environment.
Once you have copied these values, click on the Close button.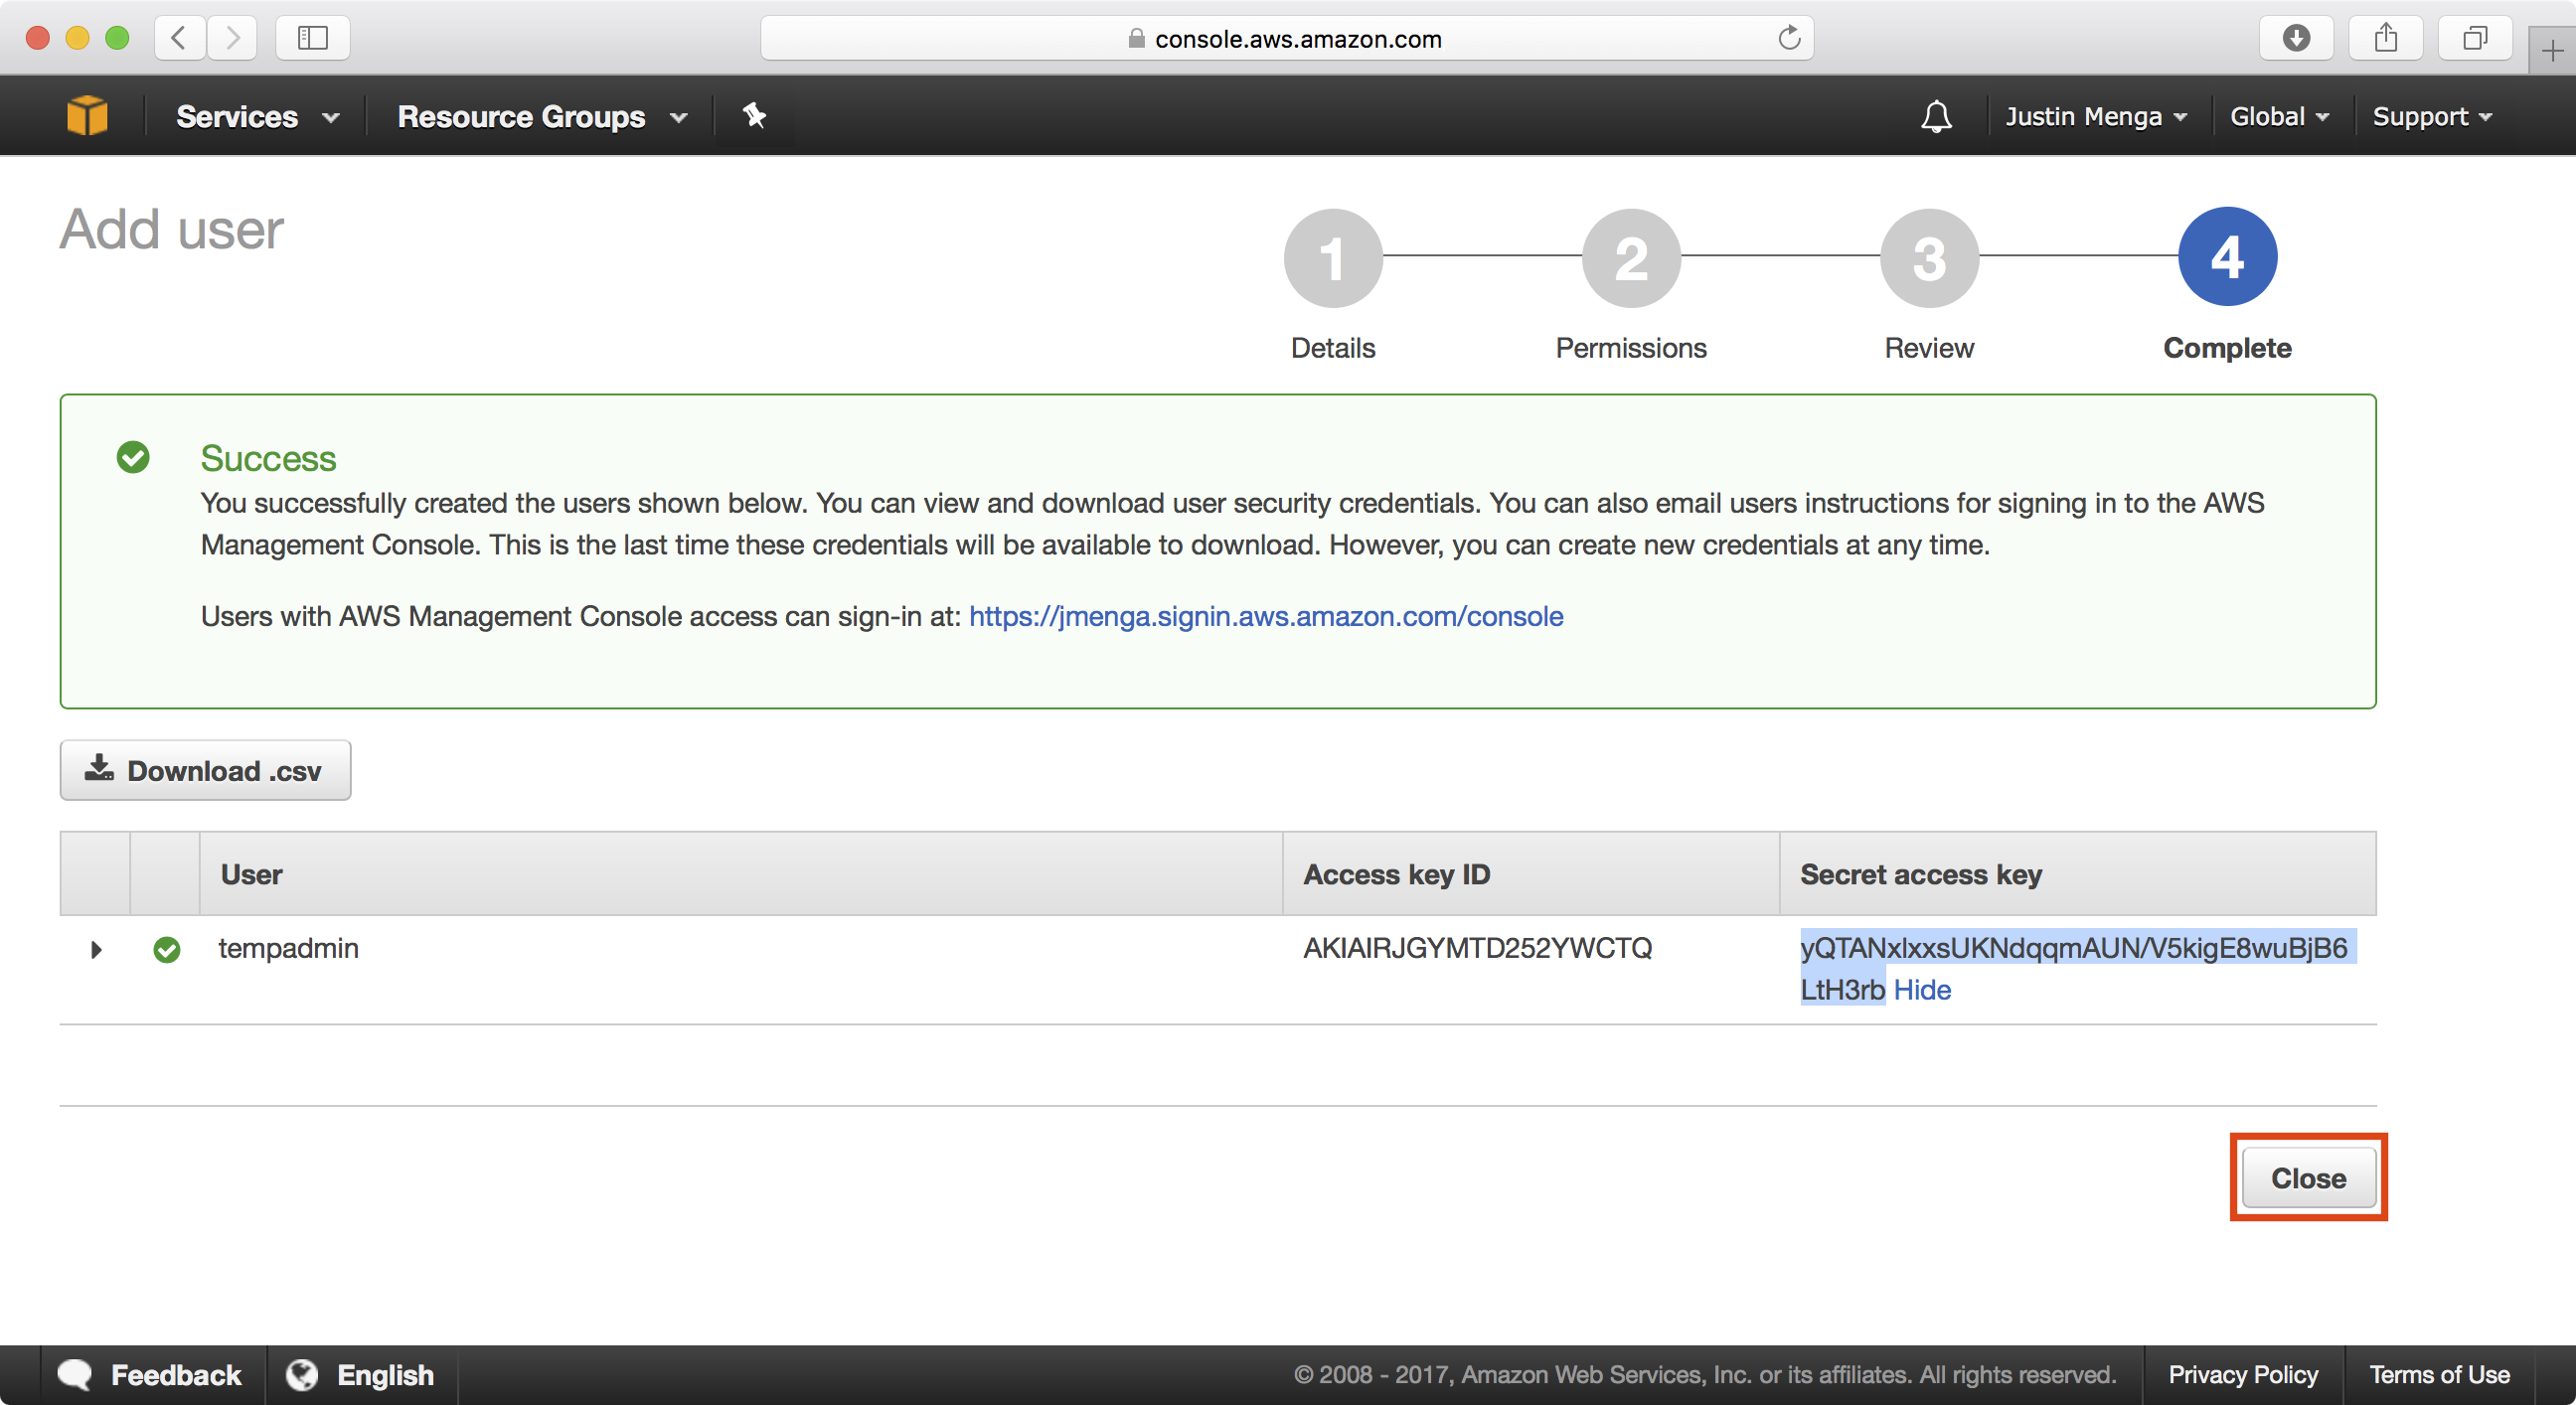
Open a new shell prompt and export the access key ID and secret access key values as demonstrated below.
$ export AWS_ACCESS_KEY_ID=AKIAIRJGYMTD252YWCTQ
$ export AWS_SECRET_ACCESS_KEY=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
$ export AWS_DEFAULT_REGION=us-west-2
Creating the Playbook
We will now establish a security resources playbook which will define security resources for both our Demo Users account and Demo Resources account.
1. Clone the AWS Starter to a local folder called demo-security-resources and re-initialise the Git repository.
$ git clone git@github.com:Casecommons/aws-starter.git demo-security-resources
  Cloning into 'demo-security'...
  remote: Counting objects: 32, done.
  remote: Total 32 (delta 0), reused 0 (delta 0), pack-reused 32
  Receiving objects: 100% (32/32), 4.78 KiB | 0 bytes/s, done.
  Resolving deltas: 100% (7/7), done.
$ cd demo-security-resources
$ rm -rf .git
$ git init
Initialized empty Git repository in /Users/jmenga/Source/casecommons/demo-security-resources/.git/
$ tree
.
├── README.md
├── ansible.cfg
├── group_vars
│   ├── all
│   │   └── vars.yml
│   └── non-prod
│       └── vars.yml
├── inventory
├── roles
│   └── requirements.yml
└── site.yml
2. Review the roles/requirements.yml file, which specifies the location and version of Ansible roles that the playbook relies on. By default the version for each role is set to install the latest commit from the master branch, however it is a good idea to lock each role to a specific version as demonstrated below:
# You can specify git tag, commit or branch for the version property
- src: git@github.com:casecommons/aws-cloudformation.git
  scm: git
  version: 0.7.0
  name: aws-cloudformation
- src: git@github.com:casecommons/aws-sts.git
  scm: git
  version: 0.1.2
  name: aws-sts
3. Install the roles using the ansible-galaxy command as demonstrated below:
$ ansible-galaxy install -r roles/requirements.yml --force
- extracting aws-cloudformation to /Users/jmenga/Source/casecommons/demo-security-resources/roles/aws-cloudformation
- aws-cloudformation was installed successfully
- extracting aws-sts to /Users/jmenga/Source/casecommons/demo-security-resources/roles/aws-sts
- aws-sts was installed successfully
4. Notice that this installs the roles locally into the roles folder, as per the roles_path setting in the local ansible.cfg file:
$ cat ansible.cfg
[defaults]
inventory = inventory
roles_path = roles
retry_files_enabled = False

$ tree roles -L 1
roles
├── aws-cloudformation
├── aws-sts
└── requirements.yml
Note
You only need to run the ansible-galaxy install command as demonstrated above in the following scenarios:
- Cloning the repository for the first time
- Updating the locally installed roles to a newer version
- Resetting the locally installed roles to their original state
Using the --force flag ensures the role will be overwritten regardless of whether or not the role is currently present locally.
5. Modify the group_vars/all/vars.yml file, which contains global settings for the playbook.
# Stack Settings
cf_stack_name: security-resources
cf_stack_template: "templates/security.yml.j2"
cf_stack_tags:
  org:business:owner: Casecommons
  org:business:product: Security
  org:business:severity: High
  org:tech:environment: "{{ env }}"
  org:tech:contact: pema@casecommons.org

# CloudFormation settings
# This sets a policy that disables updates to existing resources
# This requires you to explicitly set the cf_disable_stack_policy flag to true when running the playbook
cf_stack_policy:
  Statement:
  - Effect: "Deny"
    Action: "Update:*"
    Principal: "*"
    Resource: "*"
Notice that we set four variables, each prefixed with cf_, which by convention refers to variables that are input or output by the aws-cloudformation role:
cf_stack_name- defines the name of the stack.cf_stack_template- defines the CloudFormation template used to create the stack. Here we referencetemplates/security.yml.j2, which is a relative reference to a template included within theaws-cloudformationrole, rather than a template in the local playbook.cf_stack_tags- defines tags that will be attached to all resources created within the CloudFormation stackcf_stack_policy- defines a CloudFormation stack policy. This is a safety mechanism that requires you to temporarily explicity disable the stack policy if you want to make updates to an existing CloudFormation stack.
6. Remove the local templates folder, since we are using a template that is embedded within the aws-cloudformation role:
$ rm -rf templates
8. Finally review the site.yml file, which contains the main playbook:
- name: Assume Role
  hosts: "{{ env }}"
  gather_facts: no
  roles:
    - aws-sts

- name: Stack Deployment
  hosts: "{{ env }}"
  environment: "{{ sts_creds }}"
  roles:
    - aws-cloudformation
Notice the playbook is very simple with two plays defined:
- Assume Role - this calls the
aws-stsrole and assumes the role defined by thests_role_arnsetting for a given environment. - Stack Deployment - this calls the
aws-cloudformationrole and creates a CloudFormation stack for a given environment. Notice that we injectsts_credsinto the environment, which contains the temporary session credentials obtained via the previous Assume Role play.
In both plays, notice that the hosts variable references the env variable, which we must always supply at runtime:
$ ansible-playbook site.yml -e env=<environment-name>
An interesting aspect of the framework is that you typically don’t need to modify the primary site.yml playbook, unless you want to perform some custom pre-deployment or post-deployment actions.
Defining a New Environment
In this section we will add a new environment called demo-users to the playbook, which will be used to create security resources in our new demo-users account.
1. Modify the inventory file so that it defines a single environment called demo-users, ensuring you specify ansible_connection=local:
[demo-users]
demo-users ansible_connection=local
2. Remove the group_vars/non-prod environment folder that is included in the starter template:
$ rm -rf group_vars/non-prod
3. Create a file called group_vars/demo-users/vars.yml, which will hold all environment specific configuration for the demo-users environment:
$ mkdir -p group_vars/demo-users
$ touch group_vars/demo-users/vars.yml
4. Finally add the sts_role_arn setting to group_vars/demo-users/vars.yml:
# STS role in the target AWS account to assume
sts_role_arn: "arn:aws:iam::094411466117:role/admin"
The sts_role_arn setting defines the Amazon Resource Name (ARN) of the IAM role the aws-sts Ansible role (take care not to confuse IAM and Ansible roles) will attempt to assume. This is a very important setting, as it establishes the target account that the playbook will create a CloudFormation stack and associated resources in, and must be defined for every environment that you create.
Ensure you replace the value
094411466117above with the account ID of your own “demo-users” account.
Running the Playbook
The security template in the aws-cloudformation role will create the following resources by default:
- An IAM role named admin
- An IAM group named Administrators that grants members the ability to assume the admin role
- An IAM group named Users that requires users to authenticate using multi-factor authentication (MFA)
Let’s now run the playbook to create these resources.
These instructions assume you have configured your local environment with the AWS access key and AWS secret access key created earlier in Creating a Temporary User
First run the Ansible playbook targeting the demo-users environment as demonstrated below:
$ ansible-playbook site.yml -e env=demo-users

PLAY [Assume Role] *************************************************************

TASK [aws-sts : set_fact] ******************************************************
ok: [demo-users]

TASK [aws-sts : checking if sts functions are sts_disabled] ********************
skipping: [demo-users]

TASK [aws-sts : setting empty sts_session_output result] ***********************
skipping: [demo-users]

TASK [aws-sts : setting sts_creds if legacy AWS credentials are present (e.g. for Ansible Tower)] ***
skipping: [demo-users]

TASK [aws-sts : assume sts role] ***********************************************
fatal: [demo-users]: FAILED! => {"changed": false, "cmd": "aws sts assume-role --role-arn=\"arn:aws:iam::625916301437:role/admin\"
--role-session-name=\"adminSession\"", "delta": "0:00:02.143031", "end": "2017-02-19 14:42:24.227270", "failed": true,
"rc": 255, "start": "2017-02-19 14:42:22.084239", "stderr": "\nAn error occurred (AccessDenied) when calling the AssumeRole
operation: Not authorized to perform sts:AssumeRole", "stdout": "", "stdout_lines": [], "warnings": []}

PLAY RECAP *********************************************************************
demo                       : ok=1    changed=0    unreachable=0    failed=1
Notice that the operation fails, and this is because we have a chicken-in-egg scenario where our the aws-sts Ansible role in our playbook is attempting to assume the IAM role defined by the sts_role_arn setting in our groups_vars/demo-users/vars.yml file:
# STS role in the target AWS account to assume
sts_role_arn: "arn:aws:iam::094411466117:role/admin"
This admin role does not exist yet, as it is the job of the security playbook to create the role, creating a chicken-in-egg scenario.
To overcome this we can set a flag sts_disable to true when we run the playbook, which disables the aws-sts role:
$ ansible-playbook site.yml -e env=demo-users -e sts_disable=true

PLAY [Assume Role] *************************************************************

TASK [aws-sts : set_fact] ******************************************************
ok: [demo-users]

TASK [aws-sts : checking if sts functions are sts_disabled] ********************
ok: [demo-users] => {
    "msg": "Skipping STS functions as sts_disabled is defined"
}

...
...

TASK [aws-cloudformation : configure application stack] ************************
changed: [demo-users]

...
...

PLAY RECAP *********************************************************************
demo-users                  : ok=19   changed=1    unreachable=0    failed=0
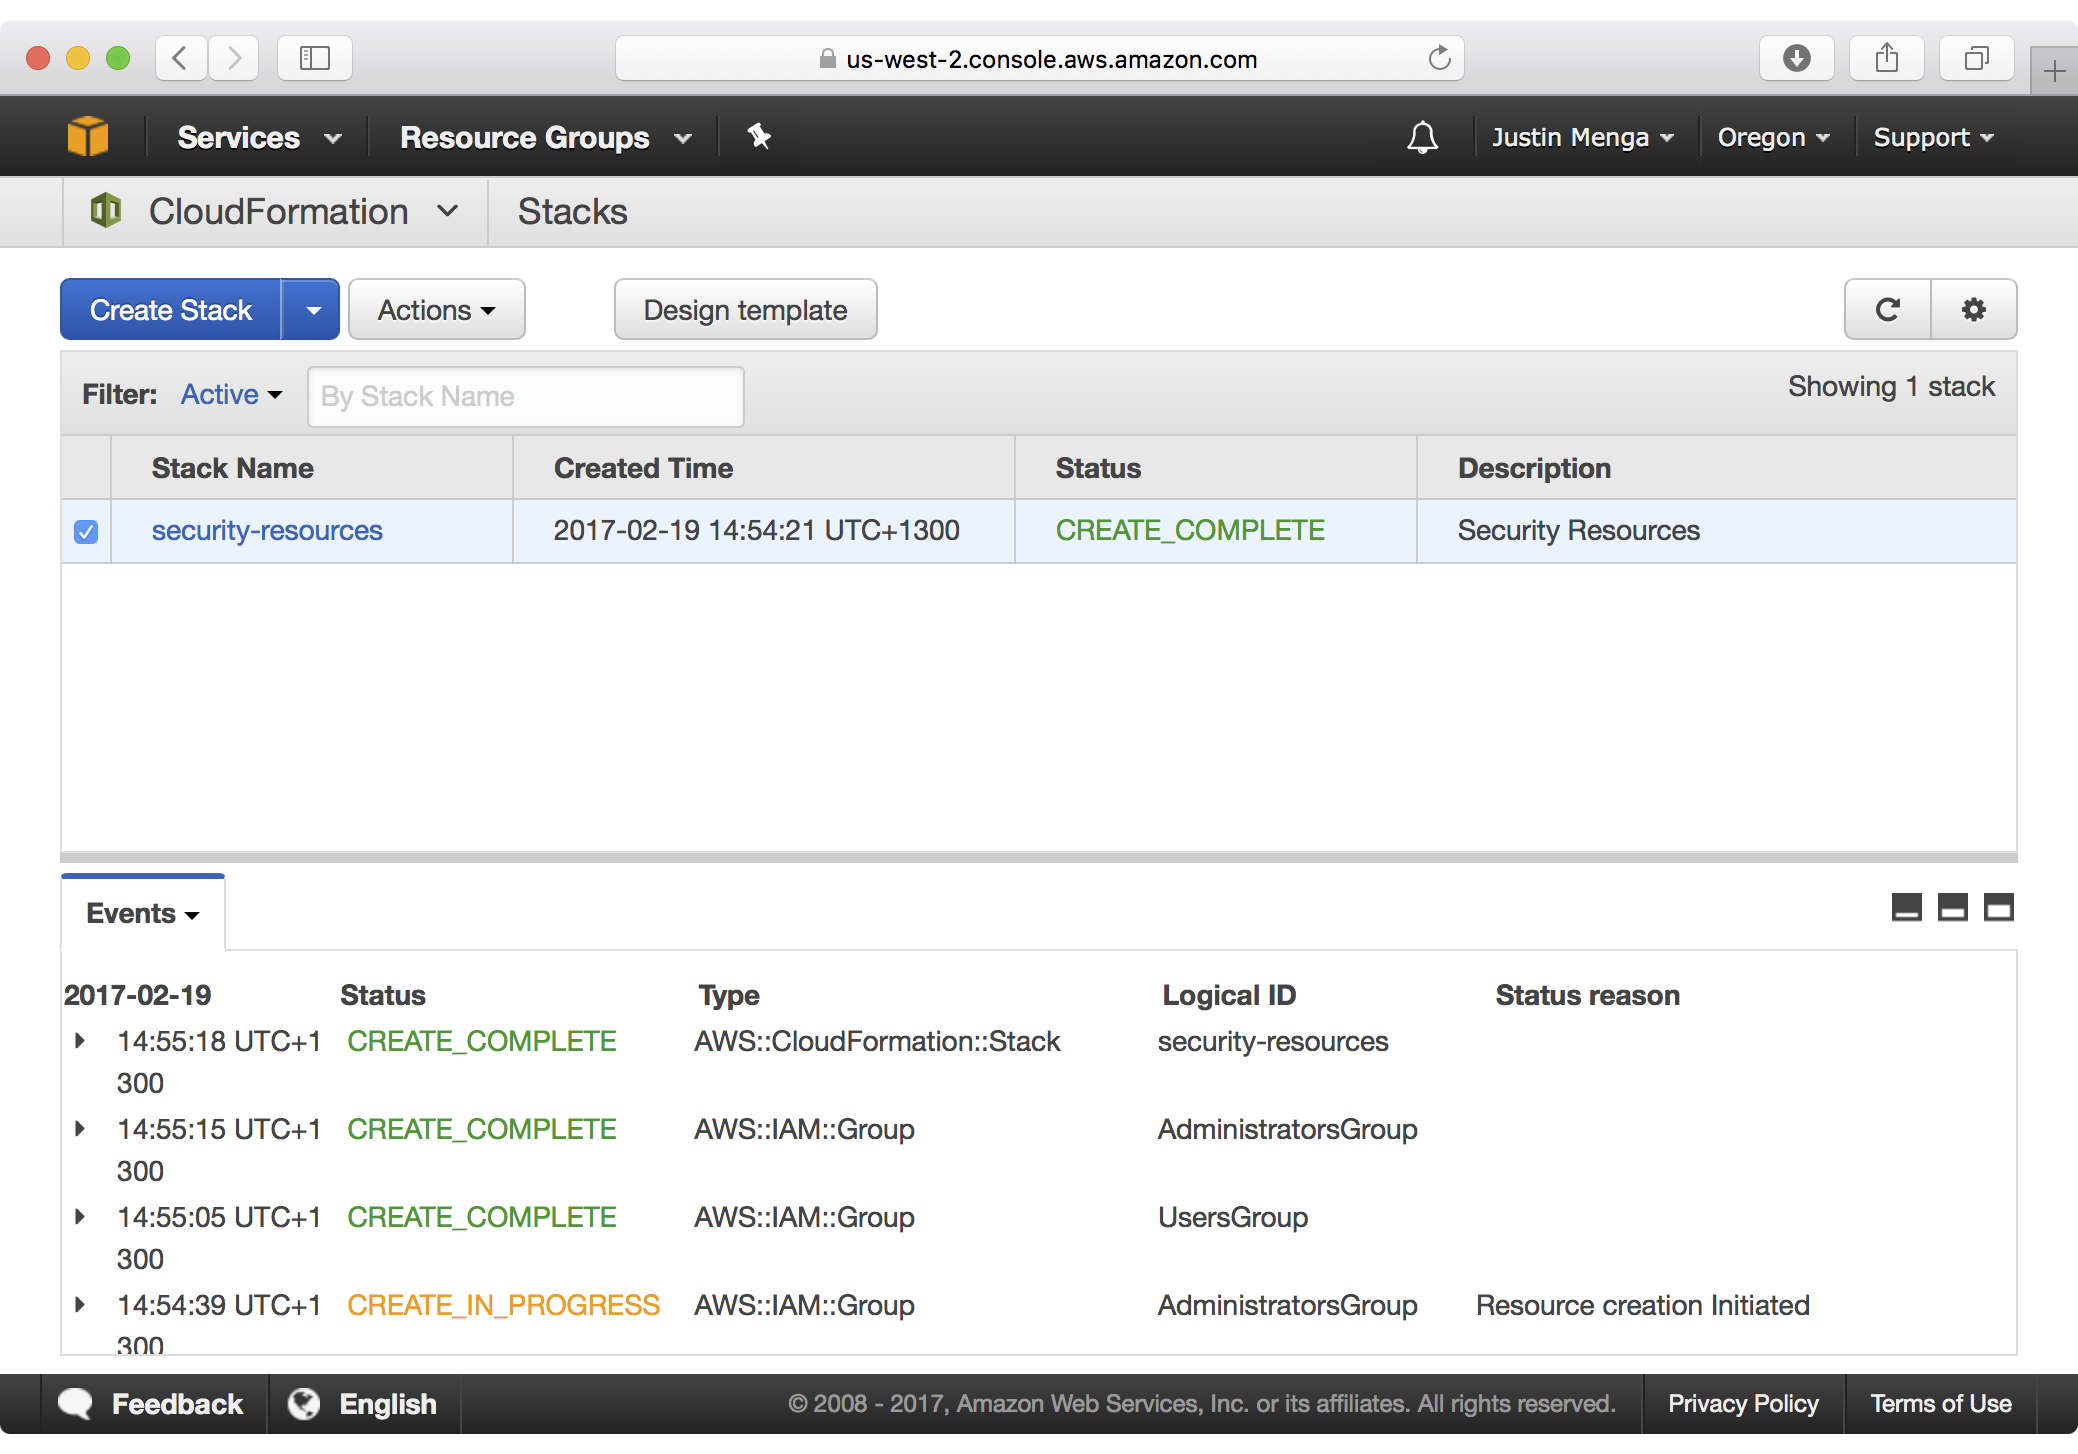
This time the playbook succeeds, pausing on the configure application stack task for a couple of minutes whilst the CloudFormation stack is created (notice this task completes with a changed status), and then completing successfully once the stack is created.
If you navigate to the CloudFormation dashboard, notice that a new stack called security-resources has been created:
In the IAM dashboard we can verify that our admin role has been created:

Because the admin role has now been created, you should be able to re-run the playbook without the sts_disable flag:
$ ansible-playbook site.yml -e env=demo-users

PLAY [Assume Role] *************************************************************

TASK [aws-sts : set_fact] ******************************************************
ok: [demo-users]
...
...

TASK [aws-cloudformation : configure application stack] ************************
ok: [demo-users]

TASK [aws-cloudformation : get stack facts] ************************************
ok: [demo-users]

TASK [aws-cloudformation : set stack facts] ************************************
ok: [demo-users]

TASK [aws-cloudformation : debug] **********************************************
skipping: [demo-users]

TASK [aws-cloudformation : S3 Template URL] ************************************
skipping: [demo-users]

TASK [aws-cloudformation : enable current stack policy] ************************
skipping: [demo-users]

TASK [aws-cloudformation : fail] ***********************************************
skipping: [demo-users]

TASK [aws-cloudformation : delete application stack] ***************************
skipping: [demo-users]

PLAY RECAP *********************************************************************
demo                       : ok=20   changed=0    unreachable=0    failed=0
This time the playbook can successfully assume the admin role (because our temporary user has administrative credentials and the role trusts the local AWS account), and notice that the configure application stack completes with no change, as the CloudFormation stack already exists and no configuration changes have been made.
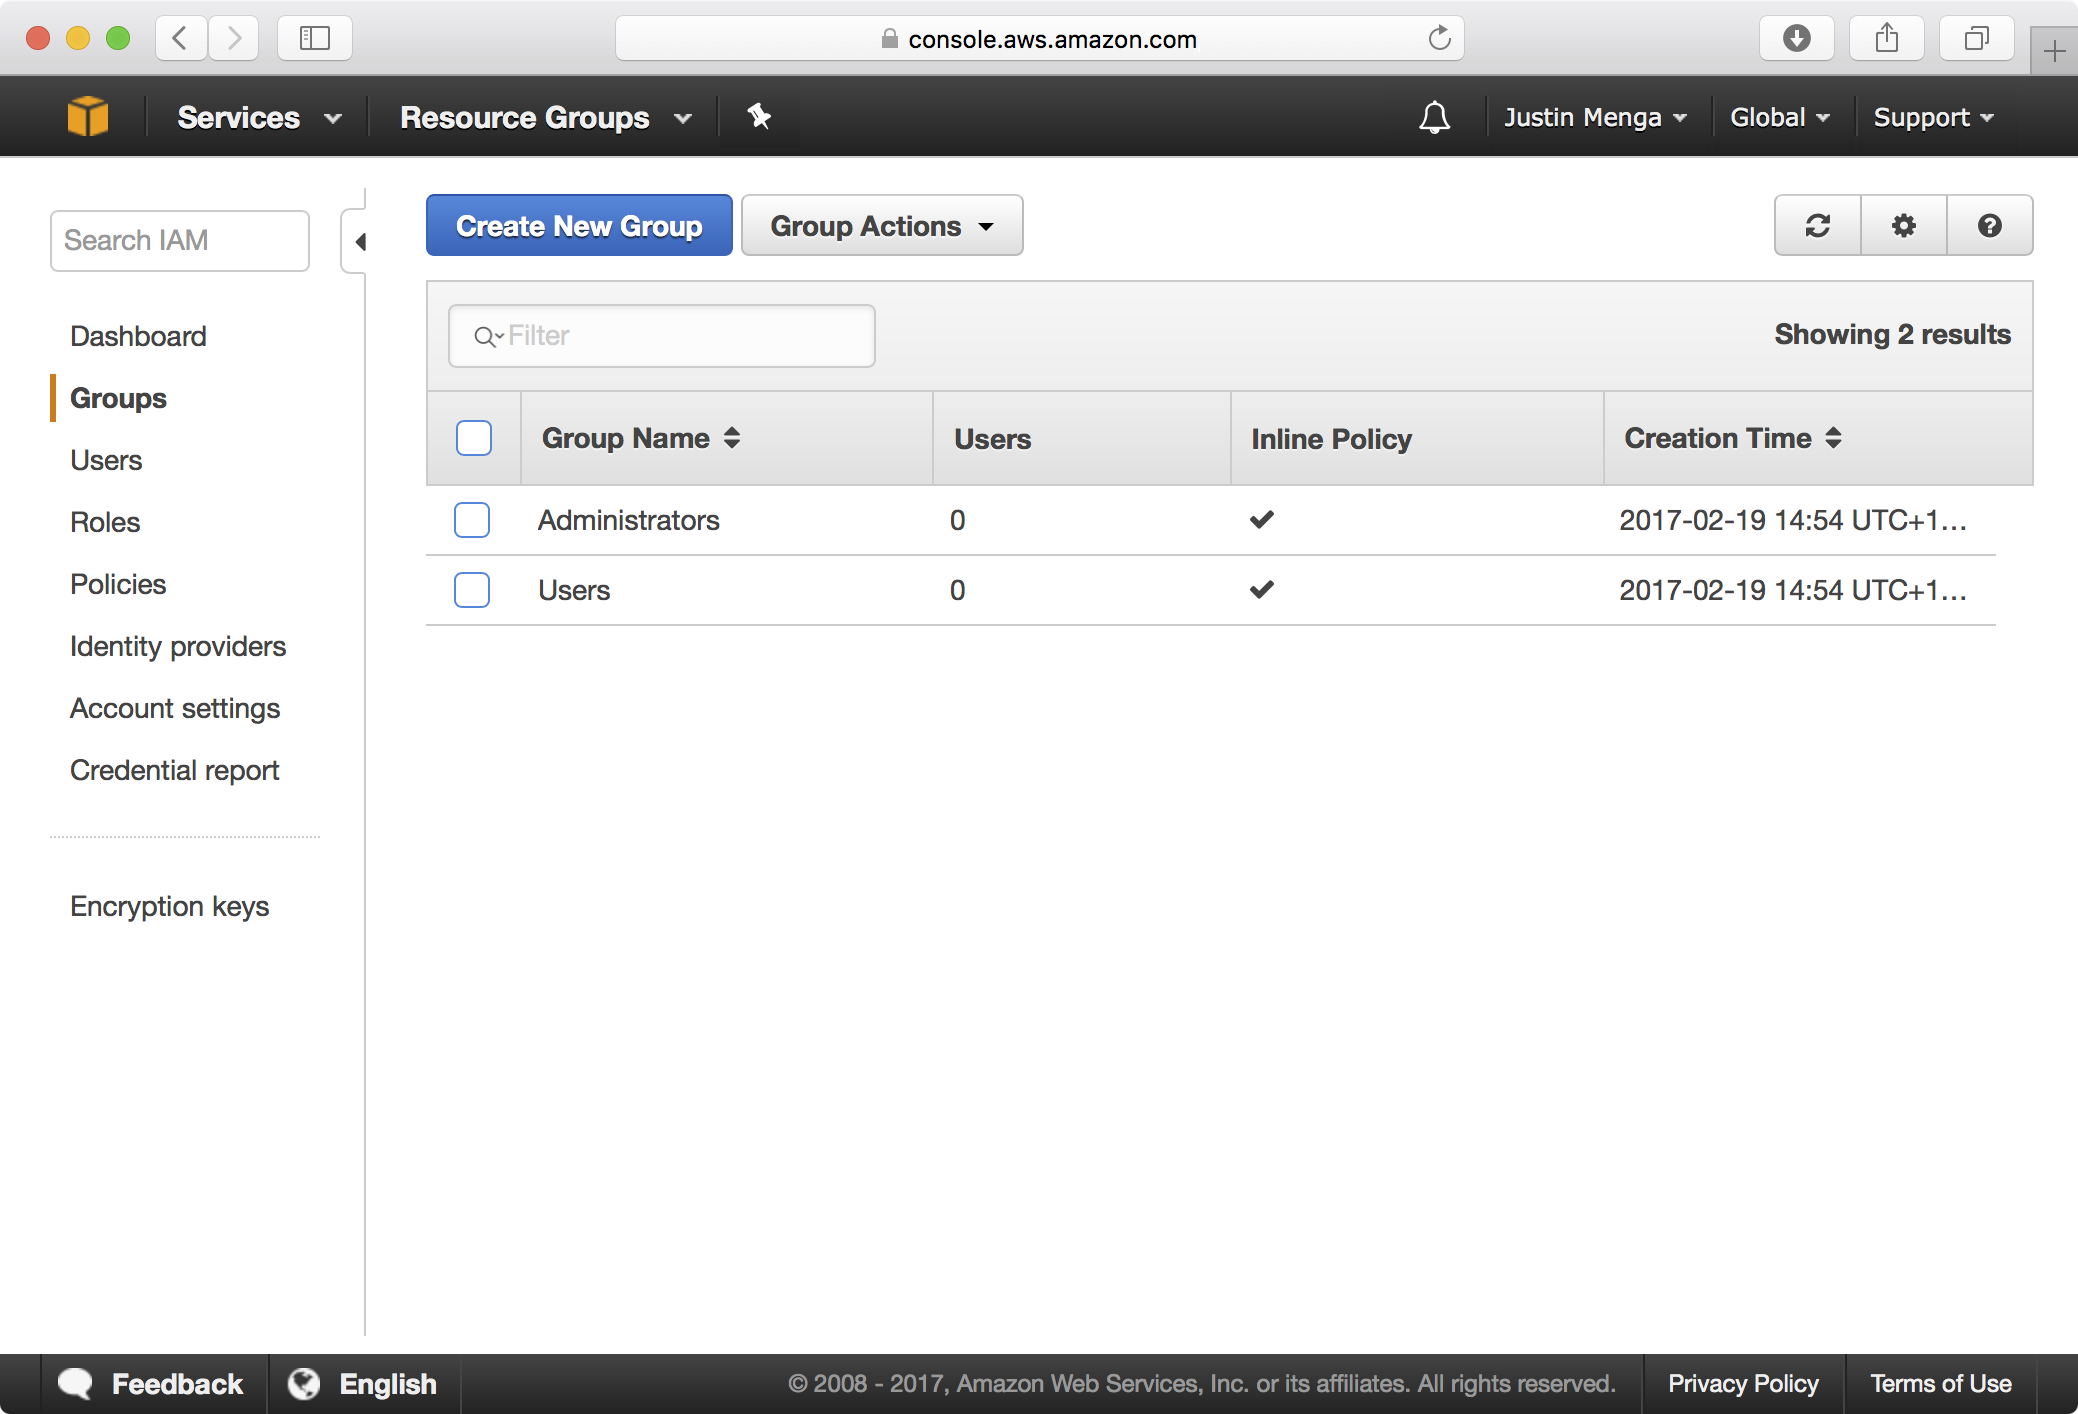
Back in the IAM console, you should also be able to see that an Administrators group and Users group have been created:
Creating an Administrator
Now that we have established an admin IAM role and an Administrators and Users group, now let’s create a new user called ‘justin.menga’ and attach this user to Users group to enforce MFA for this user, and the Administrators group to allow the user to administer the demo-users account.
These instructions assume that you are starting logged in as root to the demo-users account
1. Navigate to the Users section in the IAM dashboard and click the Add user button:
2. Configure an appropriate user name and password as shown below and click on the Next: Permissions button:
3. Add the user to the Administrators and Users group and click on the Next: Review button:

4. Click on Create User to confirm the creation of the user:
5. Copy the AWS access key ID and secret access key value as you will need these later on when you configure your local AWS environment. Once done, click on the Close button:
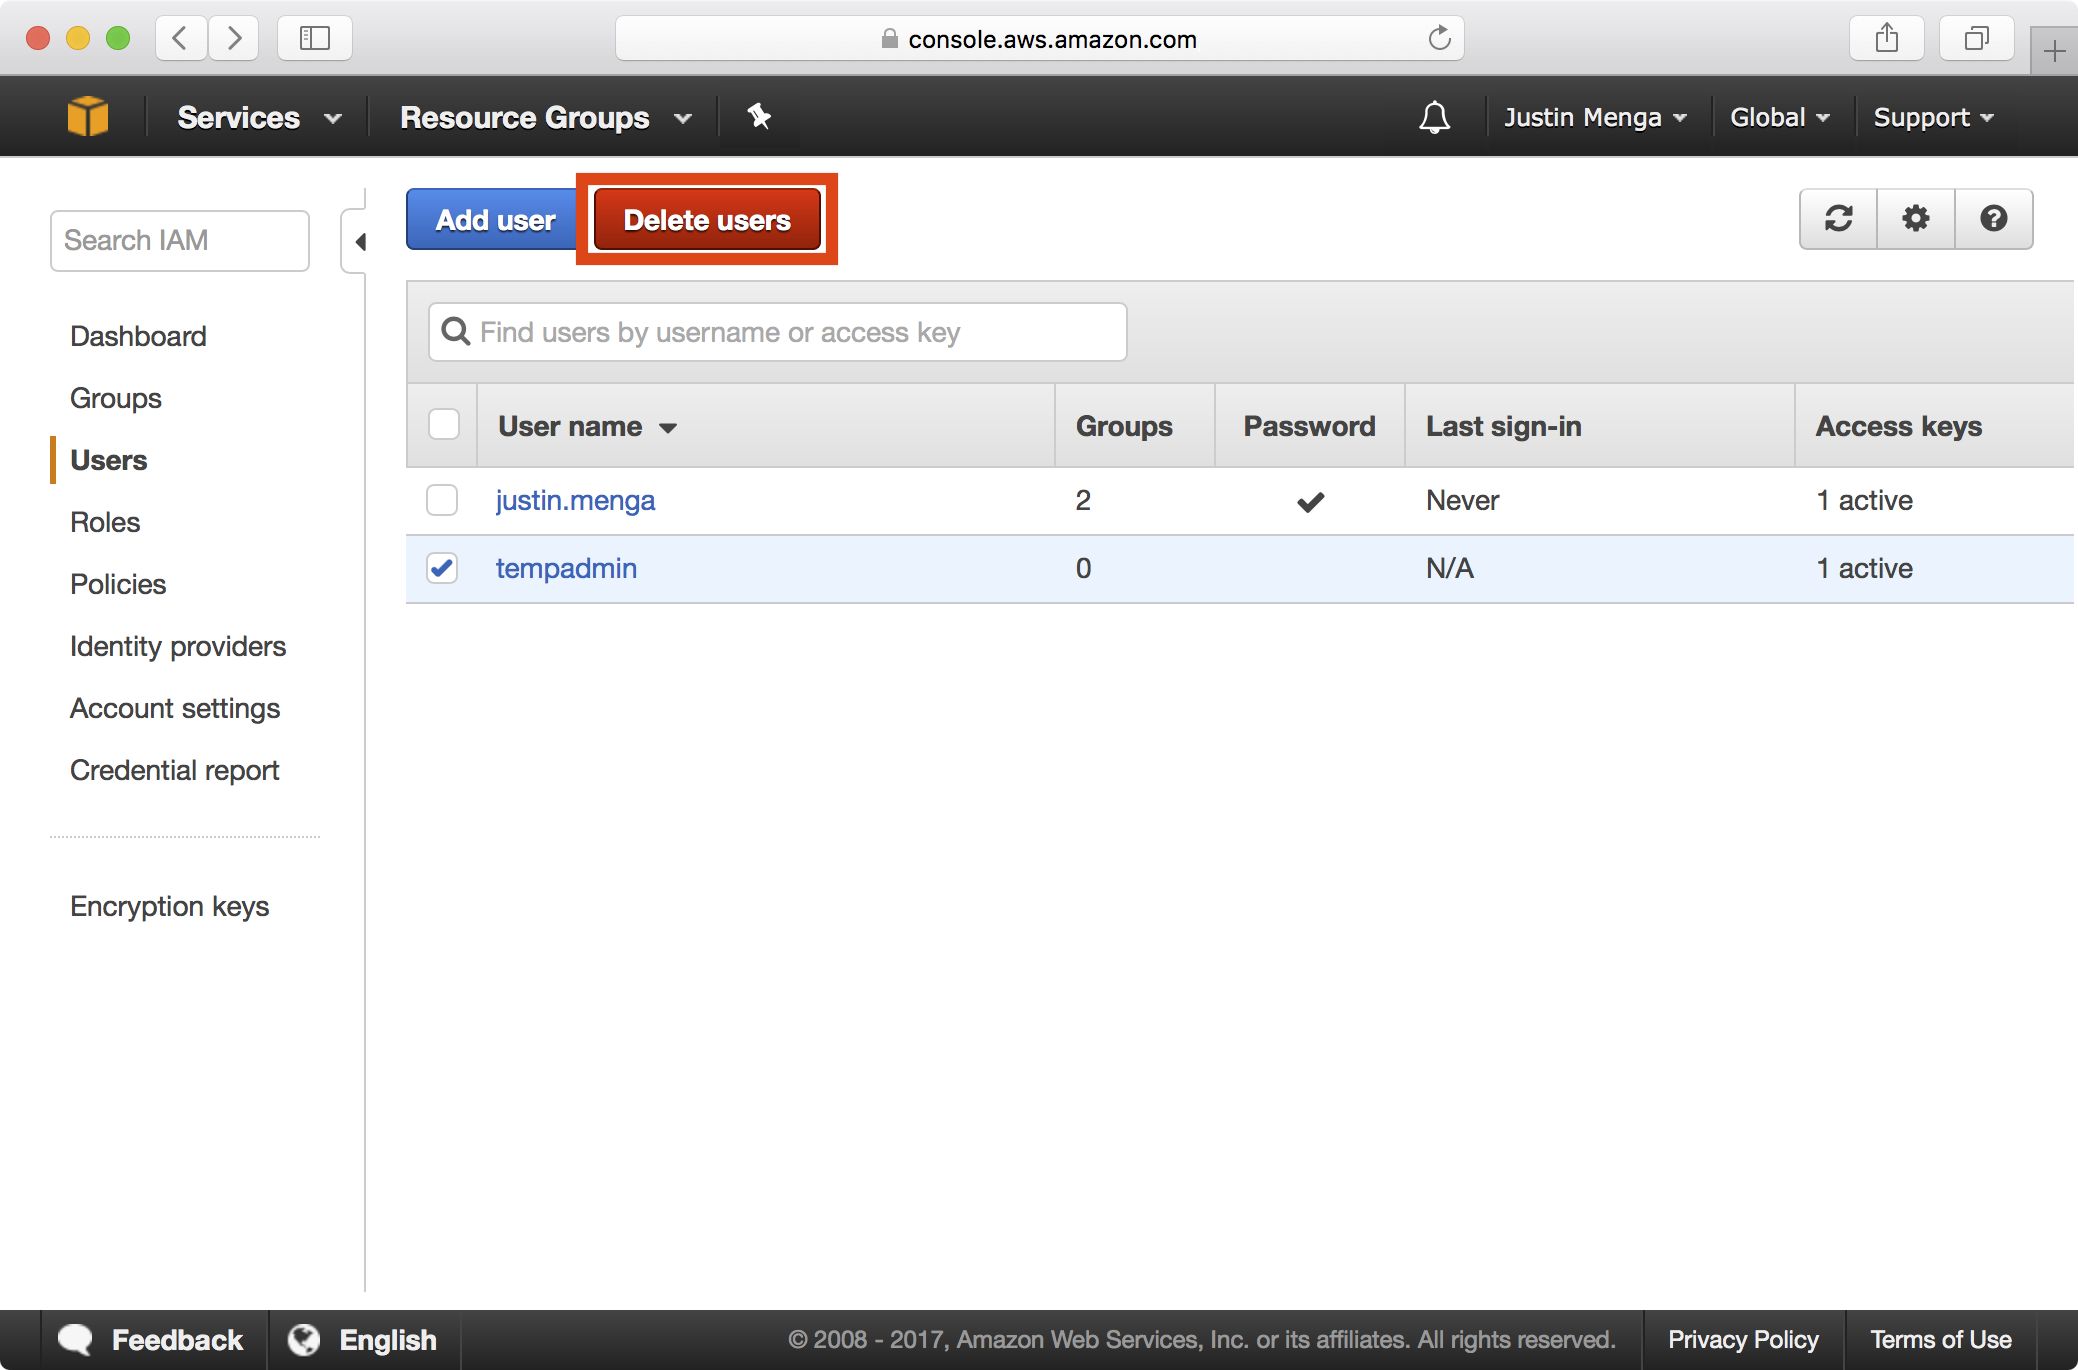
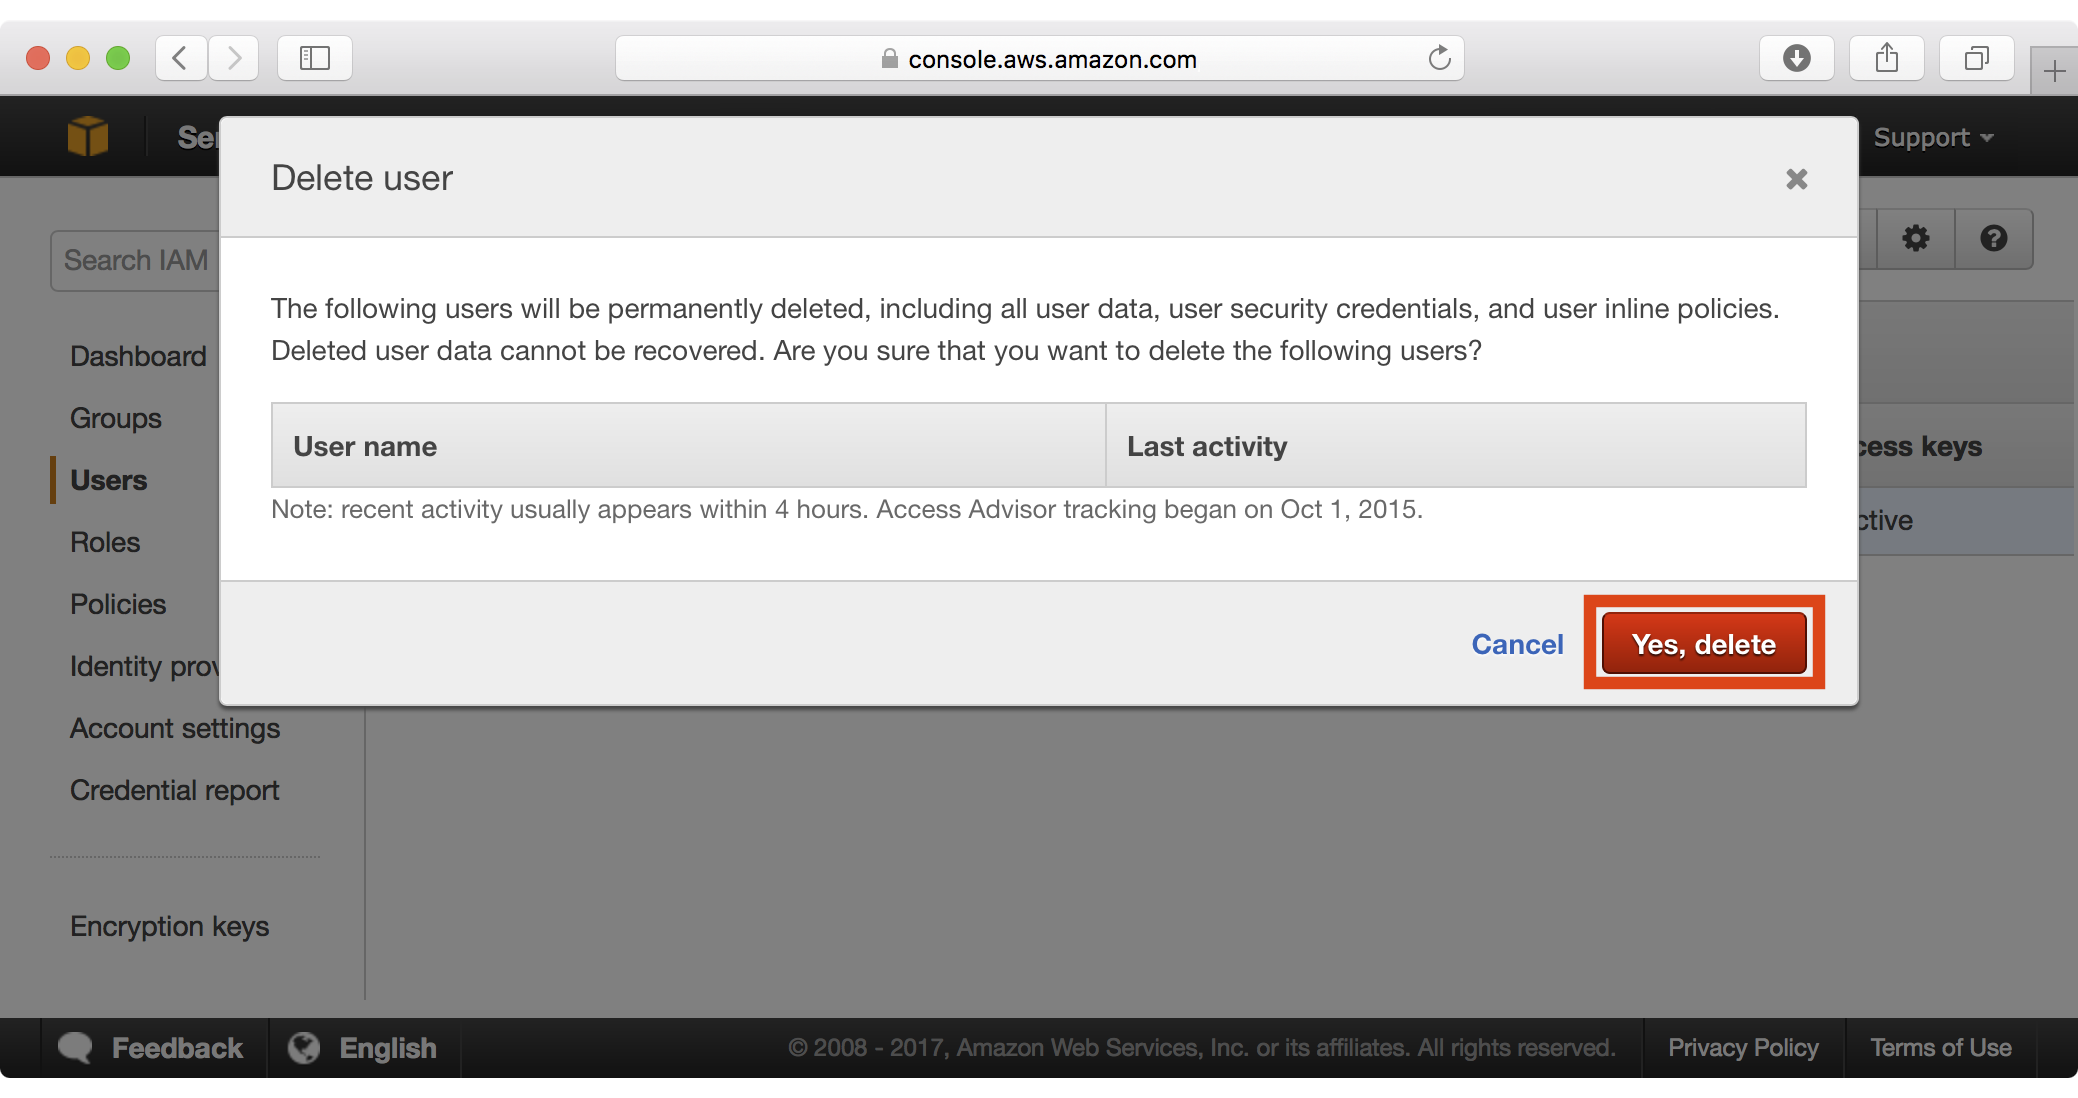
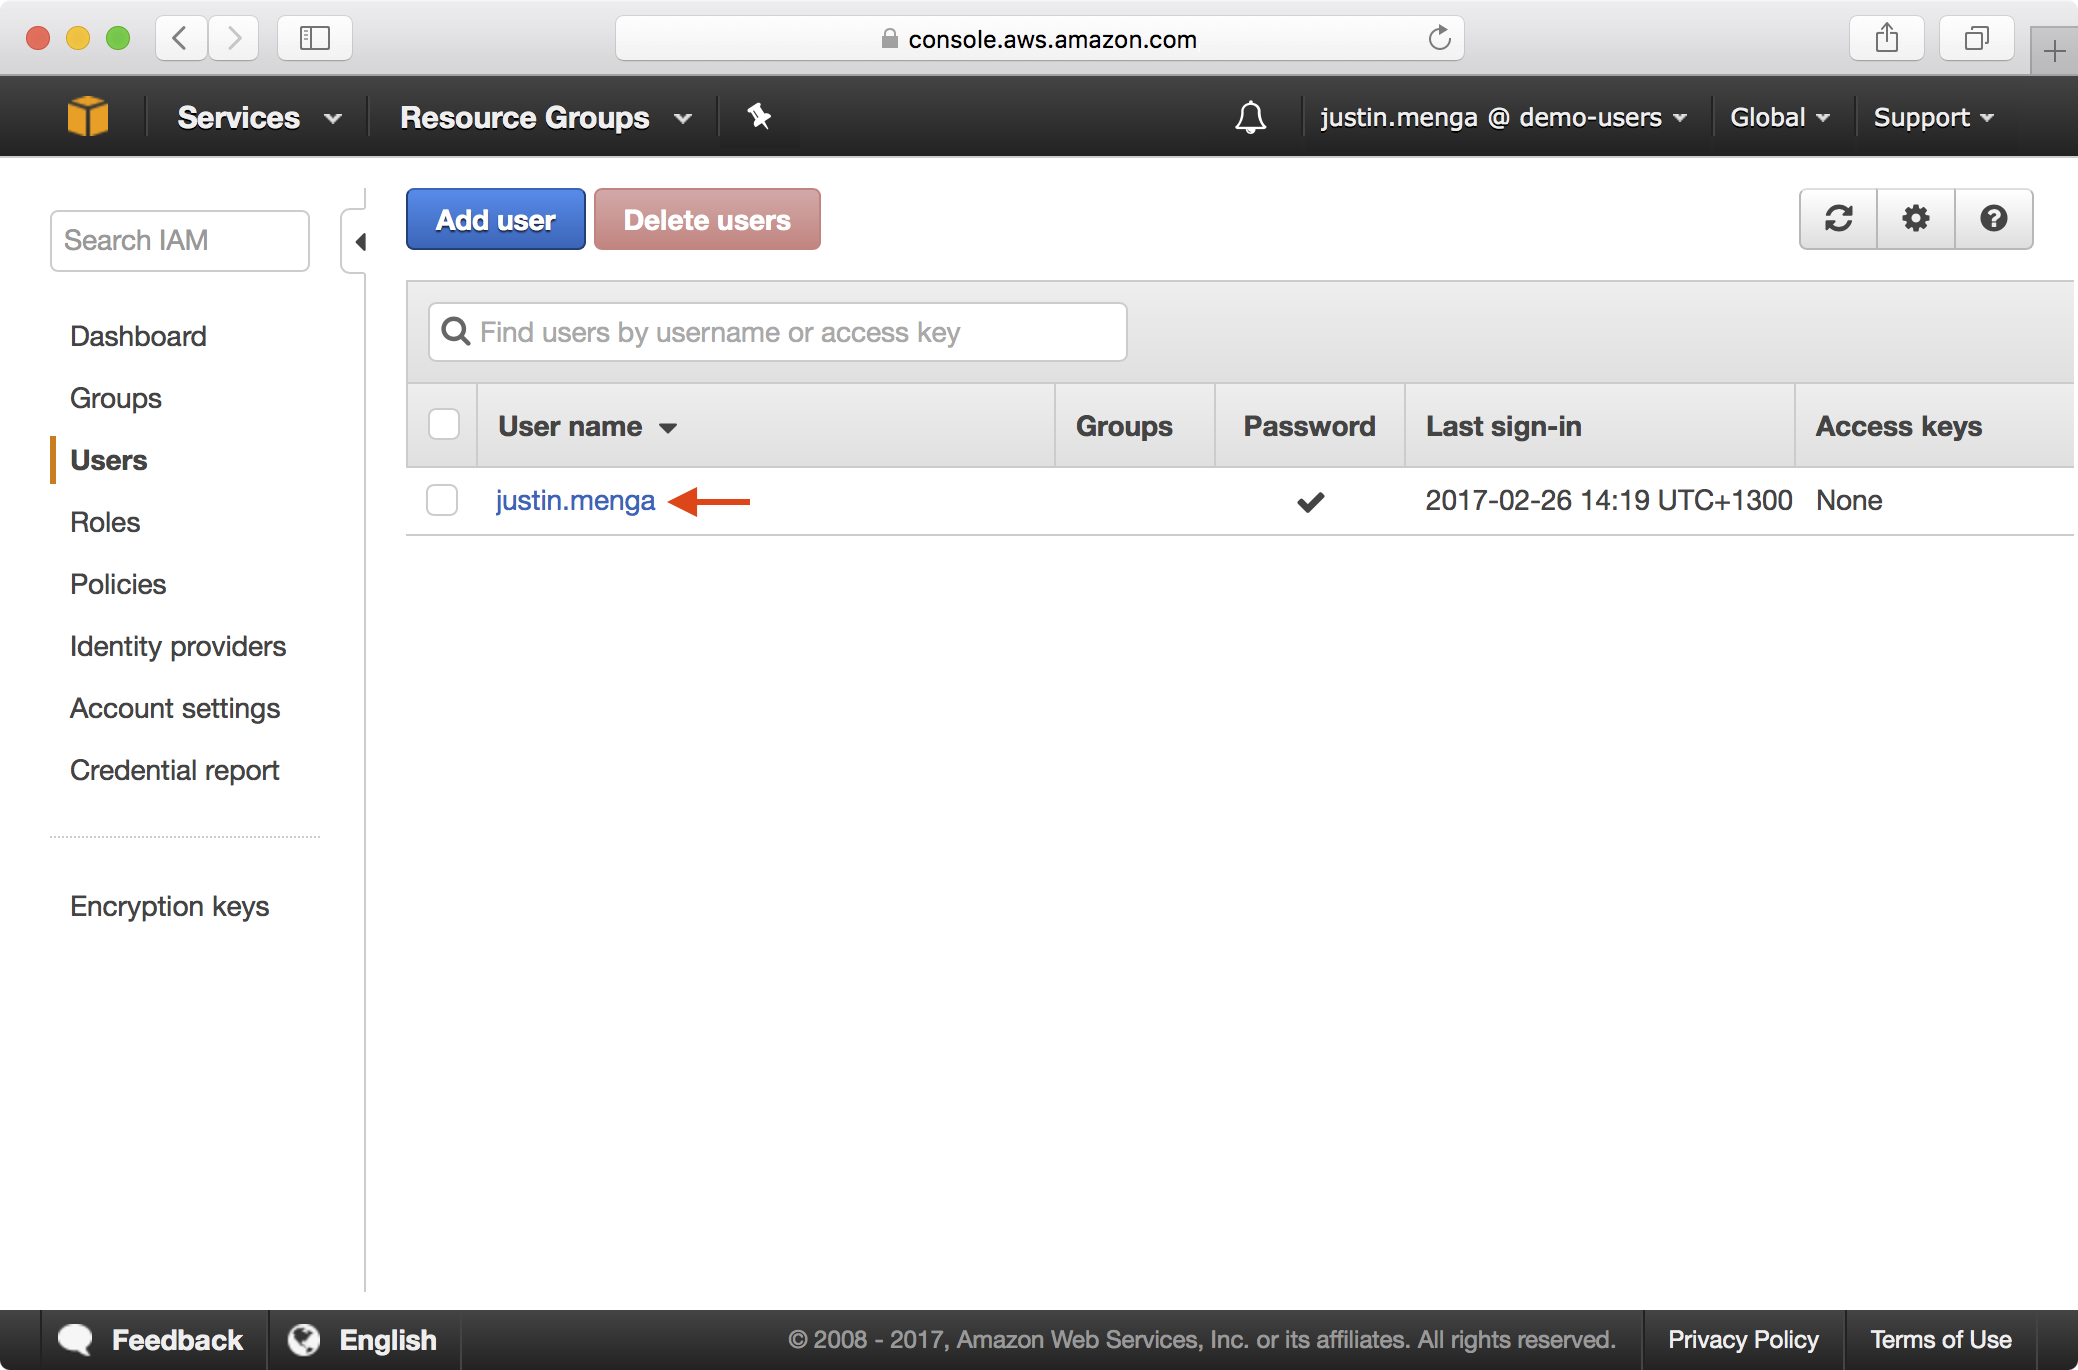
6. At this point, you can remove the temporary administrative user we created earlier by selecting the user in the IAM users section, clicking Delete users and confirming the delete operation:
7. You should also now clear the previous temporary user credentials from your local shell:
$ unset AWS_ACCESS_KEY_ID AWS_SECRET_ACCESS_KEY AWS_DEFAULT_REGION
Setting up MFA
We have created an administrative account that is assigned to the both the Administrators and Users groups. The Users groups enforces a requirement for multi-factor authentication (MFA) except for a few specific IAM actions including resetting your password and setting up/resyncing an MFA device, so now let’s setup MFA for our new user.
1. Logout from the console and login into the AWS console using the URL https://<account-id-or-alias>.signin.aws.amazon.com/console

2. Navigate to IAM > Users and select the user account you have just logged in as:
3. Select the Security Credentials tab and click on the Edit icon next to Assigned MFA device:

4. Select the A virtual MFA device option and click Next Step:
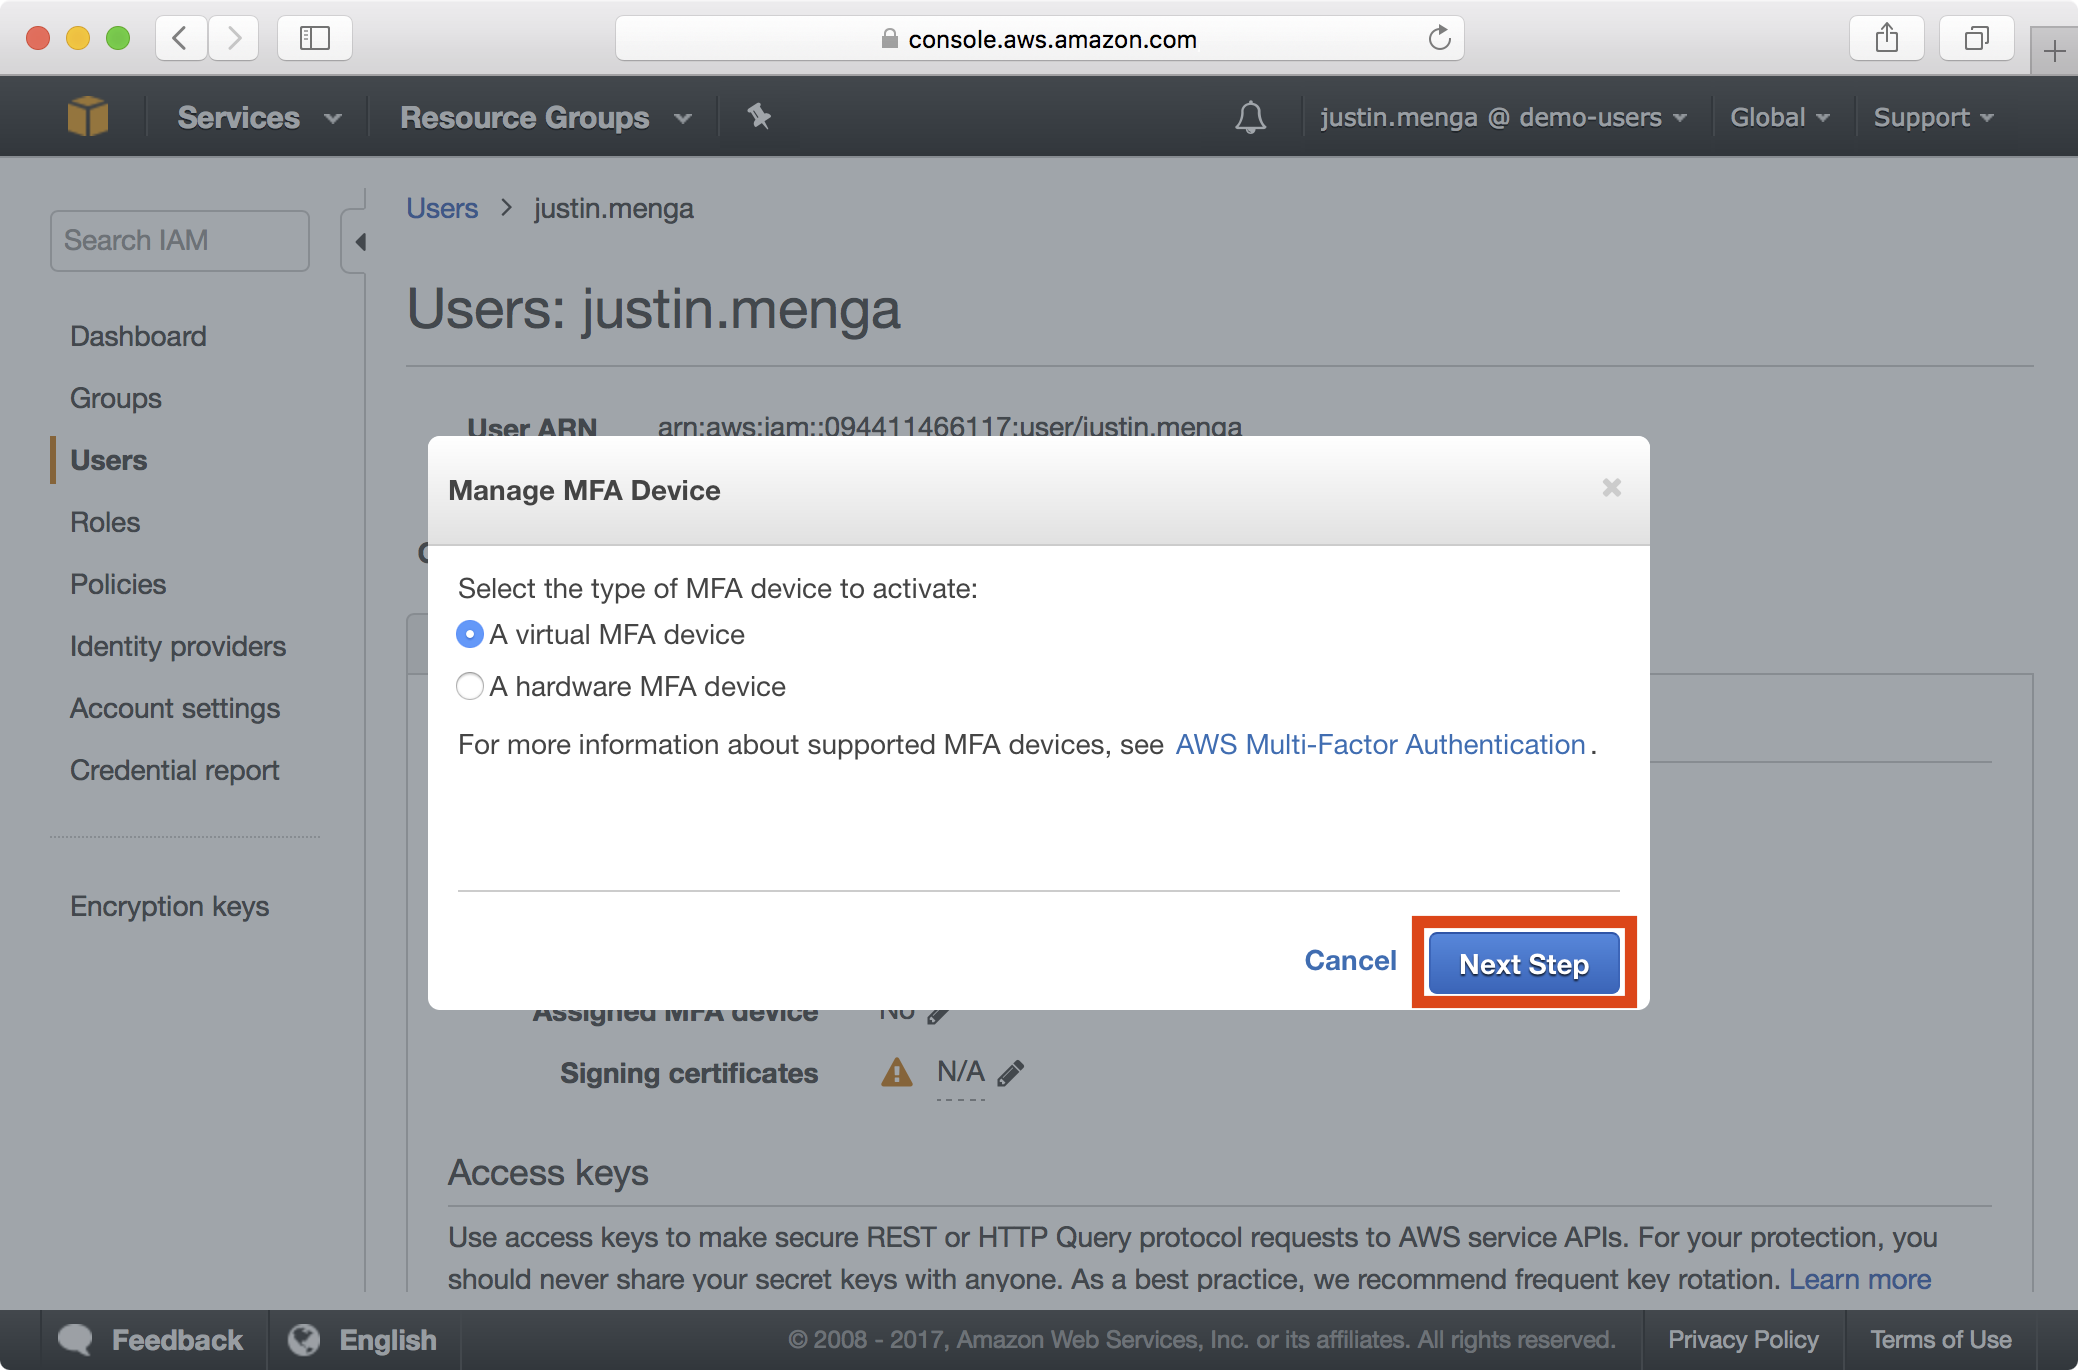
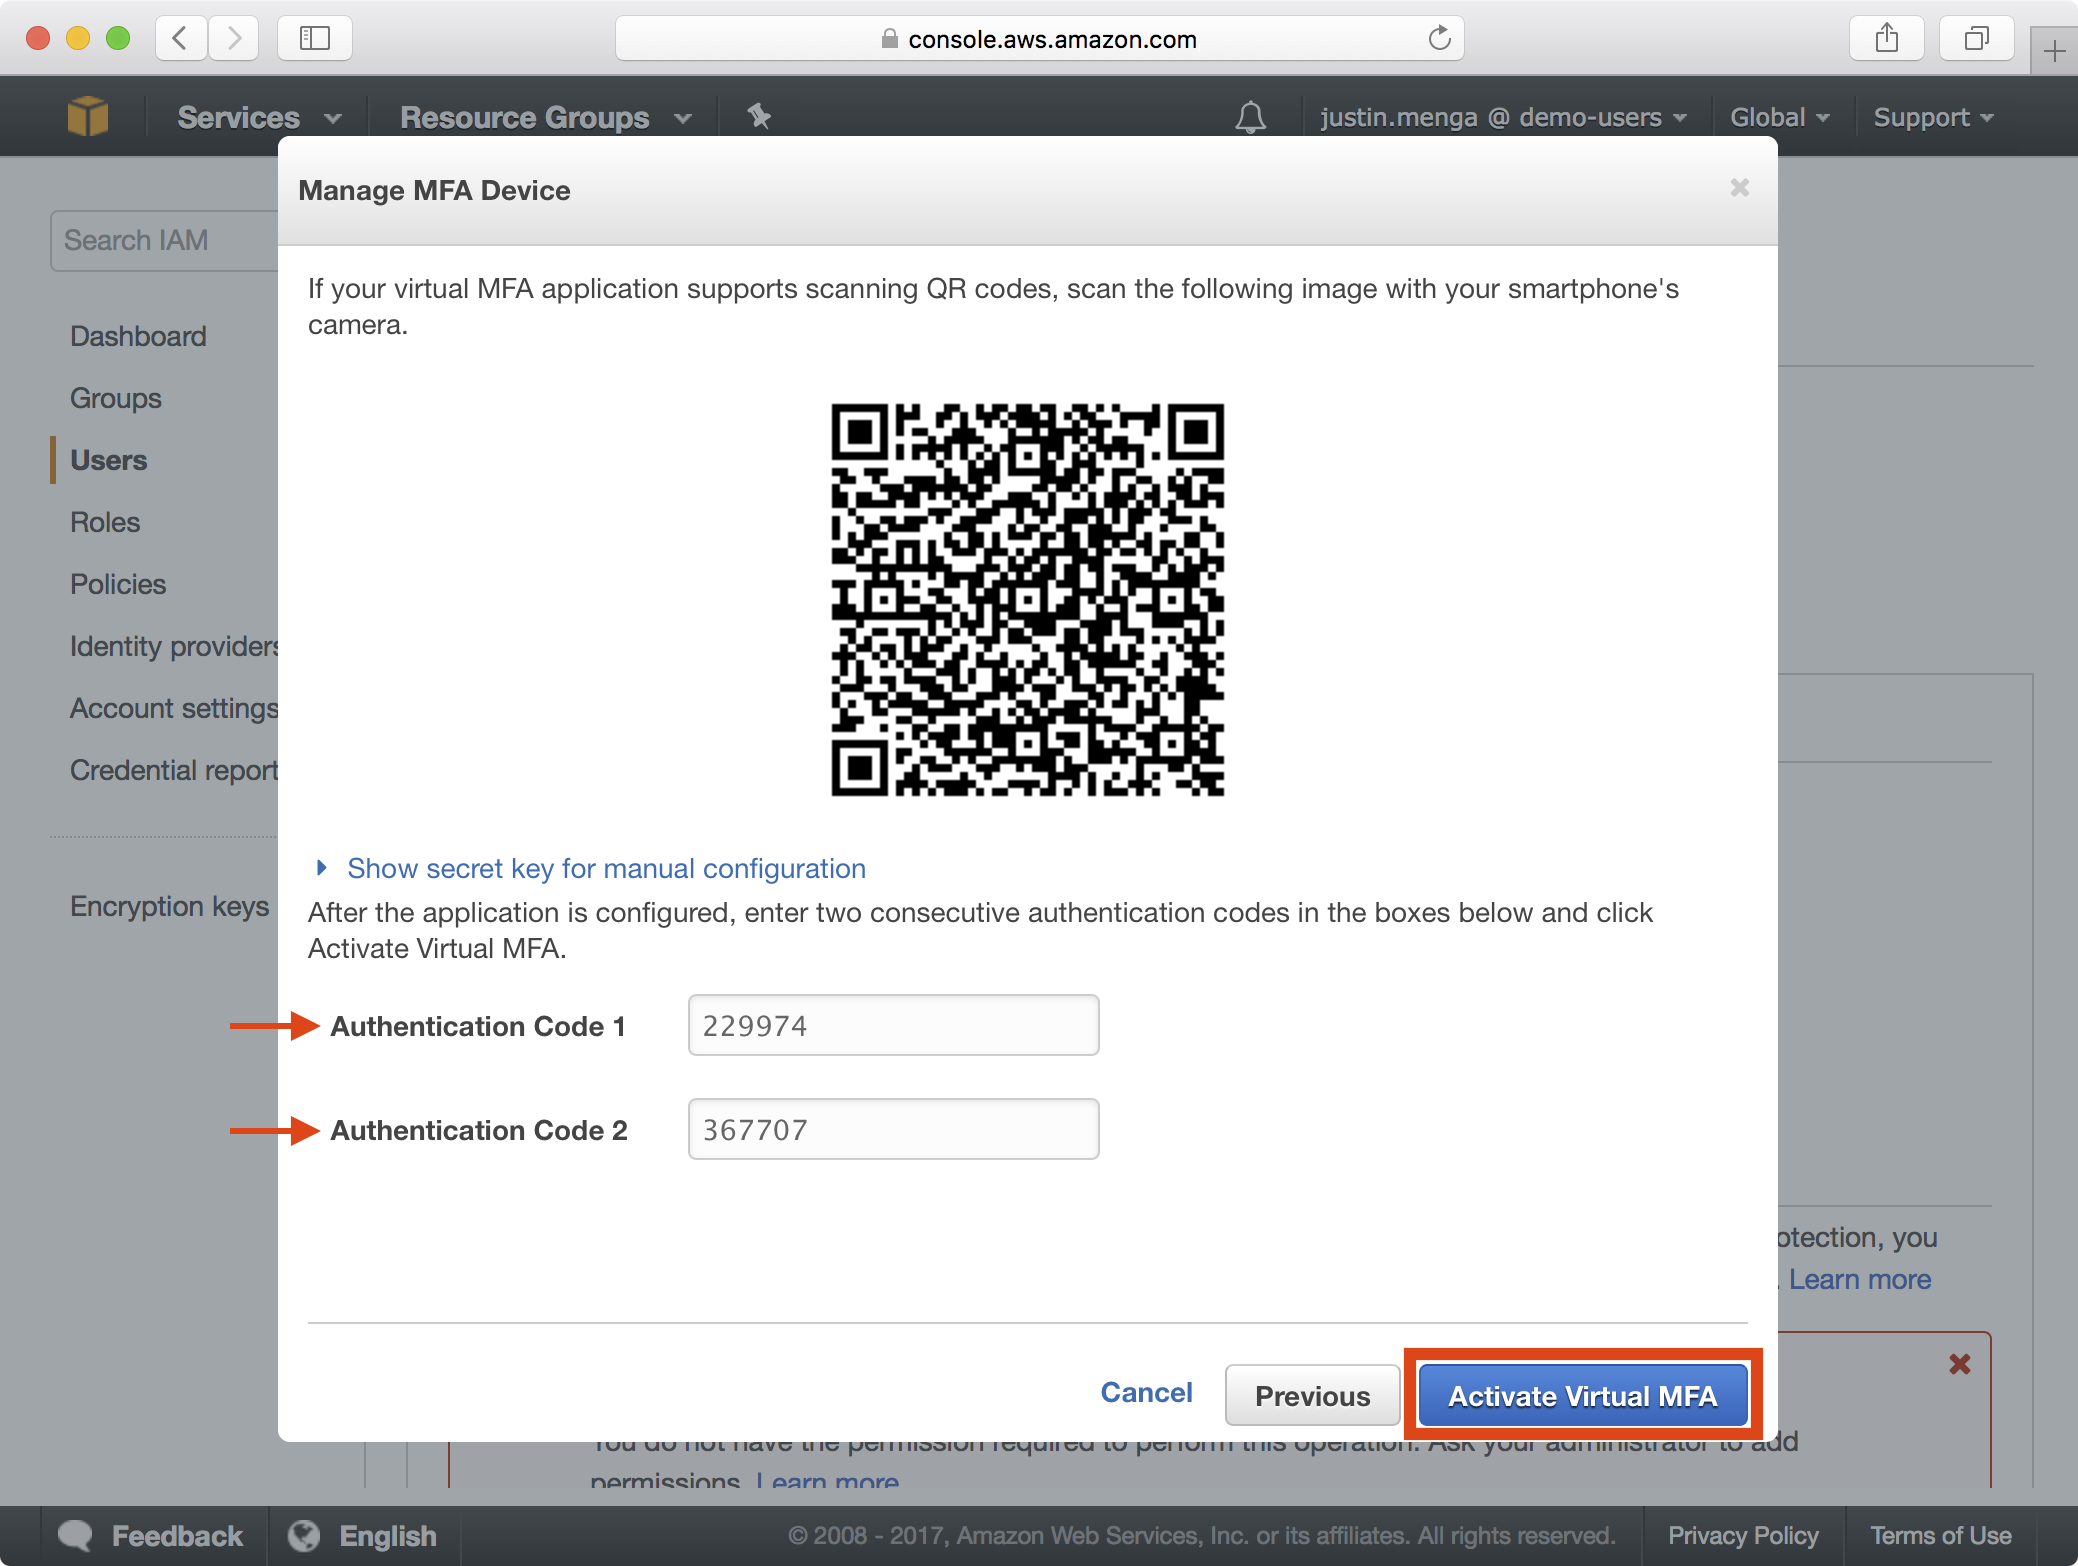
5. Add a new account on your MFA device (e.g. Microsoft or Google Authenticator) and scan the QR code displayed on screen. Once you have entered two authentication codes, click on the Activate Virtual MFA button:
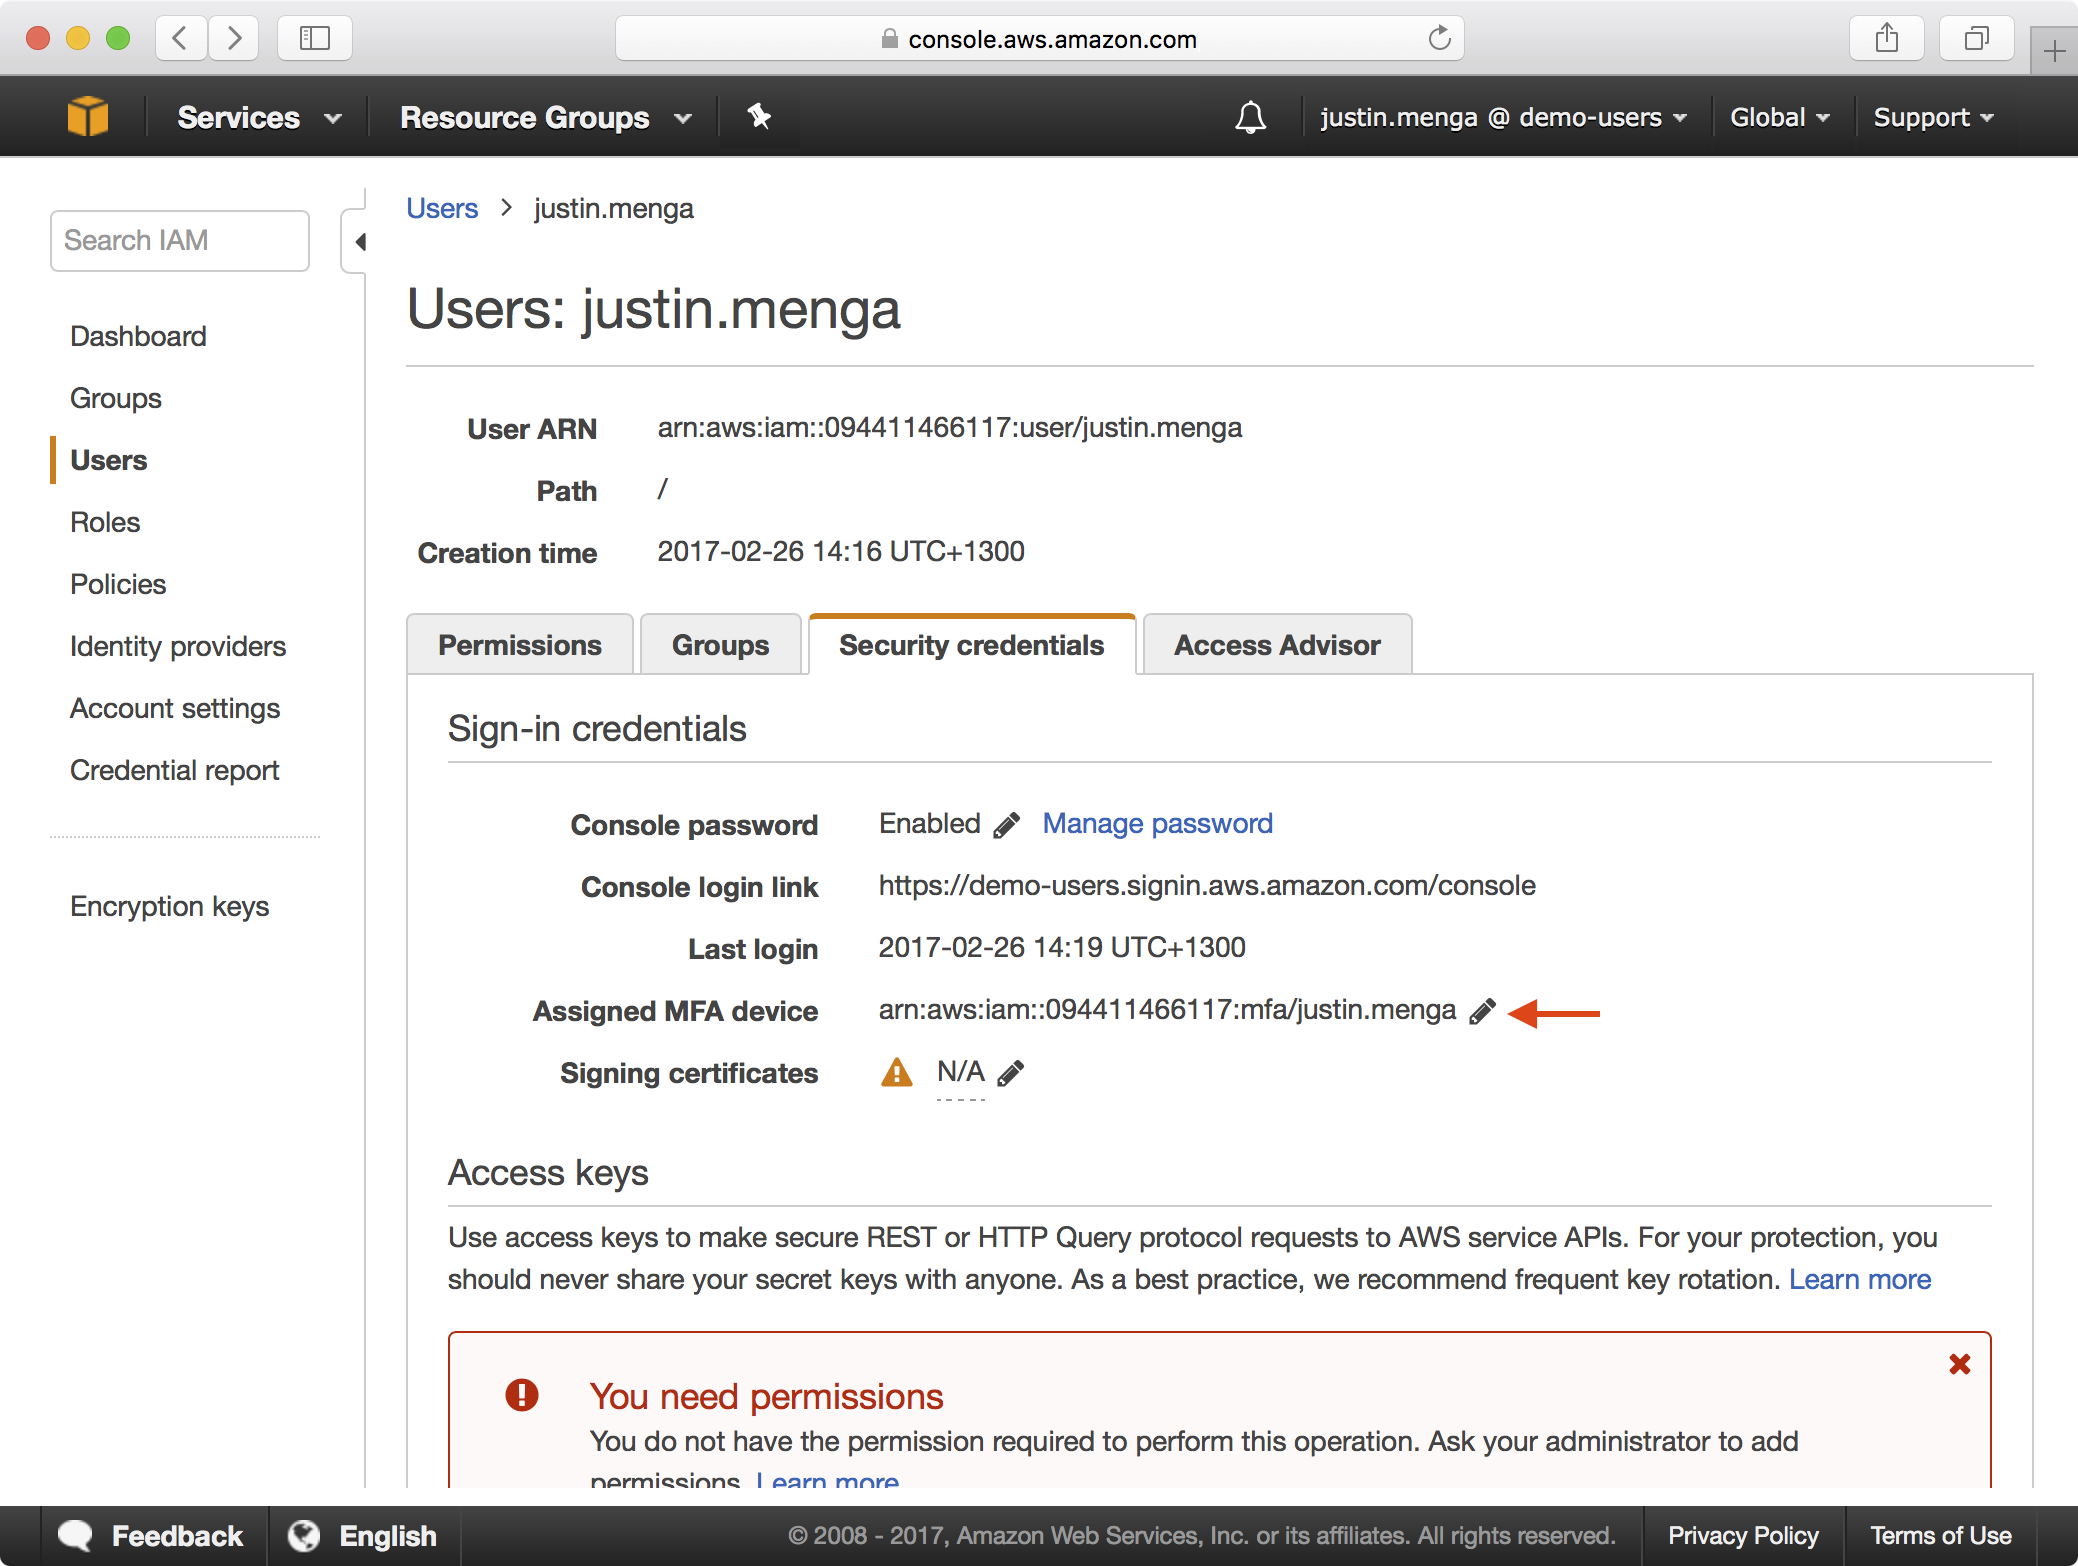
6. Copy the ARN value of the MFA device as you will need this later when you configure your local AWS environment to assume the admin role.
7. At this point, MFA is setup for the administrative user, and if you logout and log back in with the user credentials, this time you should be prompted to enter an MFA code:
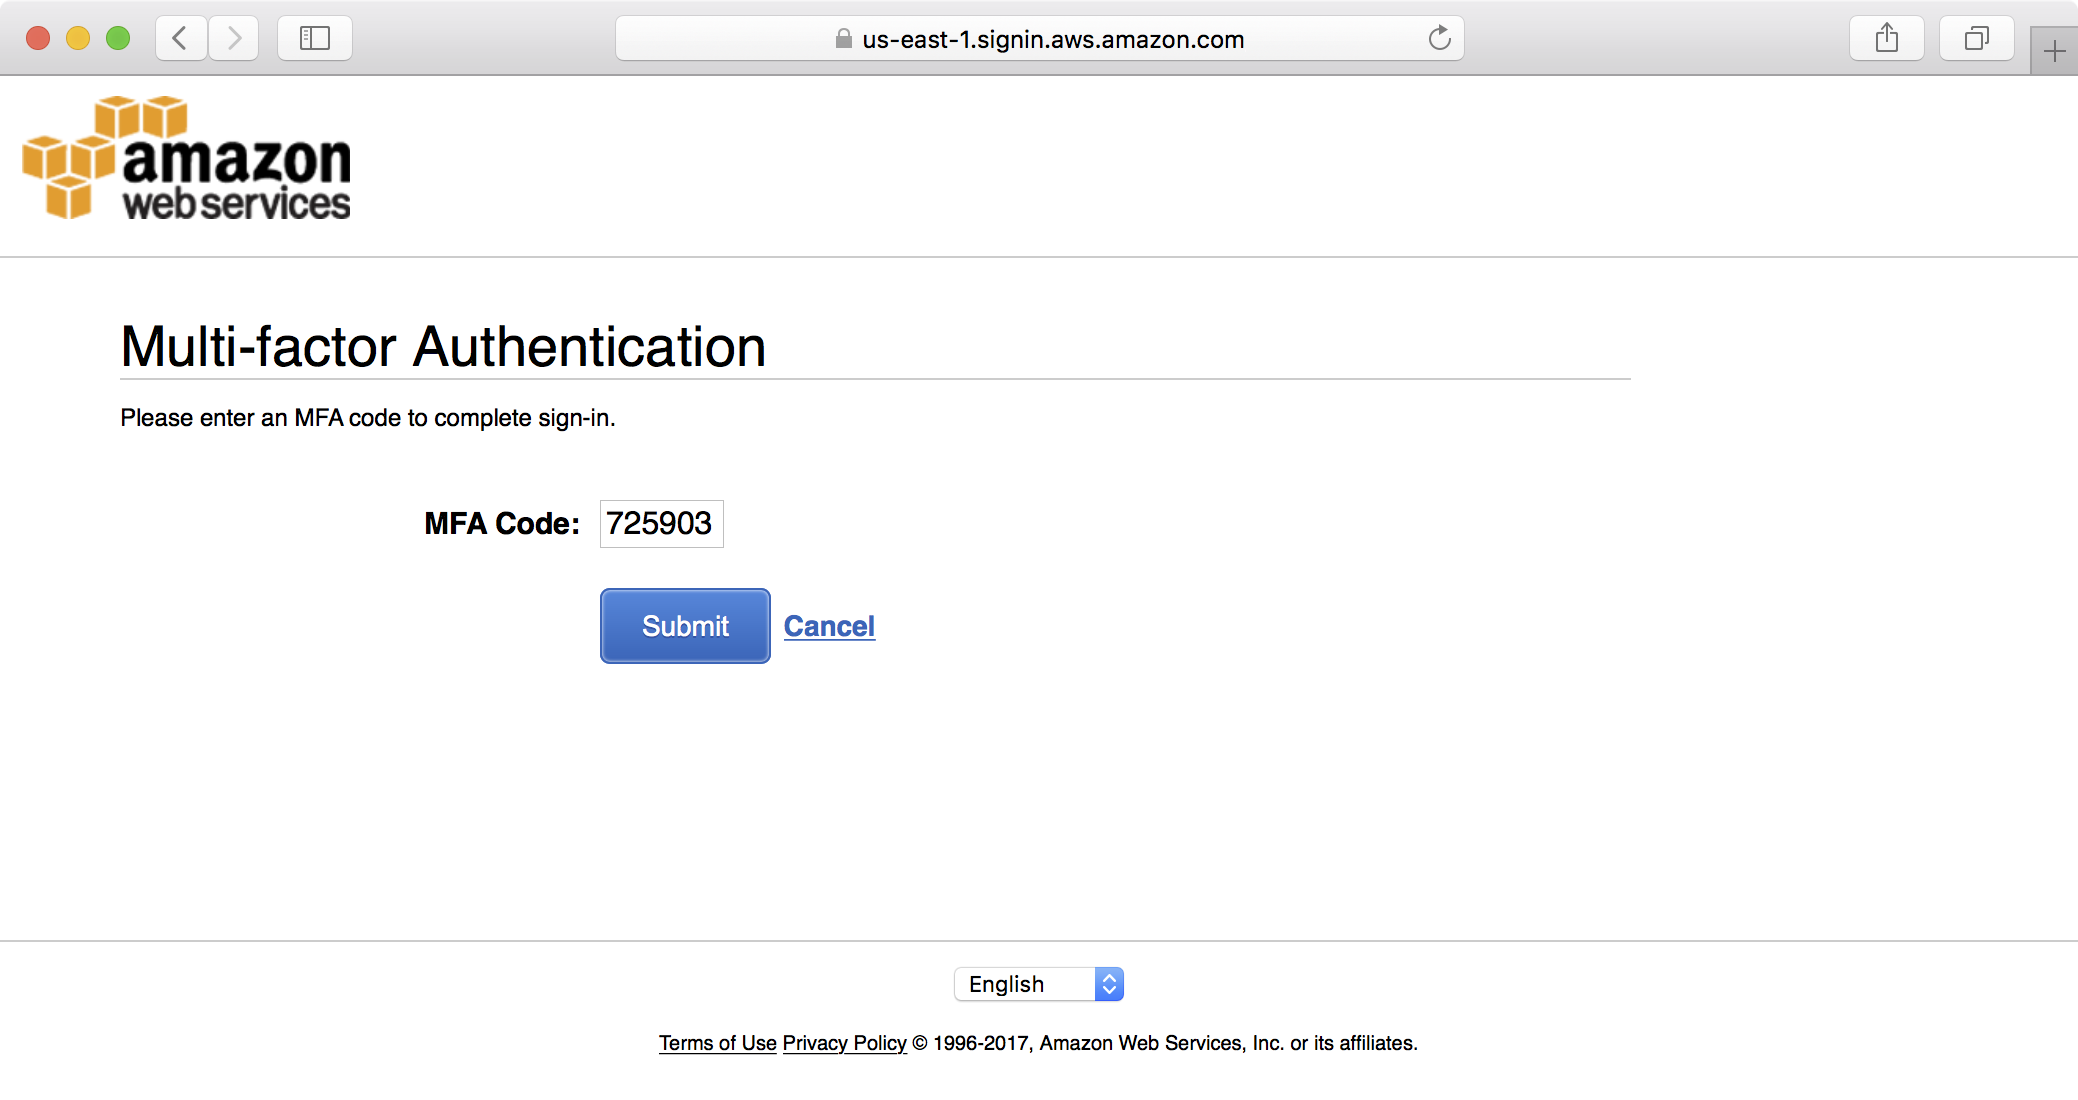
After successfully logging in with MFA auth, you will now be able to assume the admin role in the AWS console, as the user is a member of the Administrators group and has satisfied the requirement to authenticate using MFA.
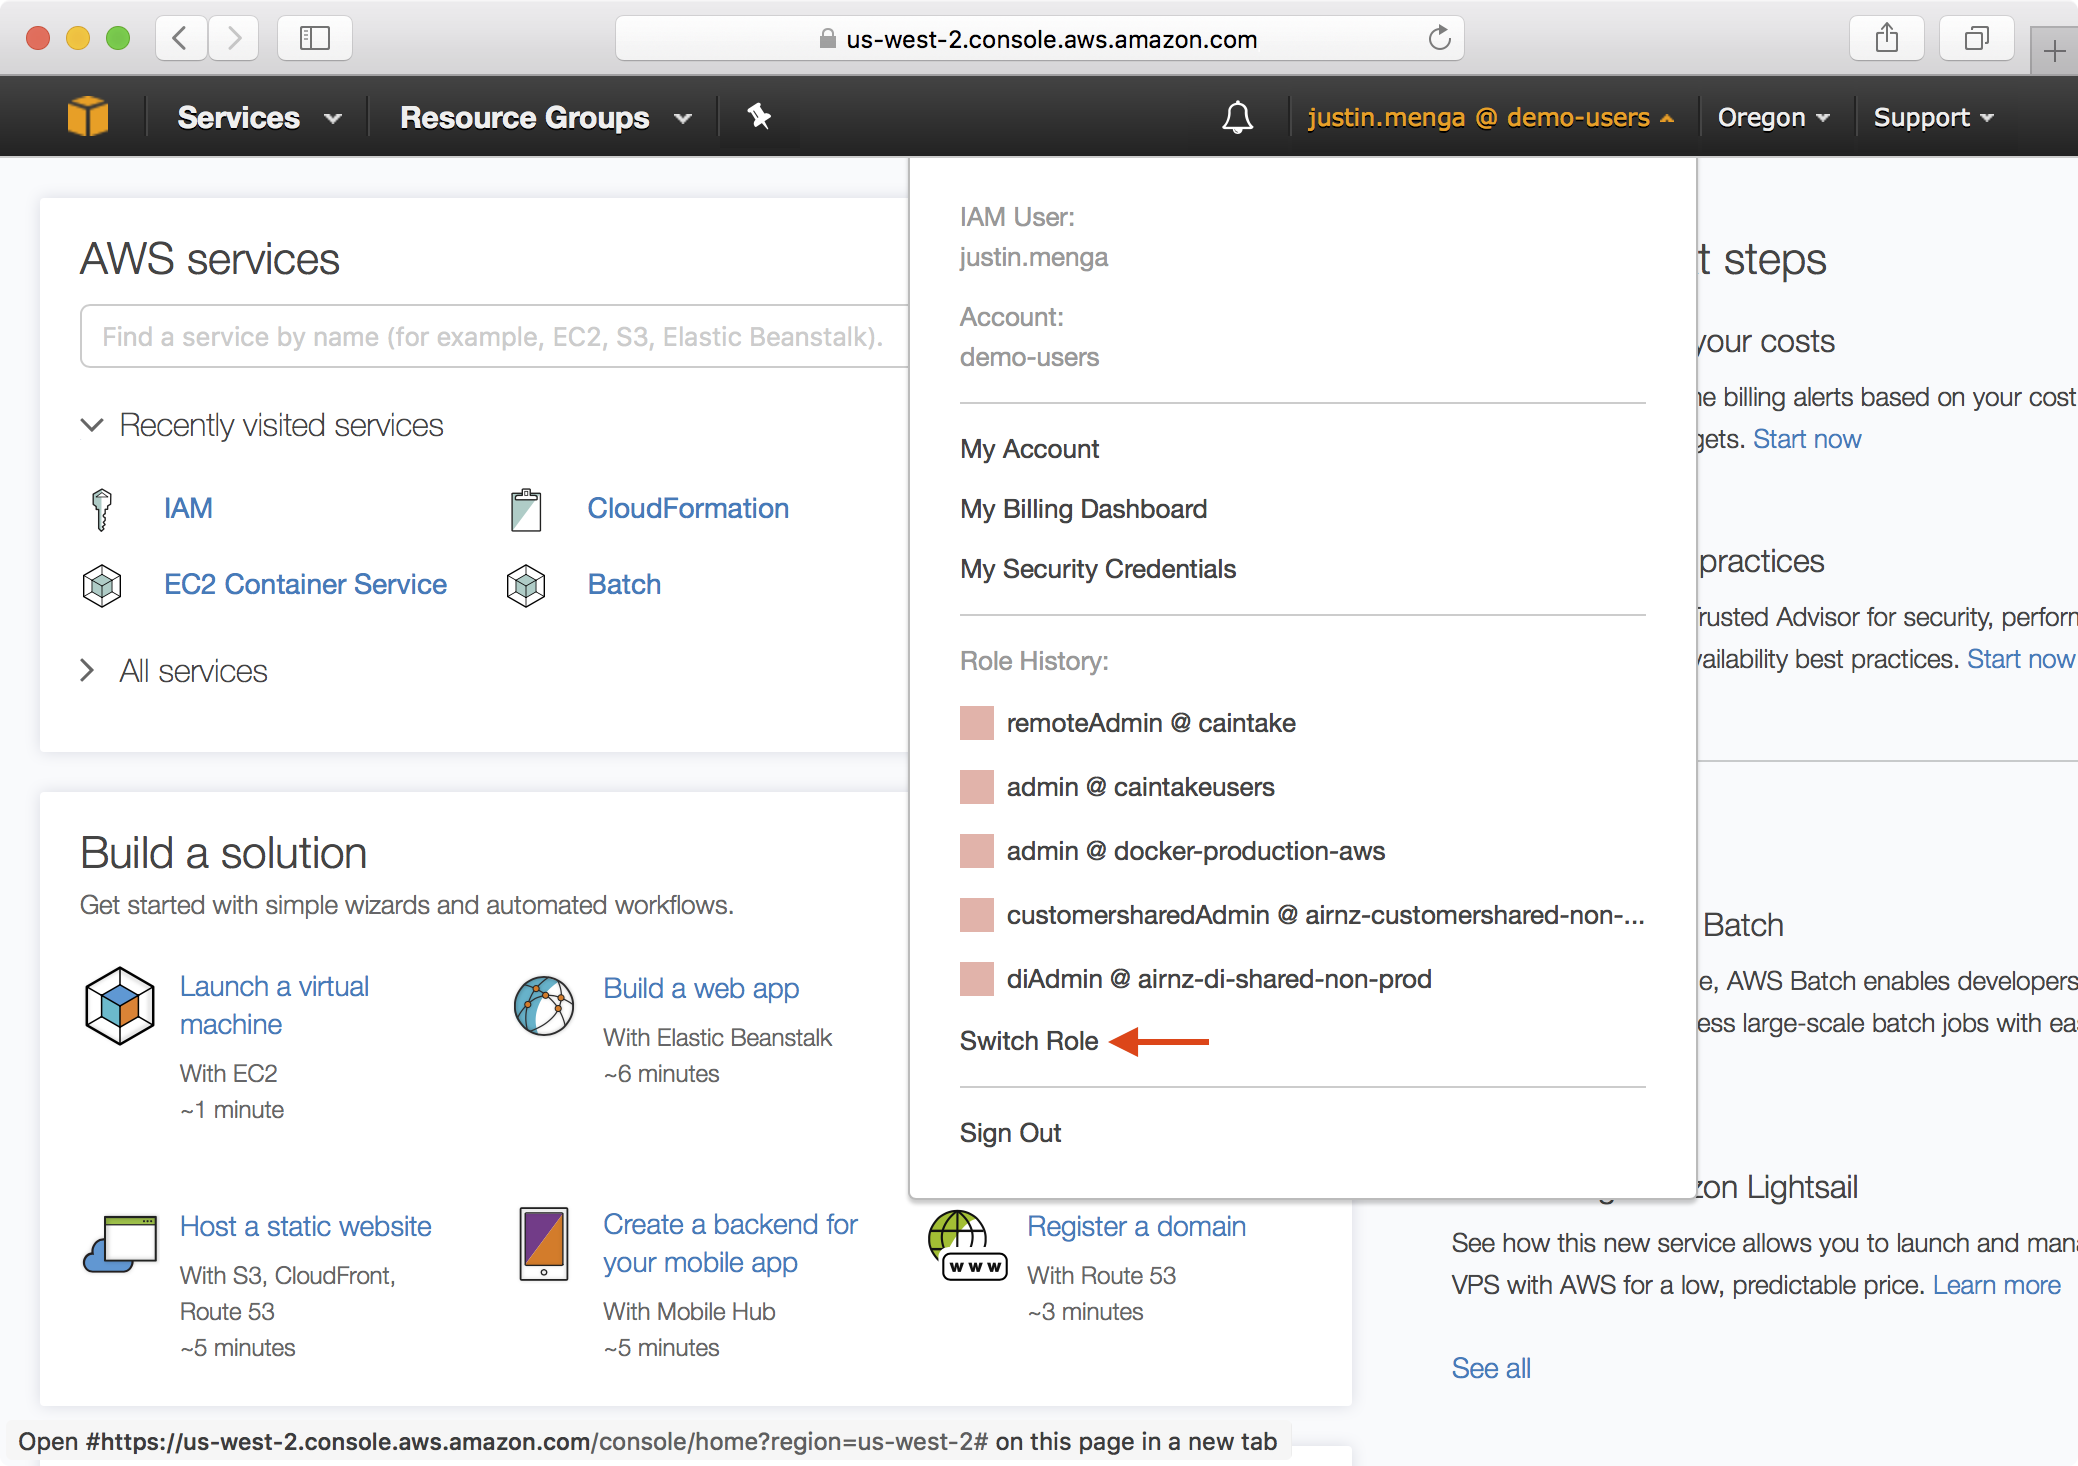
8. Expand the login dropdown and select the Switch Role option:
9. Enter the account ID or alias of the demo-users account, specify admin as the role to assume and click Switch Role:
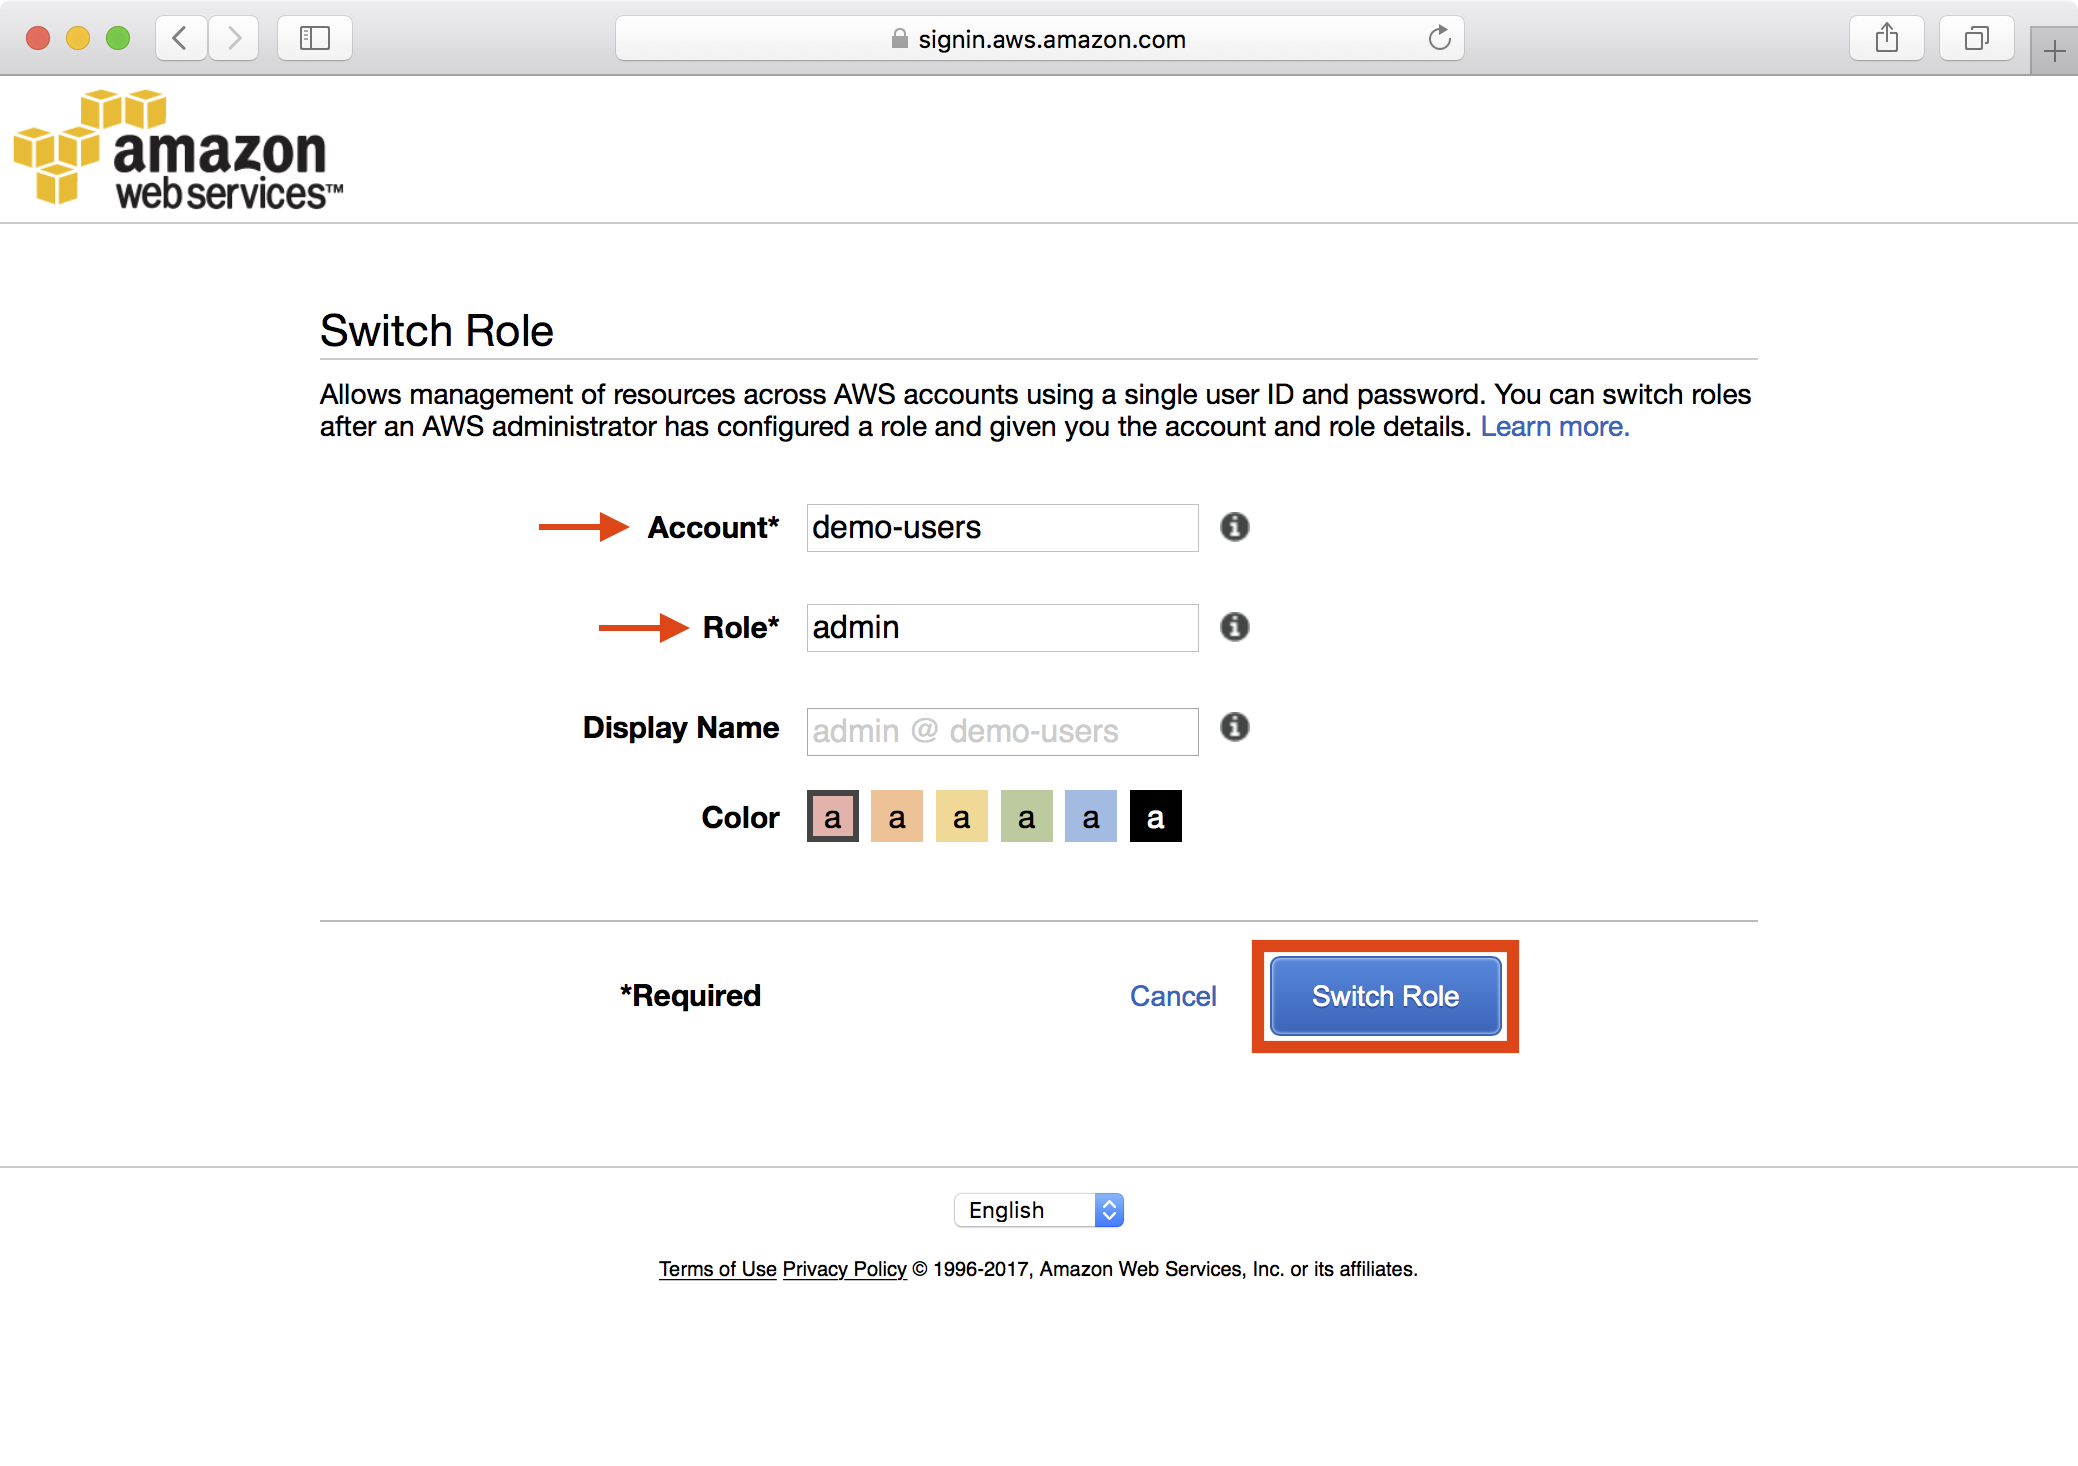
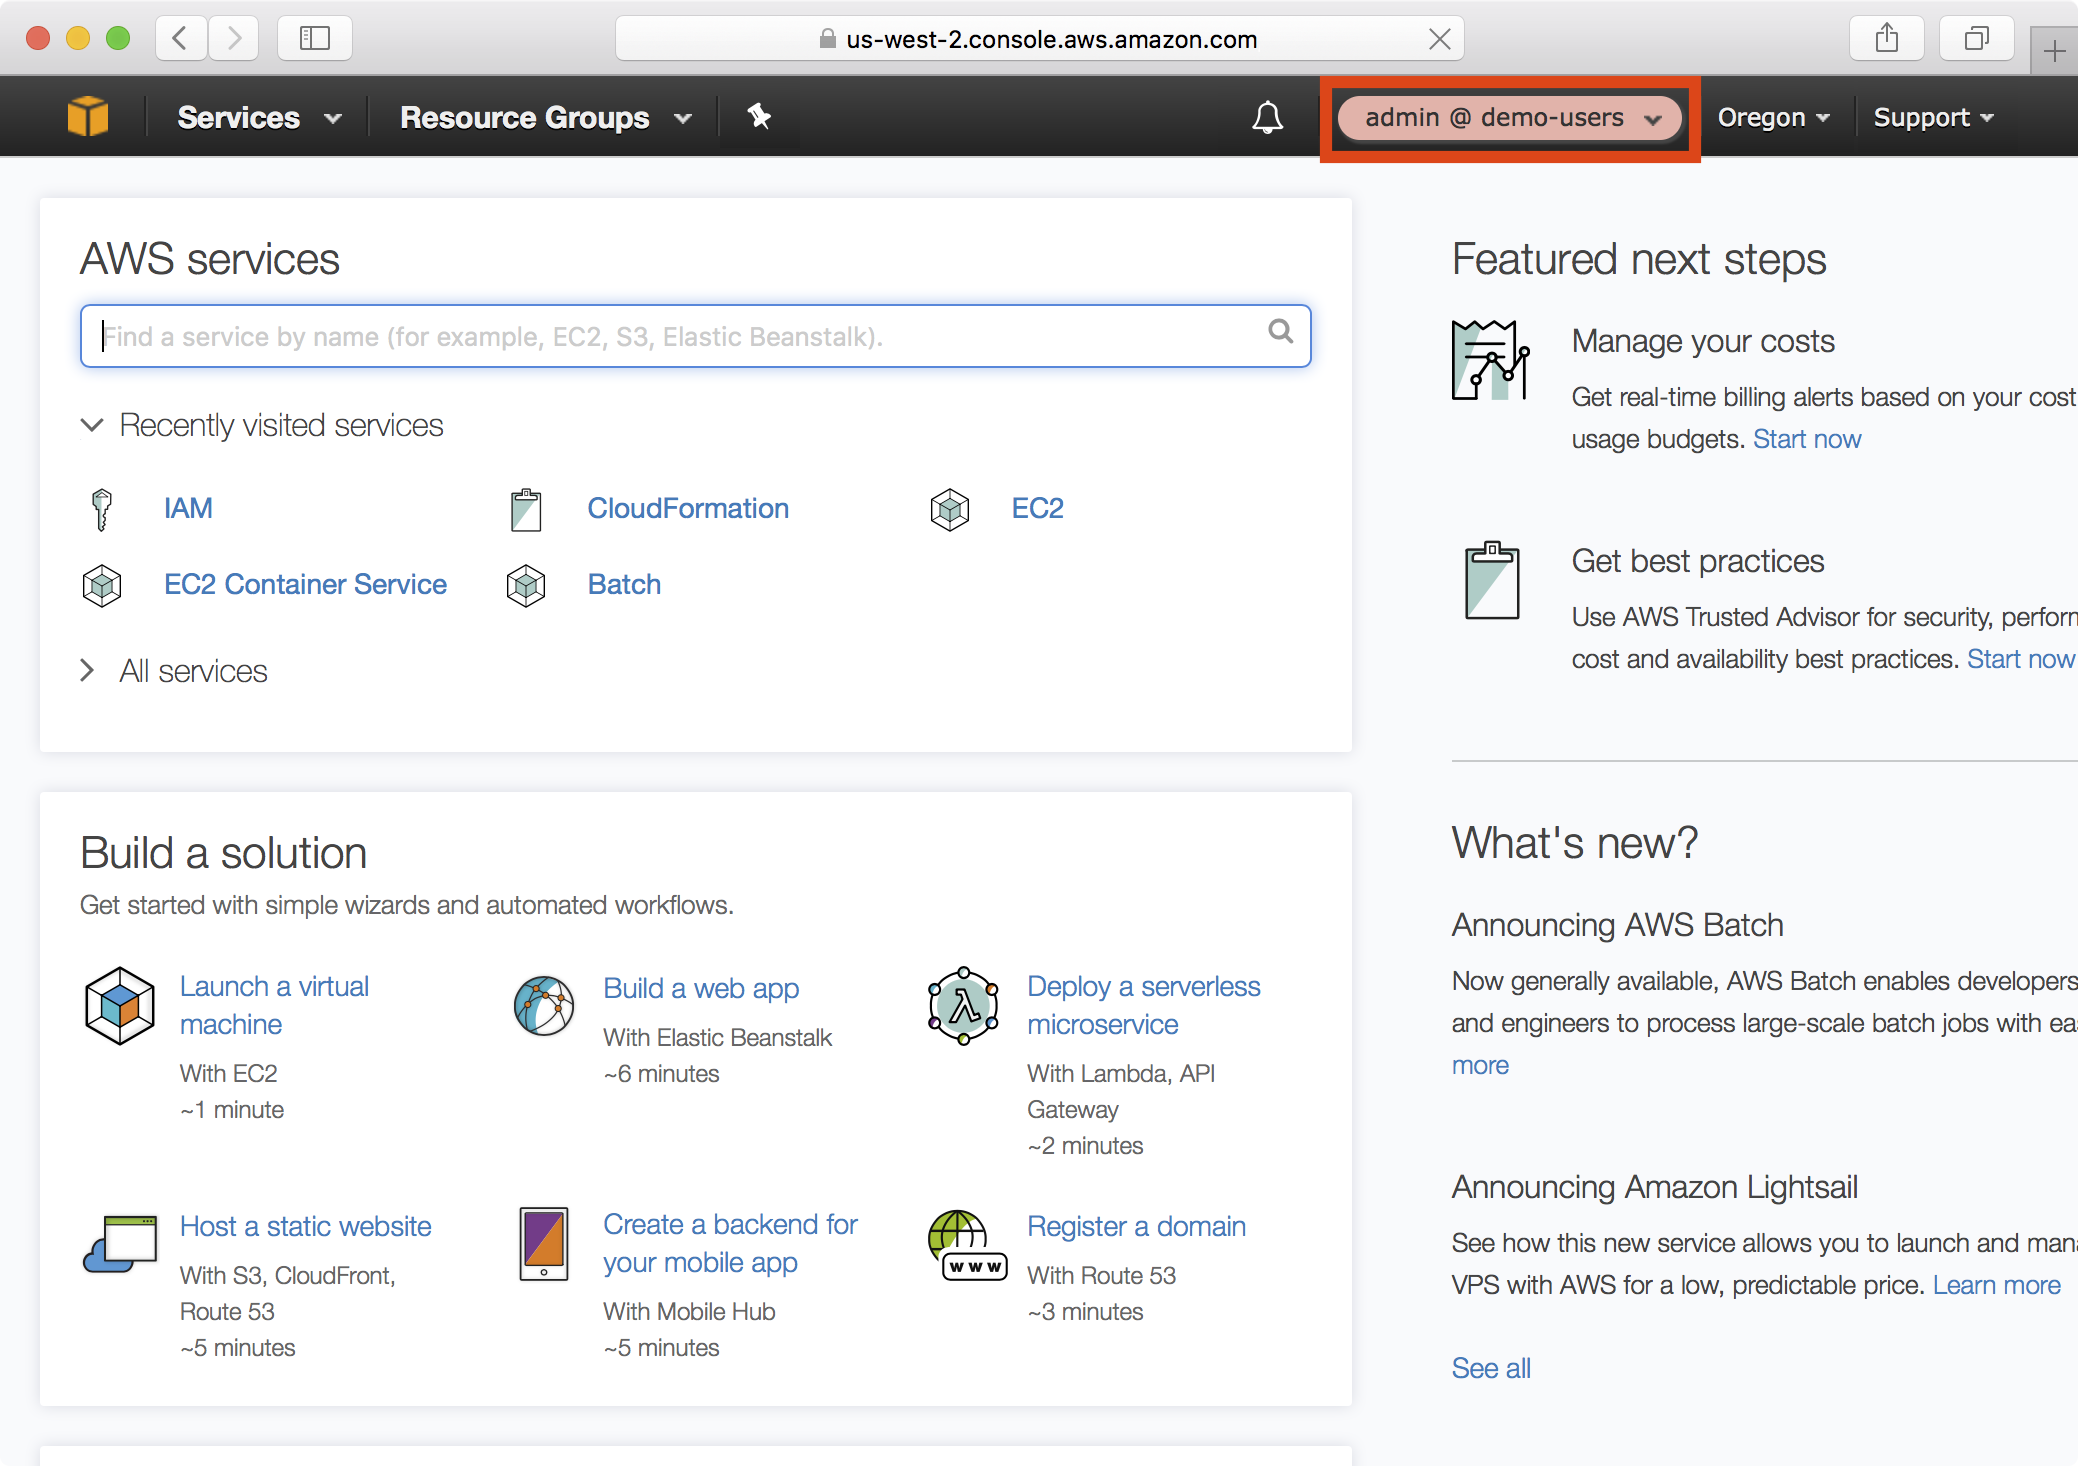
10. Notice that the AWS Console reflects you have successfully assumed the admin role:
Configuring AWS API Access
We have established an initial administrative user and have setup MFA access to the AWS Console.
We now need to setup our local AWS environment to allow us to:
- Authenticate as user using the API key created in Step 5 of Creating an Admnistrator
- Automatically assume the admin role and prompt for MFA authentication
1. Add an entry to the local ~/.aws/credentials file that includes the AWS access key ID and secret access key created in in Step 5 of Creating an Admnistrator:
[demo-users]
aws_access_key_id = xxxxxxxxxxxxxx
aws_secret_access_key = xxxxxxxxxxxxxxxxxxxxxxxxxxxx
2. Add a profile to the local ~/.aws/config file that references the credentials profile created in Step 1, and is configured to assume the admin role with MFA authentication:
[profile demo-users-admin]
source_profile=demo-users
role_arn=arn:aws:iam::094411466117:role/admin
role_session_name=justin.menga
mfa_serial=arn:aws:iam::094411466117:mfa/justin.menga
region=us-west-2
Notice that we create a profile called demo-users-admin with the following settings:
source_profile- references the credentials profile created in Step 1role_arn- the ARN of the IAM role to assume, which in this case is the admin role in the demo-users accountrole_session_name- the name to assign to each session created when you assume the role. Setting this to your user name simplifies tracking of user activity in CloudTrail logsmfa_serial- the ARN of the MFA device used for MFA, which we copied in Step 6 of Setting up MFAregion- the default AWS region to assume the role in
3. We can now test the profile we have just setup. We can configure our environment to use the profile by setting the AWS_PROFILE environment variable and then running a test AWS CLI command as demonstrated below:
$ export AWS_PROFILE=demo-users-admin
$ aws sts get-caller-identity
Enter MFA Code: ******
{
    "Account": "094411466117",
    "UserId": "AROAJRQTS5HMX77II3TQE:justin.menga",
    "Arn": "arn:aws:sts::094411466117:assumed-role/admin/justin.menga"
}
Notice that you are prompted for an MFA code, and after entering a valid code, the test AWS CLI command can be run.
The AWS CLI caches temporary session credentials obtained during the assume role process by default for one hour, meaning if you re-run the test AWS CLI command, you won’t be re-prompted for MFA authentication until after one hour has passed:
# We are not re-prompted for MFA authentication
$ aws sts get-caller-identity
{
    "Account": "094411466117",
    "UserId": "AROAJRQTS5HMX77II3TQE:justin.menga",
    "Arn": "arn:aws:sts::094411466117:assumed-role/admin/justin.menga"
}
Configure the Resources Account
We have created security resources in our demo-users account by creating an environment called demo-users in our security resources playbook.
Let’s now create security resources in the demo-resources account by creating a new environment called demo-resources in our security resources playbook.
1. Ensuring you are logged into the demo-resources account, repeat the instructions Creating a Temporary User
2. Create a new environment called demo-resources in the inventory file:
[demo-users]
demo-users ansible_connection=local

[demo-resources]
demo-resources ansible_connection=local
3. Create a file called group_vars/demo-resources/vars.yml:
$ mkdir -p group_vars/demo-resources
$ touch group_vars/demo-resources/vars.yml
4. Configure the group_vars/demo-resources/vars.yml environment settings as follows:
# STS role in the target AWS account to assume
sts_role_arn: "arn:aws:iam::160775127577:role/admin"

# Trusted entities for the IAM admin role
# Here we trust the demo-users account
config_iam_admin_accounts:
  - 094411466117
Notice that we change the sts_role_arn variable to reference the account ID (160775127577) of the demo-resources account. Again, this is very important that you target the correct account for each environment that you define.
We also configure a setting called config_iam_admin_accounts, which is an optional variable defined in the security template that adds a list of accounts as trusted entities to the IAM admin role that is created by the template.
Because all of our user accounts will be defined in the demo-users account, we need to delegate access to the admin role to the demo-users, hence we configure the demo-users account (account ID 094411466117) as a trusted entity.
Note
Adding a remote account as a trusted entity does not automatically allow all users from the remote account to assume the role.
Users in the remote account must be granted permissions to assume the role - hence we are delegating control of which users can assume the admin role to the trusted account.
5. Run the playbook, targetting the new demo-resources environment and setting sts_disable to true so that we can seed the initial IAM admin role:
$ ansible-playbook site.yml -e env=demo-resources -e sts_disable=true

PLAY [Assume Role] *************************************************************

TASK [aws-sts : set_fact] ******************************************************
ok: [demo-resources]

TASK [aws-sts : checking if sts functions are sts_disabled] ********************
ok: [demo-resources] => {
    "msg": "Skipping STS functions as sts_disabled is defined"
}

...
...

TASK [aws-cloudformation : configure application stack] ************************
changed: [demo-resources]

...
...

PLAY RECAP *********************************************************************
demo-resources              : ok=19   changed=1    unreachable=0    failed=0
If you navigate to the CloudFormation dashboard, notice that a new stack called security-resources has been created:
In the IAM dashboard we can verify that our admin role has been created:
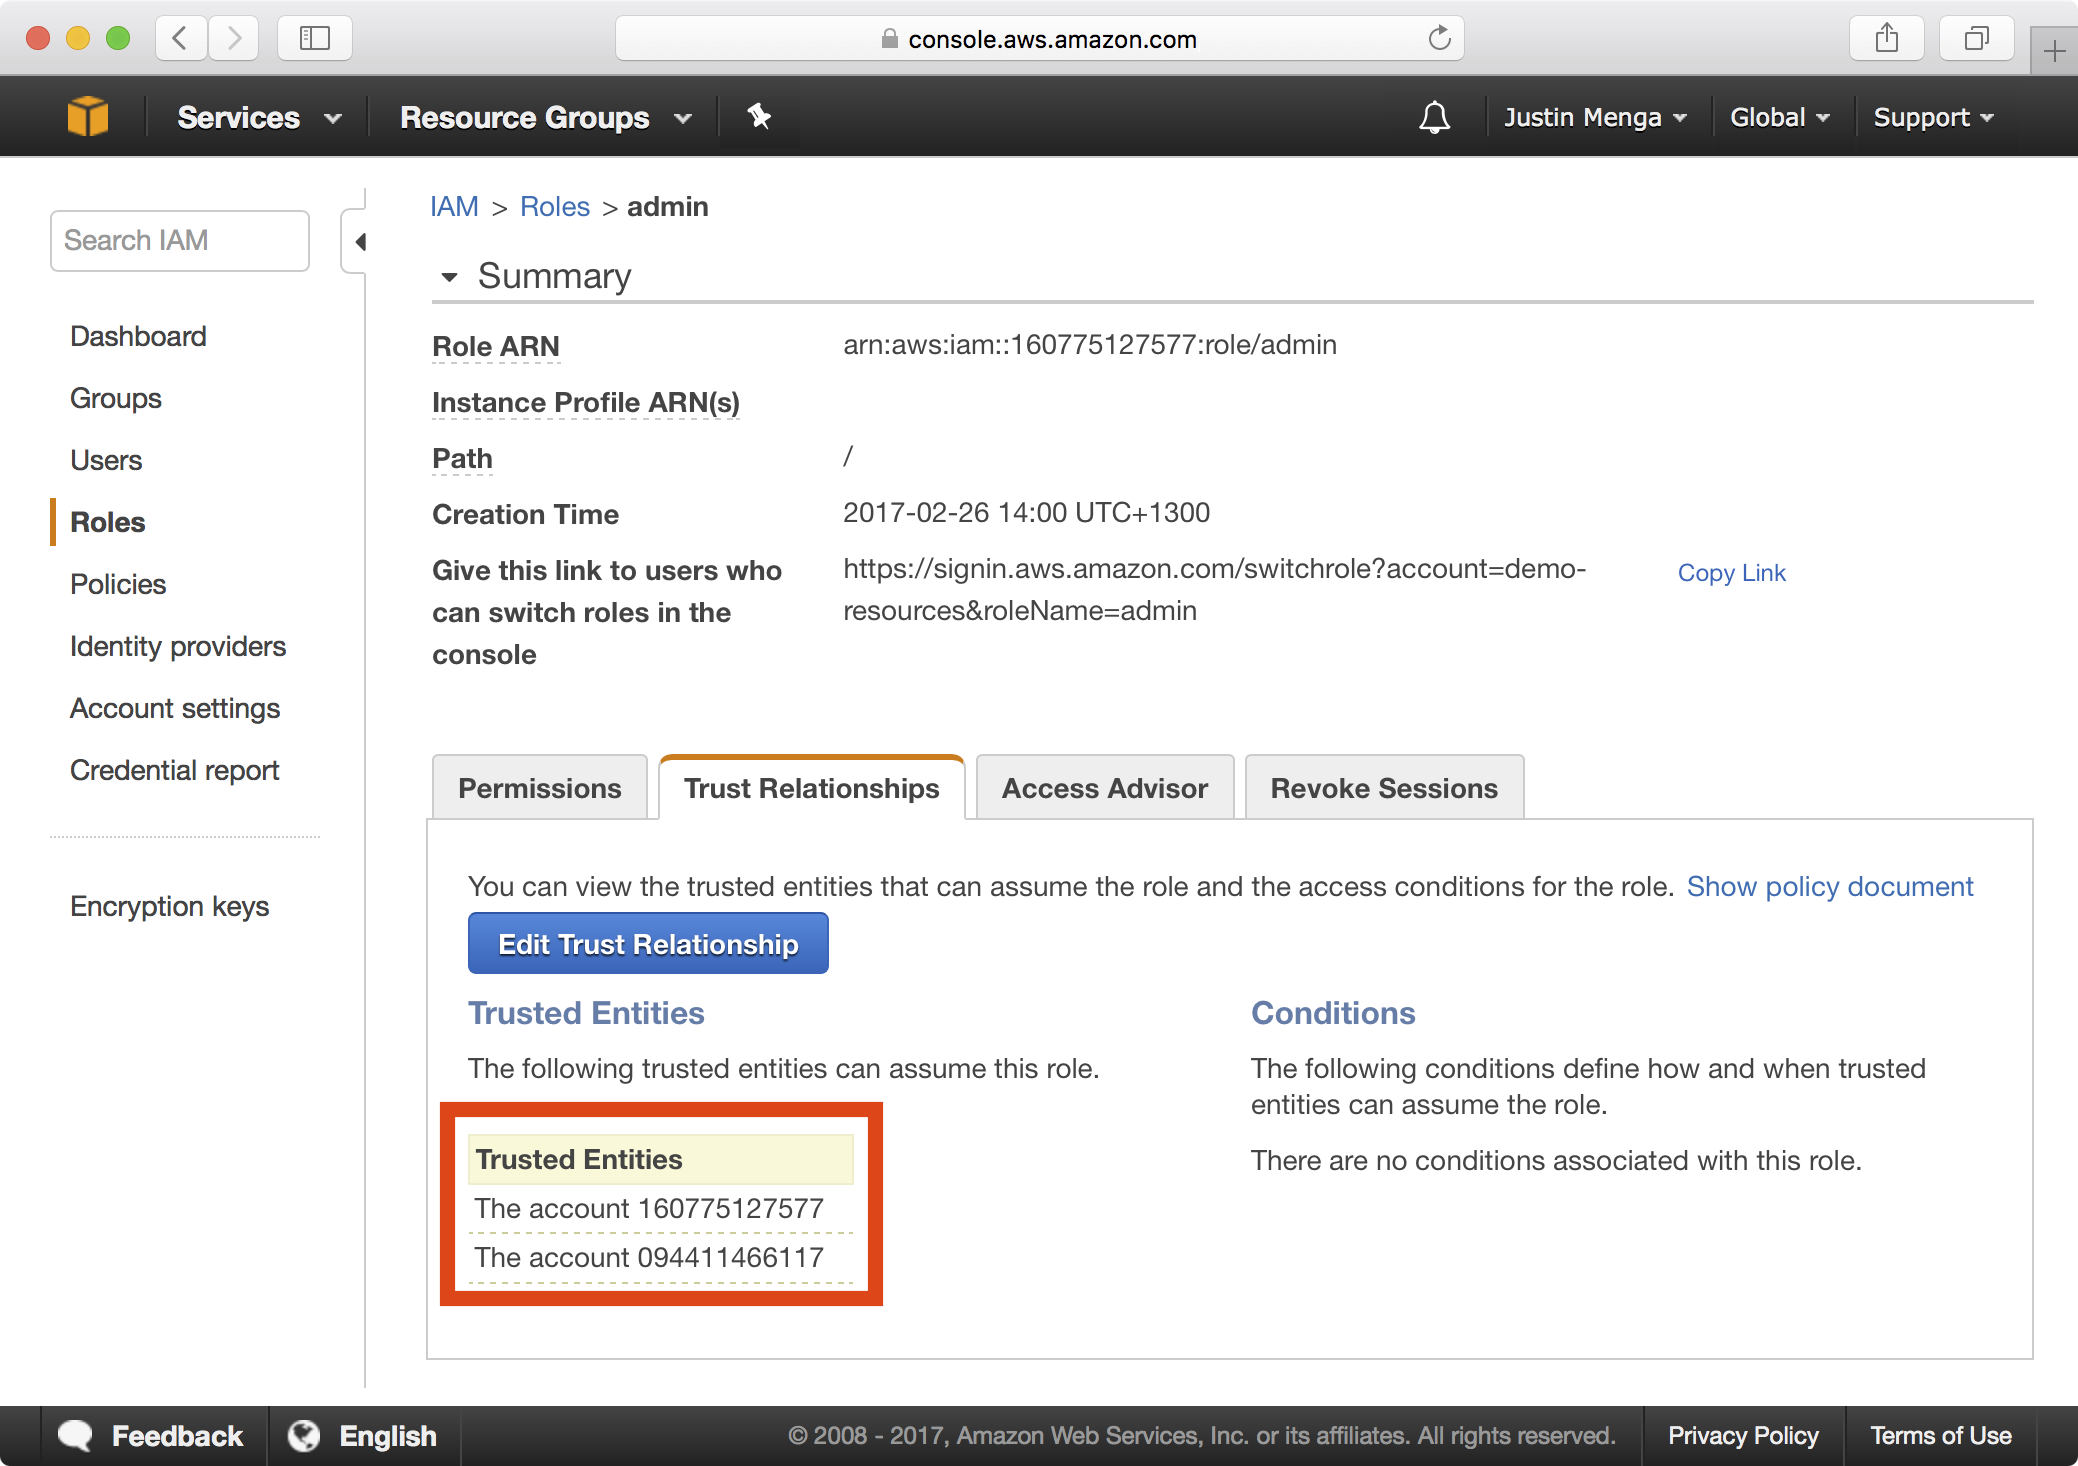
If you click on the admin role and select the Trust Relationships tab, notice that both the local account ID for demo-resources (160775127577) and the account ID for demo-users (094411466117) are trusted:
Create a Resources Admins Group
In the previous section we created security resources for the demo-resources account and added our demo-users account as a trusted entity that is allowed to assume the admin role.
Before users in the “users” account can assume the role, users within that account must be explicitly granted permission to assume the admin role.
Let’s now create a new group called DemoResourcesAdmins in the demo-users account and grant this group the ability to assume the admin role in the demo-resources account.
The security resources template in our playbook includes support for defining IAM groups, so we will define the new group in the demo-users environment.
1. Open the group_vars/demo-users/vars.yml file and add the following settings:
# STS role in the target AWS account to assume
sts_role_arn: "arn:aws:iam::094411466117:role/admin"

# IAM Groups
config_iam_groups:
  DemoResourcesAdmins:
    Policies:
      - PolicyName: "AssumeDemoResourcesAdminRole"
        PolicyDocument:
          Version: "2012-10-17"
          Statement:
            - Effect: "Allow"
              Action:
              - "sts:AssumeRole"
              Resource: "arn:aws:iam::160775127577:role/admin"
Notice that you can add custom IAM groups using the config_iam_groups dictionary, where each group is represented by a named key. In the example above the security template will create a new IAM group called DemoResourceAdmins and attach an IAM policy that allows members of the group to assume the admin role in the demo-resources account.
2. To apply the new changes, run the security playbook, targeting the demo-users environment.
$ export AWS_PROFILE=demo-users-admin
$ ansible-playbook site.yml -e env=demo-users

PLAY [Assume Role] *************************************************************

TASK [aws-sts : set_fact] ******************************************************
ok: [demo-users]

TASK [aws-sts : checking if sts functions are sts_disabled] ********************
skipping: [demo-users]

TASK [aws-sts : setting empty sts_session_output result] ***********************
skipping: [demo-users]

TASK [aws-sts : setting sts_creds if legacy AWS credentials are present (e.g. for Ansible Tower)] ***
skipping: [demo-users]

TASK [aws-sts : assume sts role] ***********************************************
Enter MFA code: ******
ok: [demo-users]
...
...
TASK [aws-cloudformation : configure application stack] ************************
changed: [demo-users]
...
...
PLAY RECAP *********************************************************************
demo-users                 : ok=20   changed=1    unreachable=0    failed=0
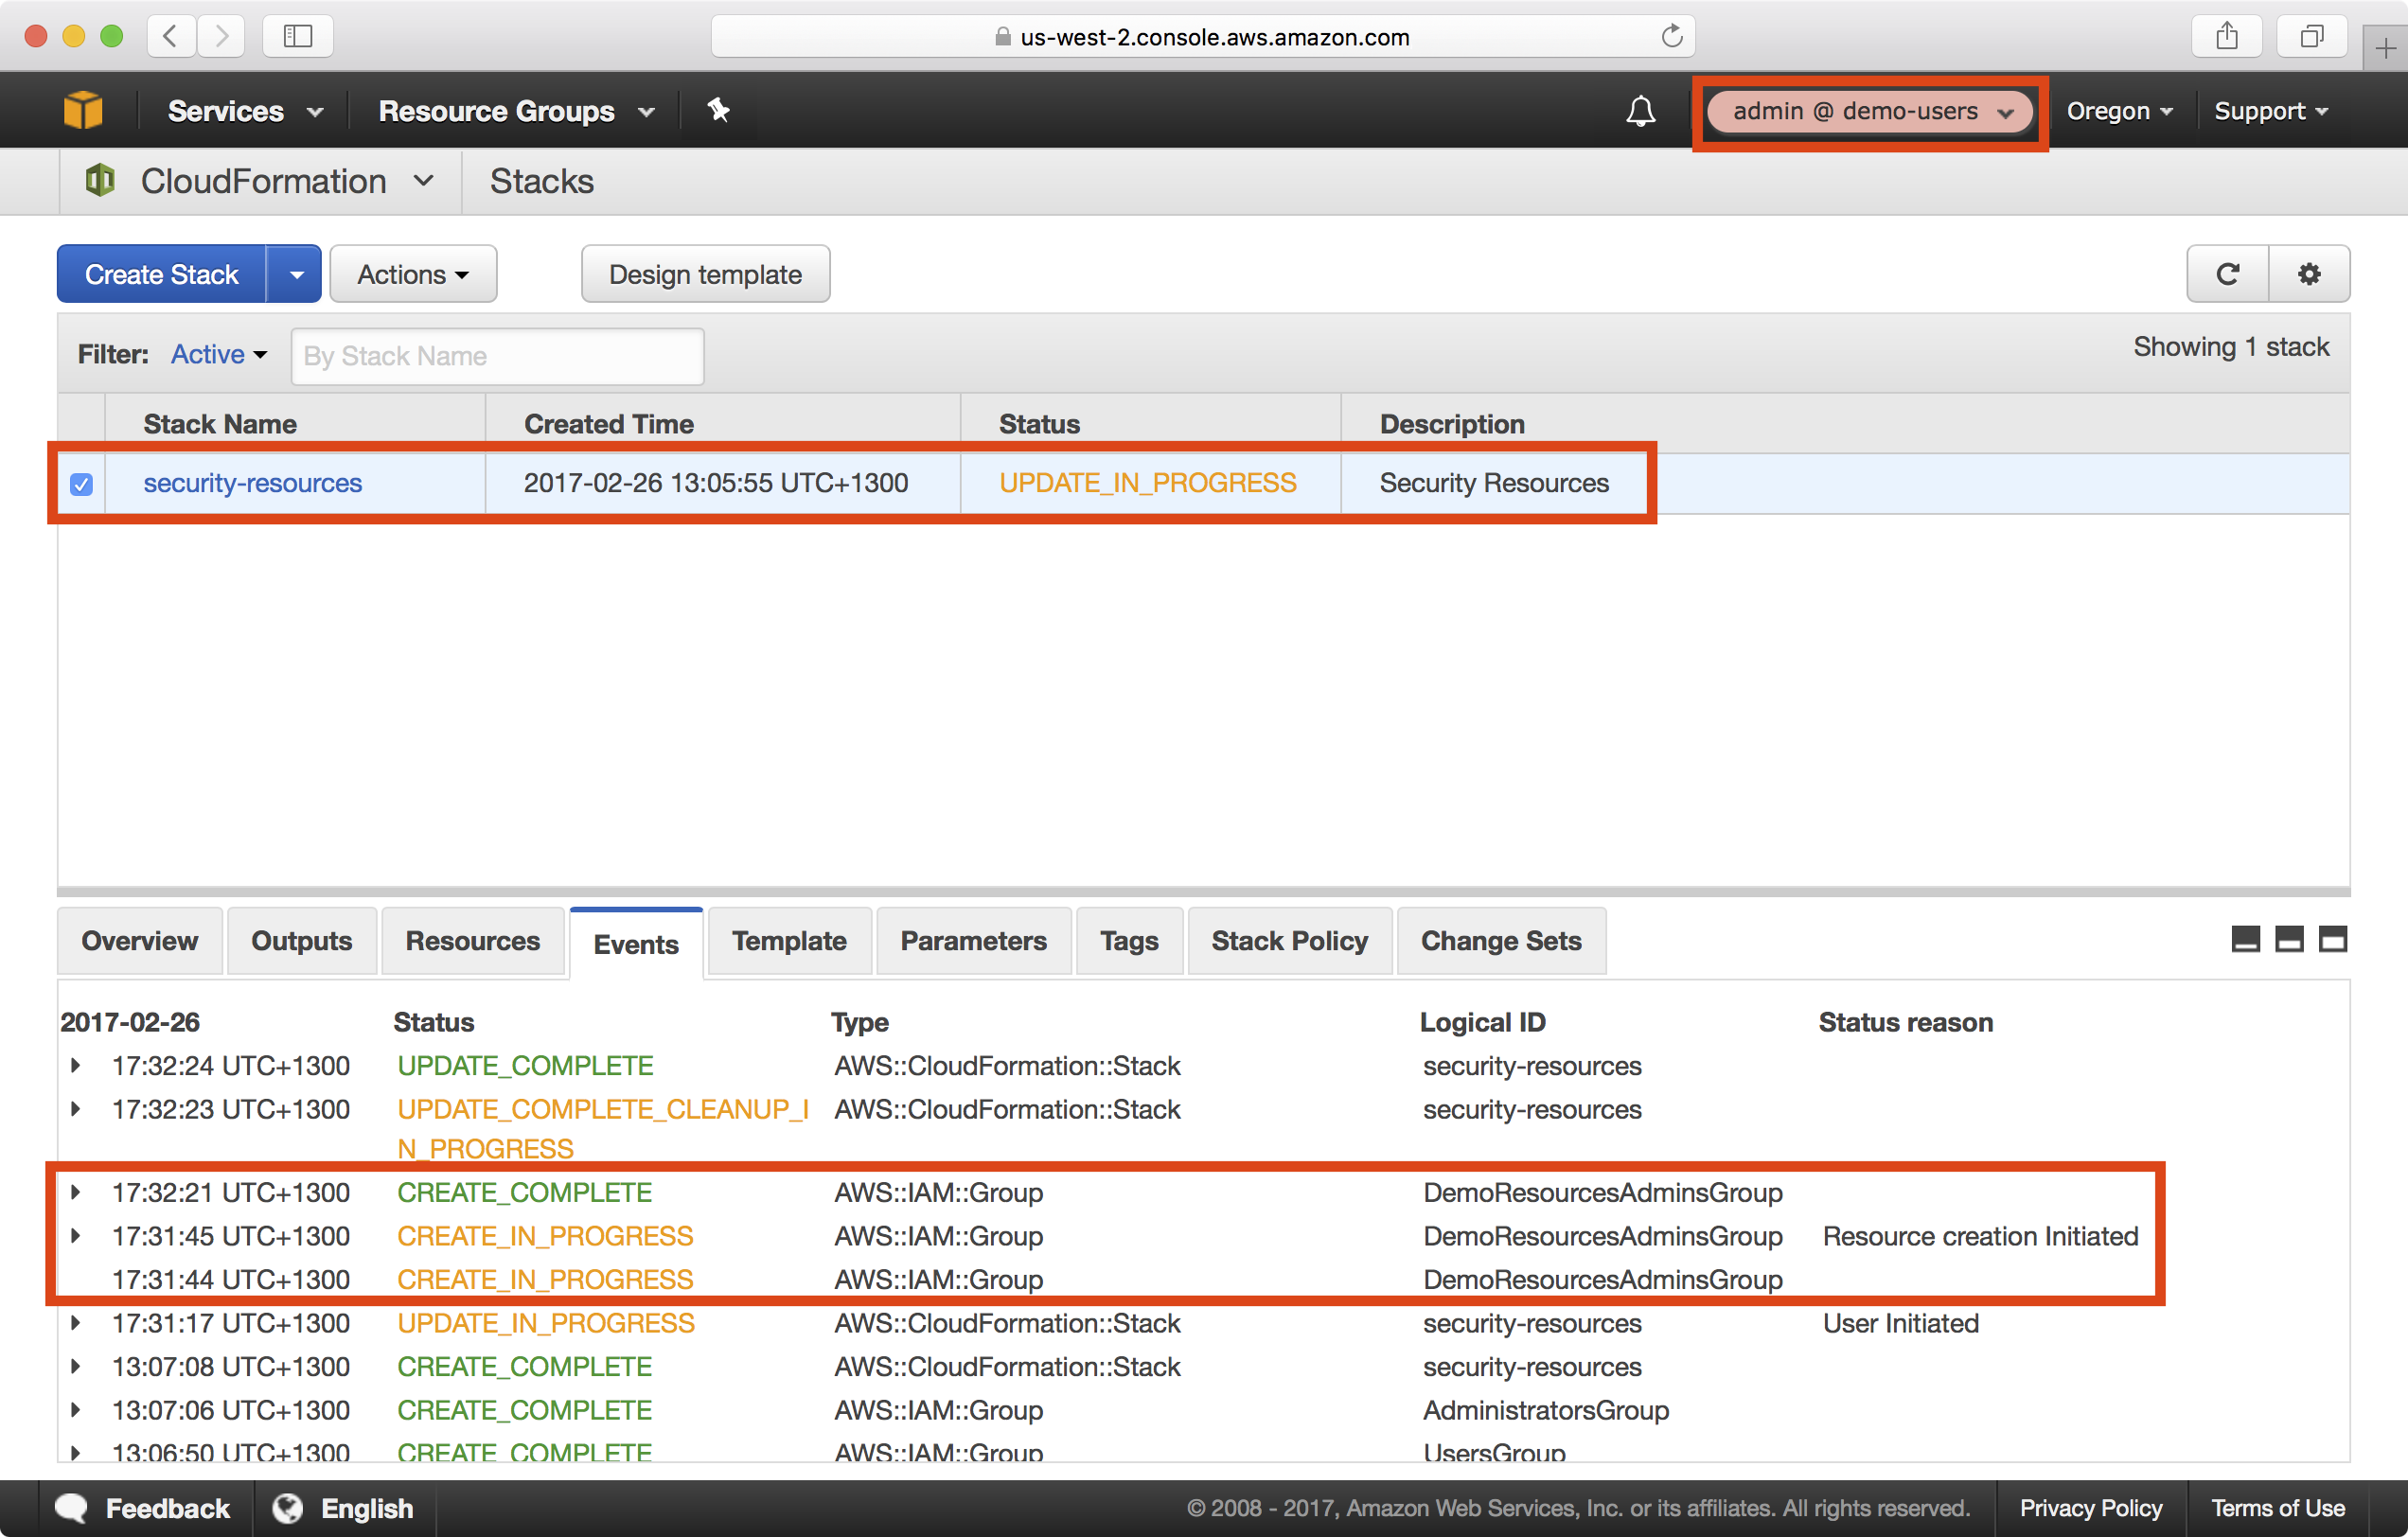
3. Whilst the playbook is running, login to the demo-users account, assume the admin role and you should be able to see the security-resources stack is being updated on the CloudFormation dashboard:
4. Once the CloudFormation stack update is complete, navigate to IAM > Groups and notice on the Permissions tab of the new DemoResourcesAdmins group that an inline policy has been attached:

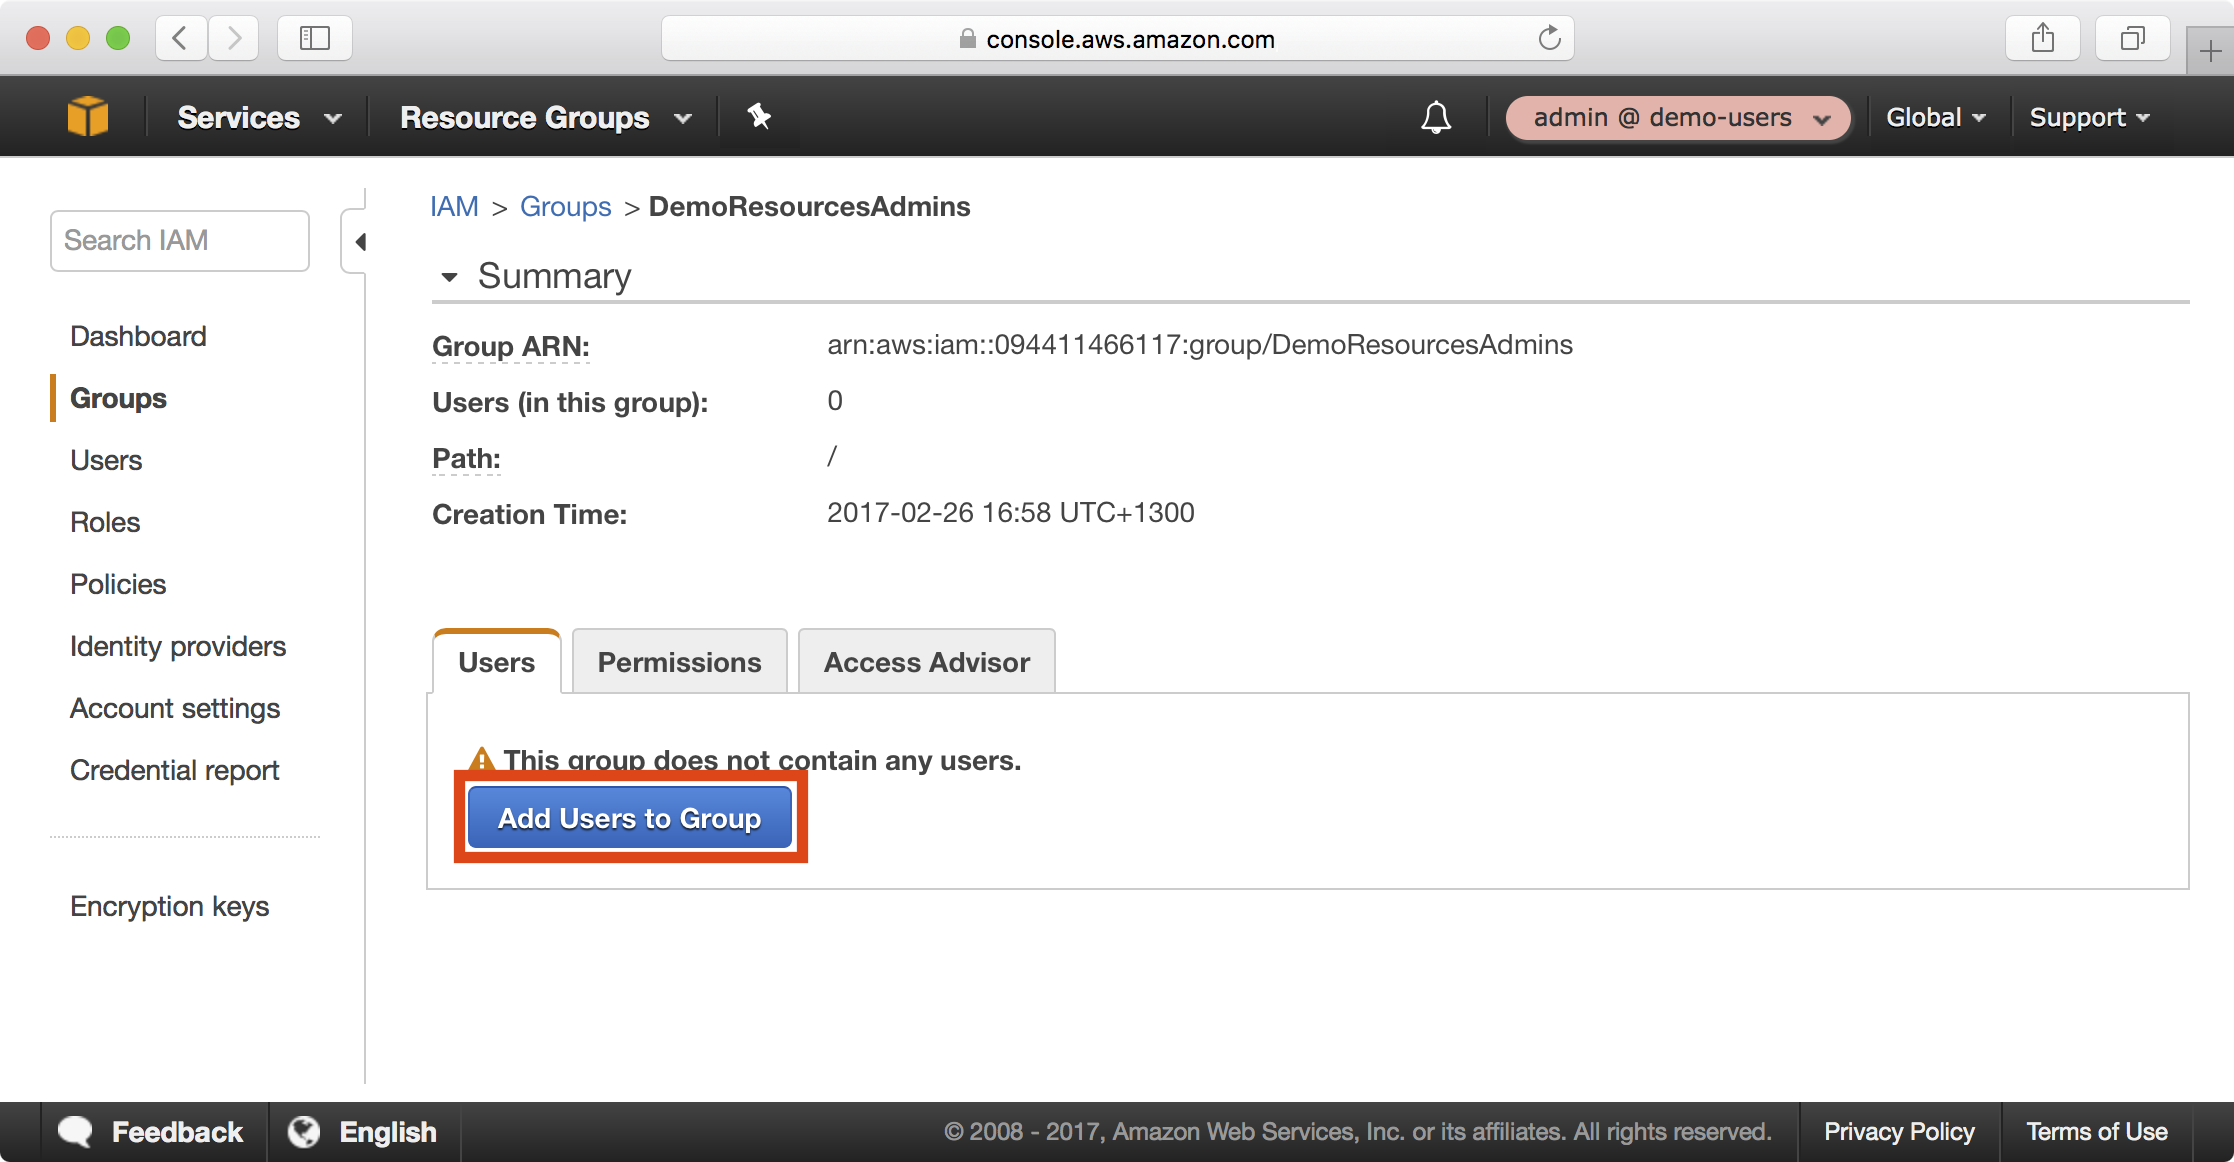
5. Click on the Users tab and click on the Add Users to Group button to add a user to the new group:
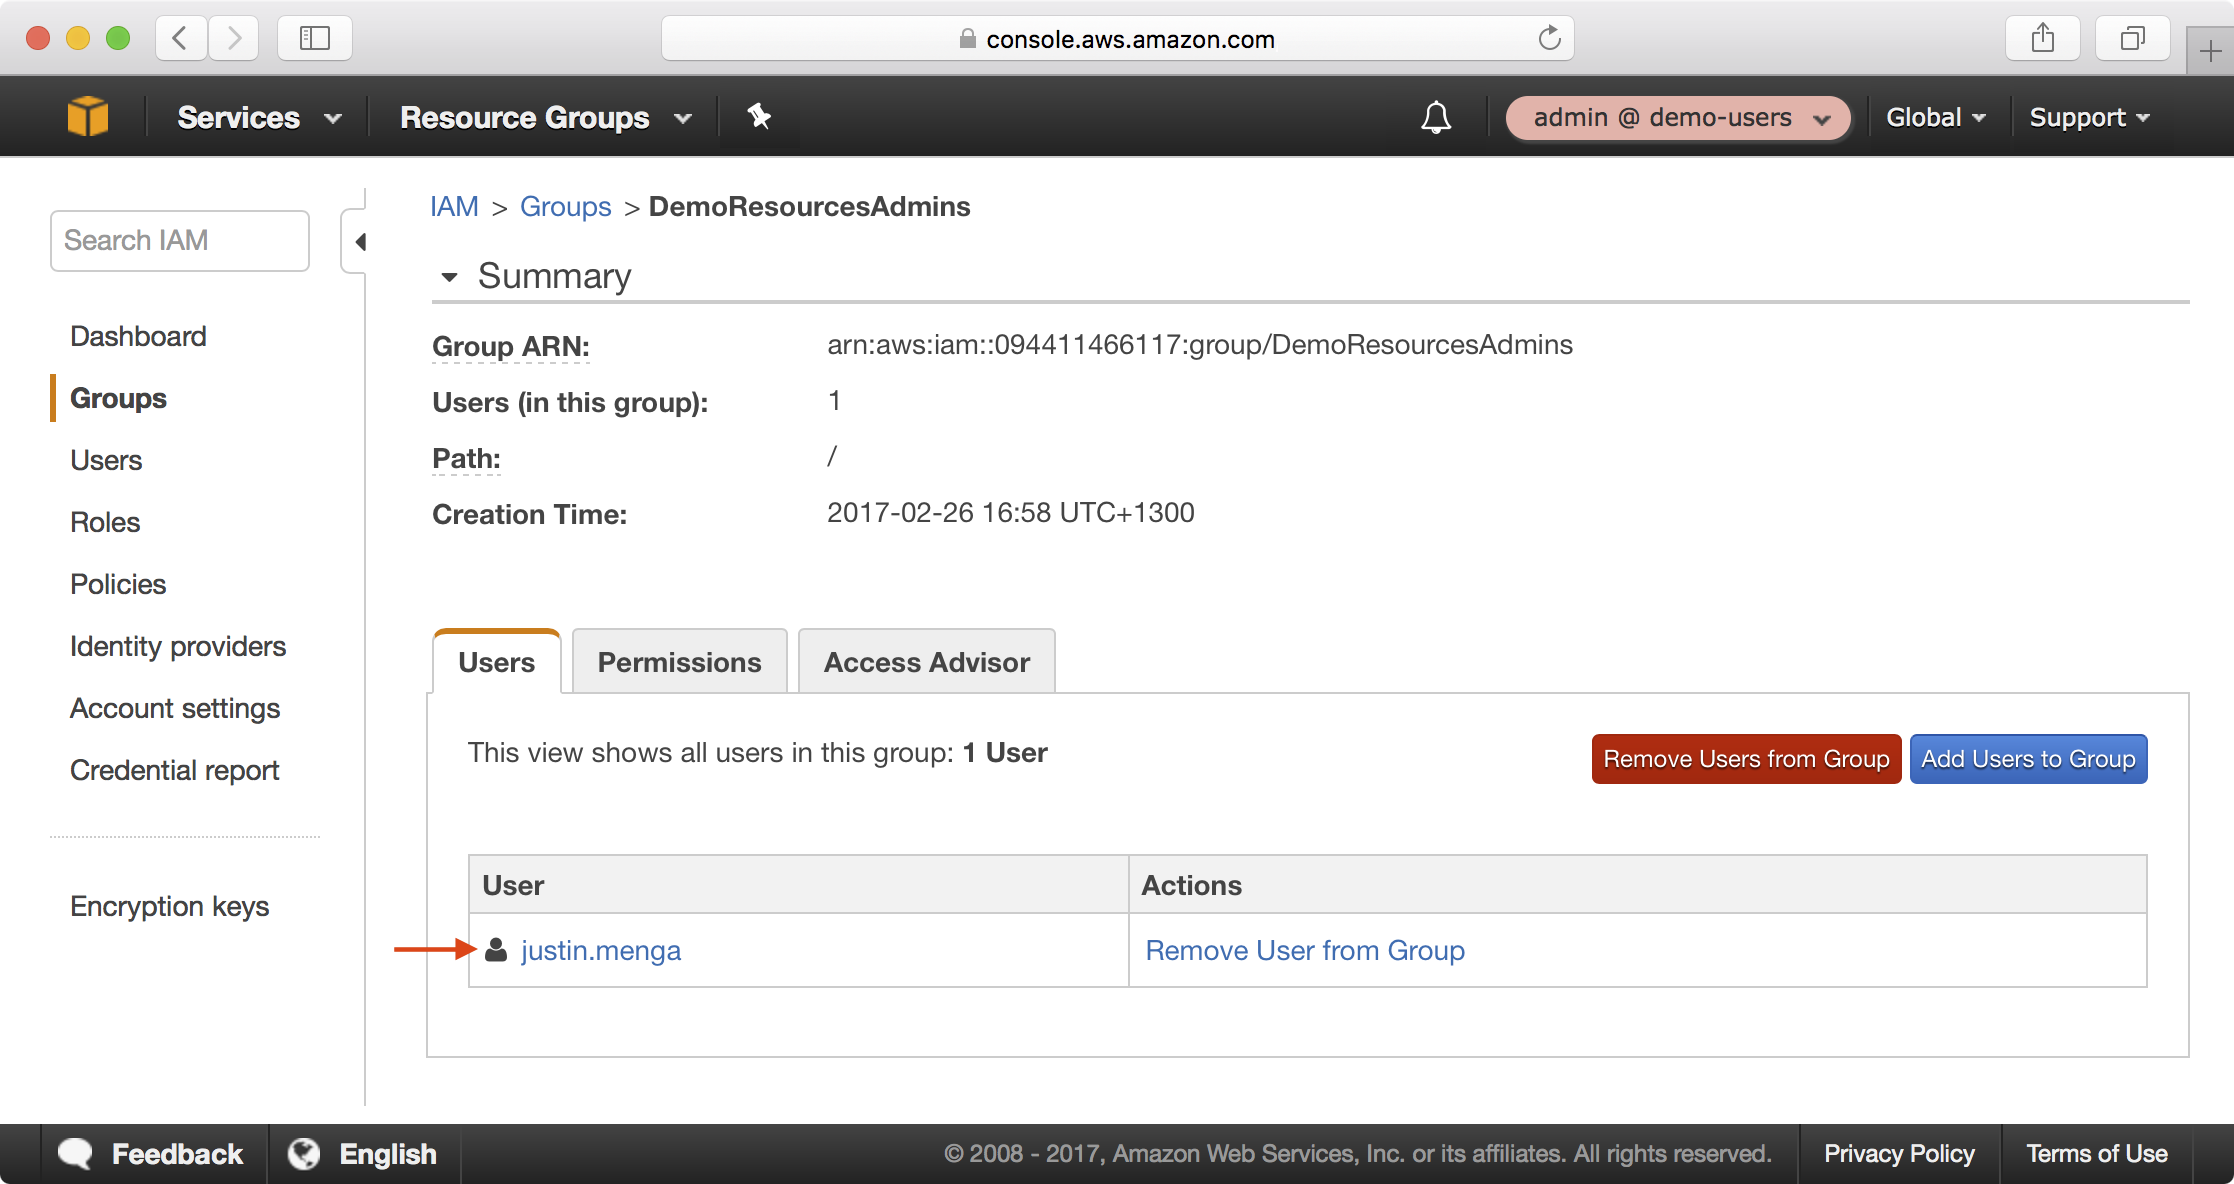
6. Select the administrative user we created earlier and click Add Users to add the user to the group:

Administer the Resource Account
To wrap up we can now verify that the user account we just added to the DemoResourcesAdmins group in the demo-users account can assume the demo-resources account admin role.
1. Add a new profile to the local ~/.aws/config file that is configured to assume the demo-resources admin role with MFA authentication:
[profile demo-users-admin]
source_profile=demo-users
role_arn=arn:aws:iam::094411466117:role/admin
role_session_name=justin.menga
mfa_serial=arn:aws:iam::094411466117:mfa/justin.menga
region=us-west-2

[profile demo-resources-admin]
source_profile=demo-users
role_arn=arn:aws:iam::160775127577:role/admin
role_session_name=justin.menga
mfa_serial=arn:aws:iam::094411466117:mfa/justin.menga
region=us-west-2
Here we create a new profile called demo-resources-admin and notice that the only difference compared to the demo-users-admin profile is the role_arn value, where the ARN of the admin role in the demo-resources account is referenced in the demo-resources-admin profile.
2. With this profile in place, you can now configure the AWS_PROFILE environment variable and verify role assumption. As before, you are able to assume the role and the playbook completes successfully with no change, as there has been no change to the security playbook configuration settings:
$ export AWS_PROFILE=demo-resources-admin
$ aws sts get-caller-identity
Enter MFA code: ******
{
    "Account": "160775127577",
    "UserId": "AROAIQBVQLVCESGBNTIK2:justin.menga",
    "Arn": "arn:aws:sts::160775127577:assumed-role/admin/justin.menga"
}
Wrap Up
We created security resources in both our demo-users and demo-resources accounts, which provide the foundational IAM resources required to further administer each AWS account.
We learned how to create a security resources playbook and represent each of our accounts as environments within the playbook, and learned how to configure the demo-resources account to trust the demo-users account for delegated user access control.
We set up a single administrative user that is able to administer both accounts, and is required to use multi-factor authentication when using both the AWS console and AWS APIs.
Note
At this point you should commit your changes to the security resources playbook before continuing.